Skip to content
  • Categories
  • Recent
  • Tags
  • Popular
  • Users
  • Groups
Skins
  • Light
  • Brite
  • Cerulean
  • Cosmo
  • Flatly
  • Journal
  • Litera
  • Lumen
  • Lux
  • Materia
  • Minty
  • Morph
  • Pulse
  • Sandstone
  • Simplex
  • Sketchy
  • Spacelab
  • United
  • Yeti
  • Zephyr
  • Dark
  • Cyborg
  • Darkly
  • Quartz
  • Slate
  • Solar
  • Superhero
  • Vapor

  • Default (No Skin)
  • No Skin
Collapse
WIBIMMERS logo

WIBIMMERS

  1. Home
  2. General Discussion
  3. Members BMWs
  4. My name is Earl, and I have a Stainless Steel bolt fetish =)

My name is Earl, and I have a Stainless Steel bolt fetish =)

Scheduled Pinned Locked Moved Members BMWs
1.8k Posts 58 Posters 0 Views 1 Watching
  • Oldest to Newest
  • Newest to Oldest
  • Most Votes
Reply
  • Reply as topic
Log in to reply
This topic has been deleted. Only users with topic management privileges can see it.
  • EarlE
    EarlE
    Earl
    wrote on last edited by
    #636

    The tire stretch will be a bit much for most people here, but it is neccessary for me to achieve the fitment I'm going for=)

    Good thing I'm not one of those people who cares what other people think about their car :)Ā  This car is being built by me, for me=D I give no shits if anyone else likes how it looks.

    I mean, who builds their car just to impress other people? That's just dumb

    Not going off on you Robert. I just wanted to state I'm not doing any of this for scene point or to impress anyone. I'm just building it to make myself happy and screw what anyone else thinks. However, I do enjoy when people say good job and such=)

    museum sig 2earl.jpg

    1 Reply Last reply
    0
    • R
      R
      REKIII
      wrote on last edited by
      #637

      I compltely understand where you are coming from, and even the 'why' behind it.Ā  I love seeing other peoples stuff, if it was all the same it would be boring.Ā  Some of it I'll like, some of it I won't.

      Regardless, all the work you are putting into your beast is impressive, and I love the updates.

      1 Reply Last reply
      0
      • EarlE
        EarlE
        Earl
        wrote on last edited by
        #638

        Thank you sir=) You get exactly what I'm saying=D

        museum sig 2earl.jpg

        1 Reply Last reply
        0
        • Brian.B
          Brian.B
          Brian.
          wrote on last edited by
          #639

          Looking good earl.

          instagram @howdoyoudrivethat

          1 Reply Last reply
          0
          • StewCrewS
            StewCrewS
            StewCrew
            wrote on last edited by
            #640

            I love it.Ā  You'll be on StanceWorkZzZzZ in no time.

            7475a3b8-1768-471d-a58d-a14ce9cfe544zps

            1 Reply Last reply
            0
            • EarlE
              EarlE
              Earl
              wrote on last edited by
              #641

              Picked up these guys Friday night:

              IMG20130614182447zps5c6e1811.jpg

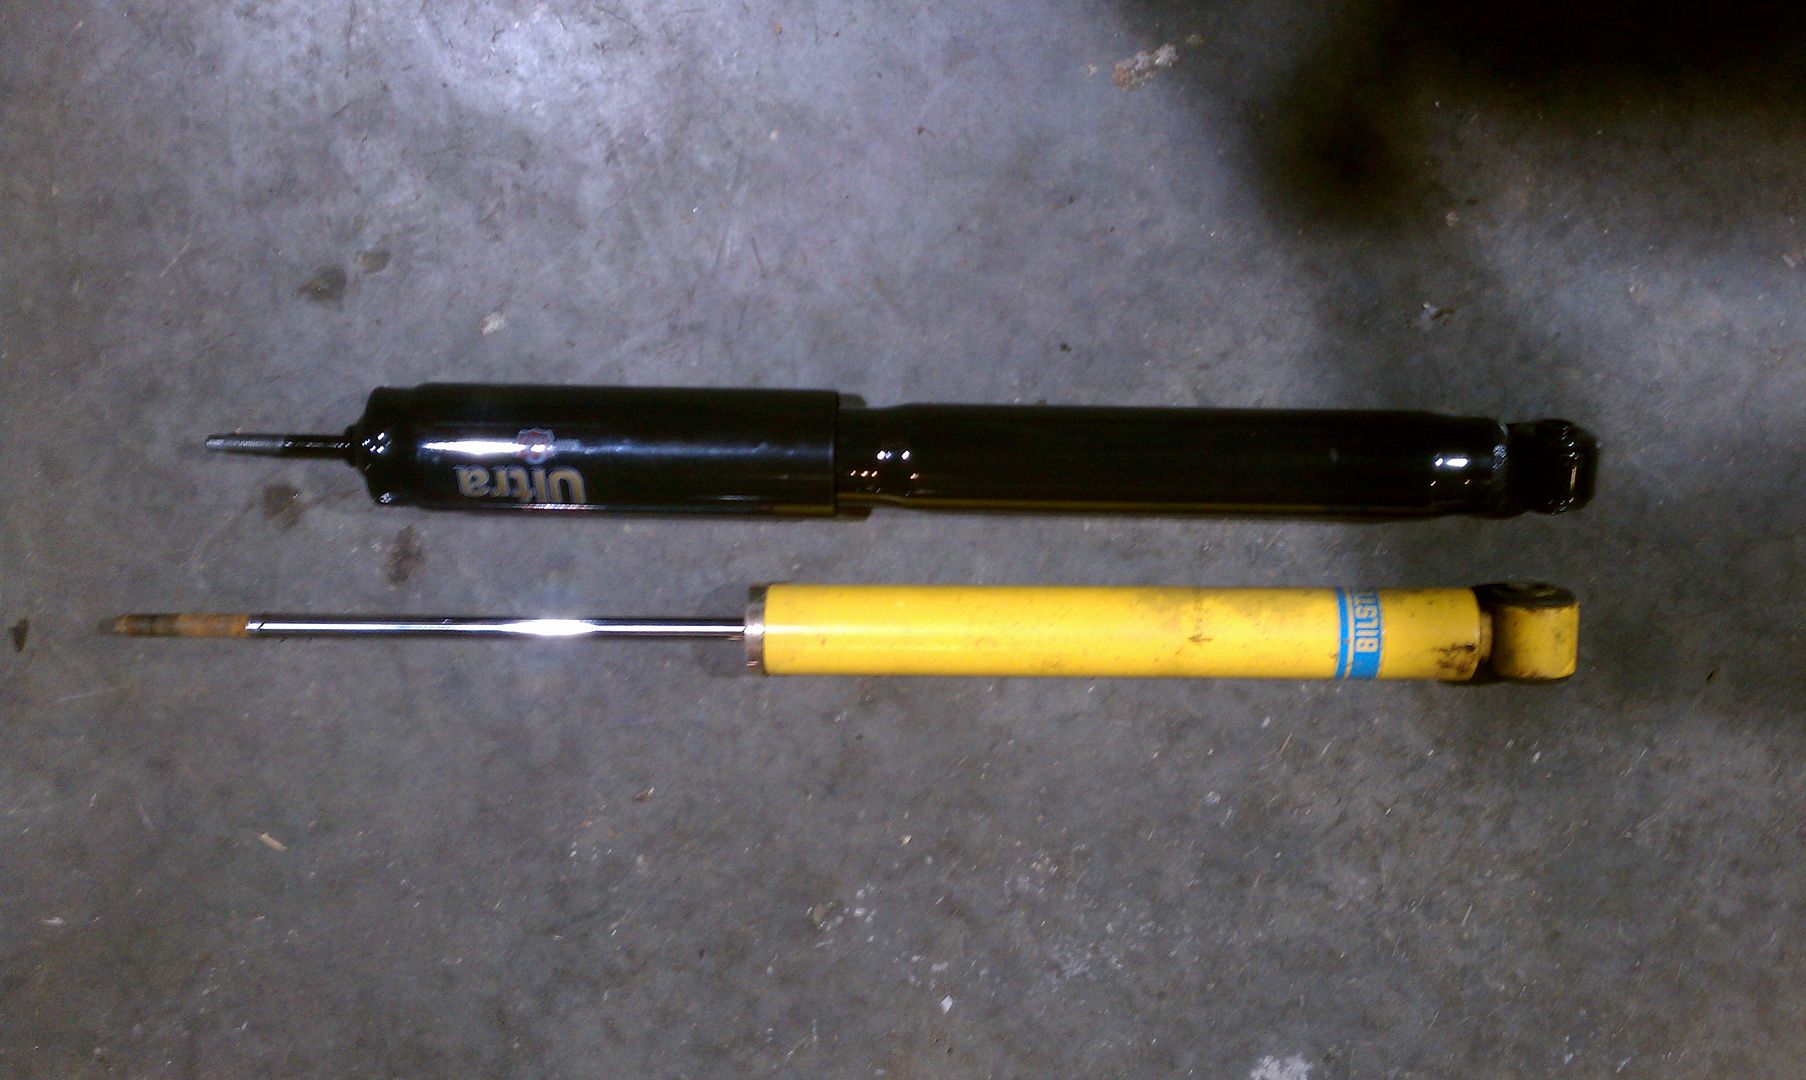
              97' Mustang GT shocks. $60 from Autozone. Lifetime warranty=D

              Reason for choosing them:
              IMAG1251zps3eafa9f5.jpg
              IMAG1252zps9f50e2ee.jpg

              I was going to measure them, but forgot to before I installed them. The mustang shocks are shorter by about 1.5" when extended. The strut body is also shorter and has more stroke. This will give me more suspension travel and let me go more than low enough.

              I also got this guy finally installed.
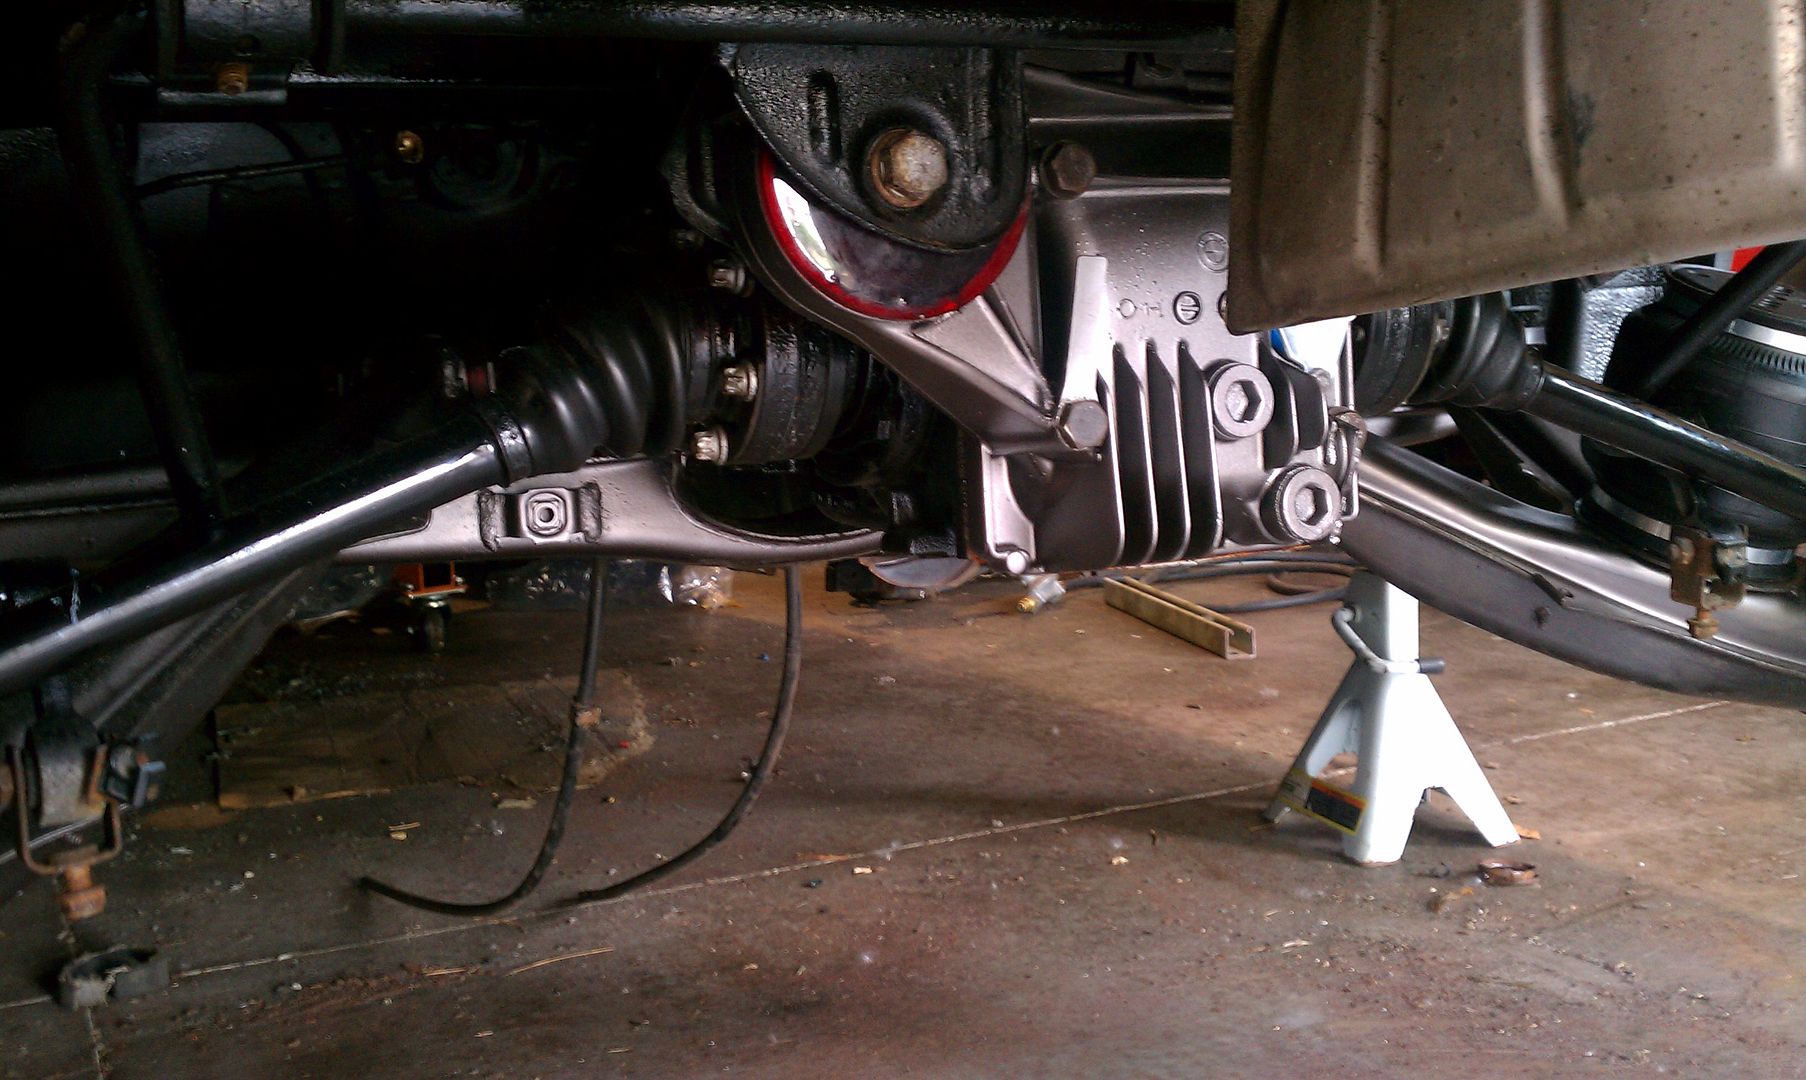
              IMAG1253zps8c7da3b1.jpg

              Things are finally coming together.

              Yesterday morning I ordered a 68mm stud kit from Motorsport Hardware. They shipped last night and I cannot wait for them to arrive so they can go straight on.

              Stay tuned.

              museum sig 2earl.jpg

              1 Reply Last reply
              0
              • KaiserRollsK
                KaiserRollsK
                KaiserRolls
                wrote on last edited by
                #642

                Anderson-Cooper-Popcorn-Gif-While-Live-O

                love it Earl.keep us posted!

                1 Reply Last reply
                0
                • EarlE
                  EarlE
                  Earl
                  wrote on last edited by
                  #643

                  Haha thank you sir:)

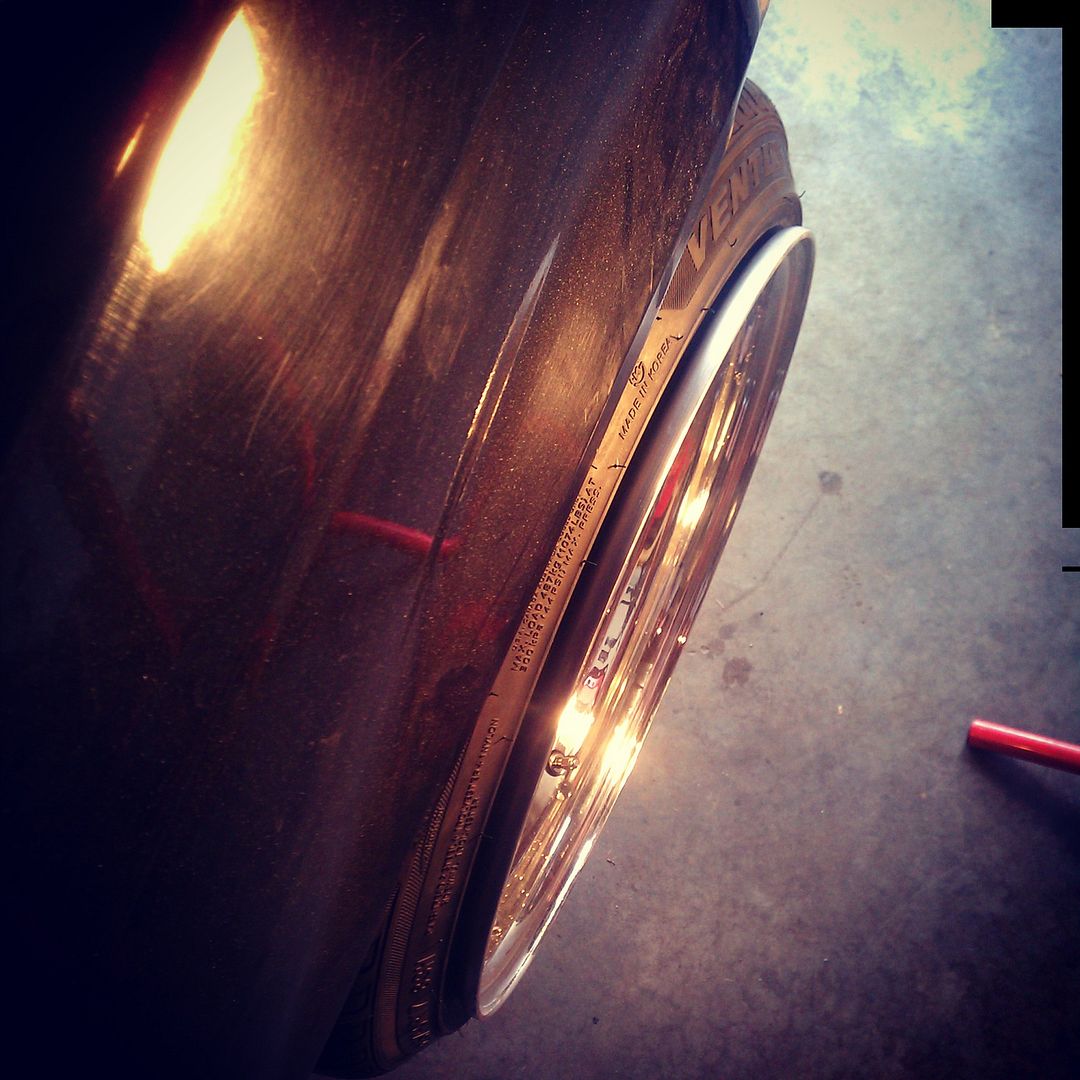
                  I had a chance to stop by the shop for a bit today. I was going to mount the bags to the top, but I grabbed the wrong bolts from work. I'm also not sure how I will be measuring to get the holes in the right locations. I did get a chance to actually mount a wheel up and jack it into place to see how much work is needed. If I could adjust camber I would have no issues, but unfortunately camber cannot be adjusted. So a slight pull will solve my issue.
                  IMG20130617143010zps3e7004b7.jpg

                  museum sig 2earl.jpg

                  1 Reply Last reply
                  1
                  • EarlE
                    EarlE
                    Earl
                    wrote on last edited by
                    #644

                    I managed to get nothing done yesterday. I was figuring out how to mount the top of the bag but couldn't find the right tools/bits to use. A package came however:

                    IMG20130619154713zps6a3031ac.jpg

                    My airline also arrived today. I'll mount the bags Saturday as well as install the studs and hopefully a bunch more.

                    museum sig 2earl.jpg

                    1 Reply Last reply
                    0
                    • KaiserRollsK
                      KaiserRollsK
                      KaiserRolls
                      wrote on last edited by
                      #645

                      Earl said:

                      I managed to get nothing doneĀ 

                      this is how I feel everyday after I punch out.

                      1 Reply Last reply
                      0
                      • EarlE
                        EarlE
                        Earl
                        wrote on last edited by
                        #646

                        I am very pleased with the outcome of Saturday=)

                        I finally got the top of my bags mounted. The first side took two hours....the second side only took about 30-45 minutes. Here is what I did (before paint of course)

                        IMAG1258zps69dbc245.jpg

                        There is one bolt up top and then a notch underneath for the fitting to sit in. The pockets were the biggest pain to get. The first one took so long because I was trying to use a countersink bit and other drill bits. Then I realized I had air tools that would make it a whole lot easier=)

                        Once that was finally out of the way, I bolted up my sway bar and bolted the bottom of the mustang shocks to the trailing arms. Everything went super smooth there.

                        I then installed my 68mm Motorsport Hardware studs. I am super happy with the quality of them. Installation was a breeze and I highly recommend them to anyone who wants to go studs versus lug bolts. The price tag for these is basically just giving them away=D

                        IMAG1258zps69dbc245.jpg
                        IMAG1262zpsd1e98639.jpg
                        IMAG1263zps0f5d9aa8.jpg

                        I also painted the hats of my rear rotors during this time, but did not take a picture. I will be getting new rotors this winter, so this is just to make them look less shitty until then.

                        After all of this I cut air line for the bags, pushed on some valve stem fittings, and manually aired up the bags. I put the rear wheels on and put it back on all fours for the first time since February. I then aired it out.

                        thVIDEO0006zpsfa111bdc.jpg

                        I was being goofy. I actually have to do way less fender work than I had initially thought. That's fine by me=) I just need to get the fenders over the tire, but let the lip still poke. Right now it is literally sitting on the tire. Here are a few more of the wheels and being aired out on the Breytons.

                        IMG20130622174337zpsde0c5953.jpg
                        IMG20130622174452zps0b076247.jpg
                        IMAG1264zpsf2370a88.jpg
                        IMAG1265zps186788f0.jpg
                        IMAG1266zps3565a44f.jpg
                        IMAG1267zps338d34ce.jpg

                        I am finally seeing things come together and it is awesome=) The studs poke a tiny bit much for me, but they were the shortest I could get being black and bullet nosed. I think they will still keep the clean and subtle look without being too aggressive.

                        On a side note, my friend Kerry has been working on my rear bumper and I cannot thank him enough. I wanted the exhaust cutout shaved so I can have the exhaust hidden underneath. I am not a huge fan of DTM tips and this was the cleanest option I could come up with. I also don't really like the M-Tech rear bumper so I figured I would make the OEM one better.

                        20130613133751zps49f8e94f.jpg
                        20130613142825zpsd1fe77af.jpg
                        201306141422042zps8c757de3.jpg
                        20130622210436zps9ca41c33.jpg
                        20130622210119zps171d0b91.jpg

                        He did such an excellent job. He used no bondo and uses only the finest plastic repair kits. Bravo Kerry=)

                        More to come Wednesday. Maybe I will take a funny picture of how the rear is sitting right now aired out on stock wheels.

                        museum sig 2earl.jpg

                        1 Reply Last reply
                        0
                        • B
                          B
                          B C
                          wrote on last edited by
                          #647

                          You are doing a great job on this Earl

                          1 Reply Last reply
                          0
                          • EarlE
                            EarlE
                            Earl
                            wrote on last edited by
                            #648

                            Snap said:

                            You are doing a great job on this Earl

                            Thank you Brian=) Your approval makes it all worth it

                            museum sig 2earl.jpg

                            1 Reply Last reply
                            0
                            • Brian.B
                              Brian.B
                              Brian.
                              wrote on last edited by
                              #649

                              Looking good, and roll those fenders so you can tuck, and have this thing lay body!

                              instagram @howdoyoudrivethat

                              1 Reply Last reply
                              0
                              • EarlE
                                EarlE
                                Earl
                                wrote on last edited by
                                #650

                                Brian said:

                                Looking good, and roll those fenders so you can tuck, and have this thing lay body!

                                Not a huge fan of tuck. Also, I have the car sitting at the shop aired out on stock 15's and it is about 2"-3" away from laying frame. That is with nothing holding it up besides the bag being fully deflated. You would have to do a ton of fab work (customĀ trailing arms, modified upper mount, ect.)Ā to get it to lay frame in the back. I'll take a picture of it Wednesday=)

                                museum sig 2earl.jpg

                                1 Reply Last reply
                                0
                                • EarlE
                                  EarlE
                                  Earl
                                  wrote on last edited by
                                  #651

                                  Also, has anyone done rear wheel bearings on an e30? I need to do mine before this car becomes a daily again. They're absolutely horrid. I'm not sure how they got that bad. Didn't seem that bad when I took the trailing arms off initially.

                                  museum sig 2earl.jpg

                                  1 Reply Last reply
                                  0
                                  • KaiserRollsK
                                    KaiserRollsK
                                    KaiserRolls
                                    wrote on last edited by
                                    #652

                                    dang Earl, nice work!

                                    1 Reply Last reply
                                    0
                                    • Brian.B
                                      Brian.B
                                      Brian.
                                      wrote on last edited by
                                      #653

                                      Looking good, and wheel bearings are easy. I'm pretty sure our very own J-stewart's replaced one!

                                      instagram @howdoyoudrivethat

                                      1 Reply Last reply
                                      0
                                      • EarlE
                                        EarlE
                                        Earl
                                        wrote on last edited by
                                        #654

                                        Got something done I've been meaning too.

                                        I finally got the hole cut properly to route my headlight harness back out of. Glad I had the right tools this time=) I also got the harness pulled through.

                                        IMAG1271zpse60ba70f.jpg
                                        IMAG1269zpse7dd8792.jpg
                                        IMG20130626144407zps661ca162.jpg

                                        I also wrestled with the crank bolt for about an hour and still havent gotten it off. I figured the only way to lock it from turning is a wood block in between the crank and block. I didn't want to wrench too hard because I don't need a cracked block. I tried head. a deadblow, a 3 foot cheater bar and still it wouldn't budge.

                                        How are you supposed to get this sucker off when the engine is on a stand? There has to be something I'm overlooking. I've tried a nice large electric impact and that did absolutely nothing besides make noise.

                                        For those who were curious, here is a shot aired out on the 15's. This is with the bags fully compressed. To get lower would require pocketing the arms and frame. I won't be anywhere near this low so no worries for me=)

                                        IMG20130626140321zps67bc05e3.jpg
                                        IMG20130626140136zps327b6b66.jpg

                                        Also if you haven't noticed, the all reds are back on. I need to reclear the top of the drivers side and then I need to lay into them with a buffer to get them nice and shiny.

                                        IMAG1270zpsb8646131.jpg

                                        More to come Saturday

                                        museum sig 2earl.jpg

                                        1 Reply Last reply
                                        0
                                        • merlM
                                          merlM
                                          merl
                                          wrote on last edited by
                                          #655

                                          Your supposed to get the nut off with the engine in the car ... I made the same mistake. You need to hold the crank from moving and apply a lot of leverage and heat. I could not believe how tight the one on my car was. We had over a 4 foot bar and we were hanging off of it. I think the heat finally did the trick.


                                          1 Reply Last reply
                                          0

                                          Hello! It looks like you're interested in this conversation, but you don't have an account yet.

                                          Getting fed up of having to scroll through the same posts each visit? When you register for an account, you'll always come back to exactly where you were before, and choose to be notified of new replies (either via email, or push notification). You'll also be able to save bookmarks and upvote posts to show your appreciation to other community members.

                                          With your input, this post could be even better šŸ’—

                                          Register Login
                                          Reply
                                          • Reply as topic
                                          Log in to reply
                                          • Oldest to Newest
                                          • Newest to Oldest
                                          • Most Votes


                                          • Login

                                          • Don't have an account? Register

                                          • Login or register to search.
                                          Powered by NodeBB Contributors
                                          • First post
                                            Last post
                                          0
                                          • Categories
                                          • Recent
                                          • Tags
                                          • Popular
                                          • Users
                                          • Groups