Skip to content
  • Categories
  • Recent
  • Tags
  • Popular
  • Users
  • Groups
Skins
  • Light
  • Brite
  • Cerulean
  • Cosmo
  • Flatly
  • Journal
  • Litera
  • Lumen
  • Lux
  • Materia
  • Minty
  • Morph
  • Pulse
  • Sandstone
  • Simplex
  • Sketchy
  • Spacelab
  • United
  • Yeti
  • Zephyr
  • Dark
  • Cyborg
  • Darkly
  • Quartz
  • Slate
  • Solar
  • Superhero
  • Vapor

  • Default (No Skin)
  • No Skin
Collapse
WIBIMMERS logo

WIBIMMERS

  1. Home
  2. General Discussion
  3. Members BMWs
  4. Alpine e30 progress/build thread

Alpine e30 progress/build thread

Scheduled Pinned Locked Moved Members BMWs
821 Posts 31 Posters 2 Views 1 Watching
  • Oldest to Newest
  • Newest to Oldest
  • Most Votes
Reply
  • Reply as topic
Log in to reply
This topic has been deleted. Only users with topic management privileges can see it.
  • m42b32M
    m42b32M
    m42b32
    wrote on last edited by
    #288

    Made more progress:

    Struts are assembled! The KBS came out kinda crappy, but I'm not going for a pebble beach level of perfection on the underside. I plan to drive this car as much as possible, so it'll get buried in dirt anyway. One wheel bearing needs to be replaced so I'll be doing both soon. 
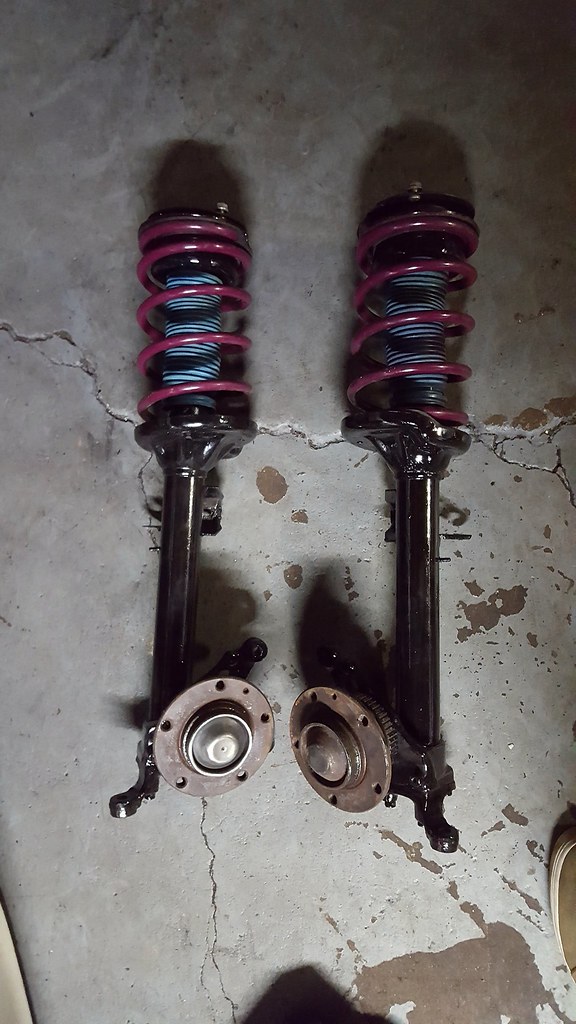
    32849394484a4947c337cb.jpg

    While I had the driveshaft out, I figured it would be a good time to rebuild the shift linkage and install a short shifter. I didn't want a z3/etc shifter as they tend drop the shift knob into the console further, and shifters that raise the knob height (akg stage 2, bimmerworld race, etc) are $350+, so I decided to make my own DTM style floor mounted shifter. How hard could it be, right? 

    There really isn't much for information on building your own shift lever on the internet, so I just started measuring things and formulating a plan. I got all my parts in last week and started putting it together over the weekend. 

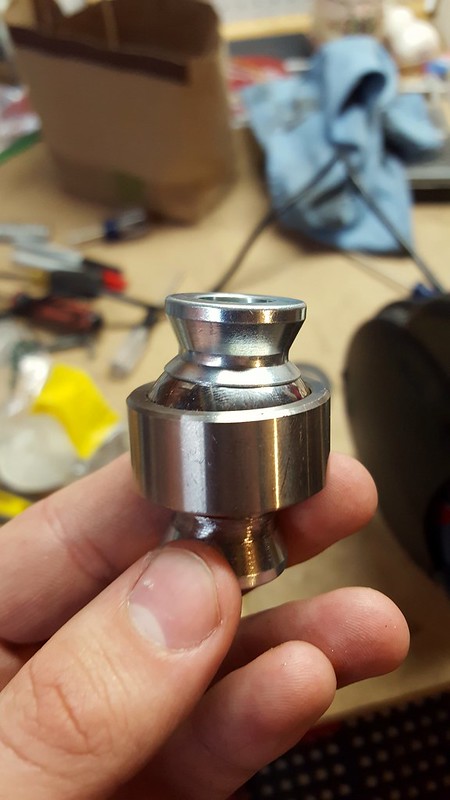
    The pivot point is a spherical bearing typically used in off-road suspension, with high misalignment spacers from tie-rod ends. Typically, high misalignment spacers don't fit in plain spherical bearings, but I needed the additional angle capability.
    333081358604ae513ba21c.jpg

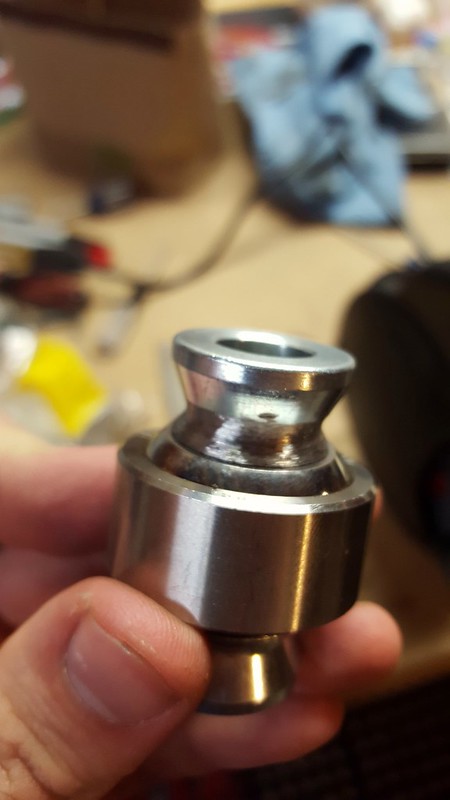
    As you can see, the spacers stick out and won't allow the bearing to rotate beyond it's normal limit. As I don't have access to a lathe, I made a jig to chuck the spacer in a drill and then used a bench grinder to trim the excess material off the spacer. The surface finish is rough so I went a little past the edge of the bearing so it wouldn't chew up the bearing liner. 
    33562876321becaeefd43c.jpg

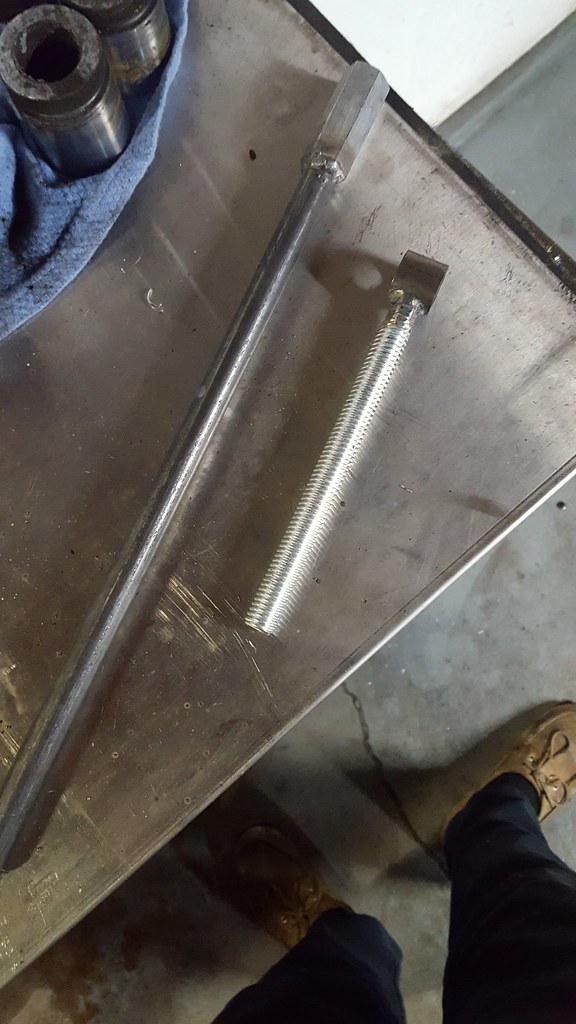
    I then welded the parts of the upper and lower halves of the shift lever together (I ground off any zinc plating prior to welding, don't worry). I left the lengths long on each so that I can fine tune the knob height and shift throw once it's all mounted up in the car. I worked on calculating a desired throw and planning the dimensions ahead of time, but ultimately I don't know what I want so I'm just starting at too short of a throw, and too tall of a lever, and trimming each till I'm happy. 
    335628830917cc4971ea3b.jpg

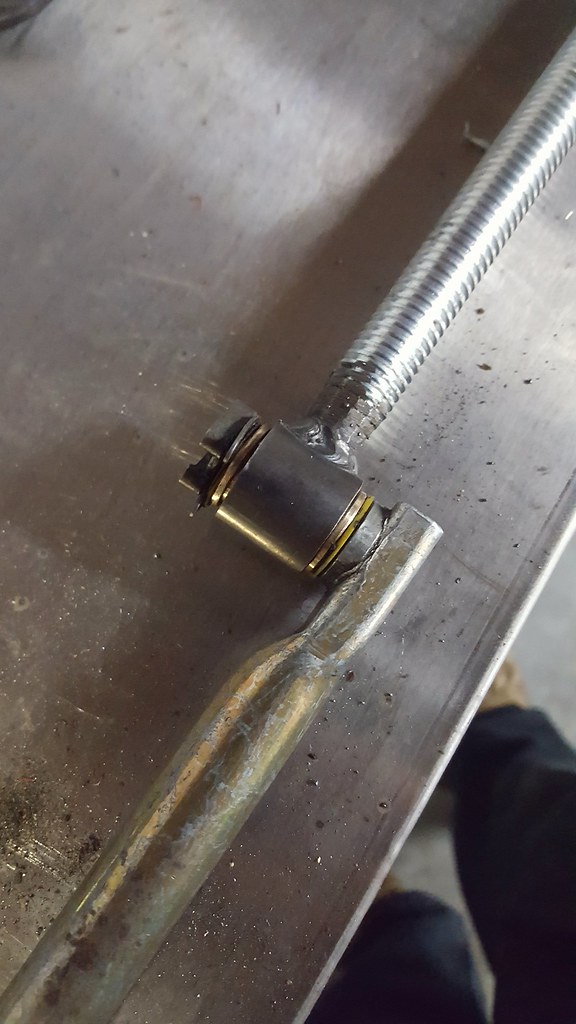
    I got some bronze bushings and pressed them into the bottom half of the shift lever to mate with the selector rod. The fit is super tight and there is absolutely zero play. 
    328788690439d366e6cbbb.jpg

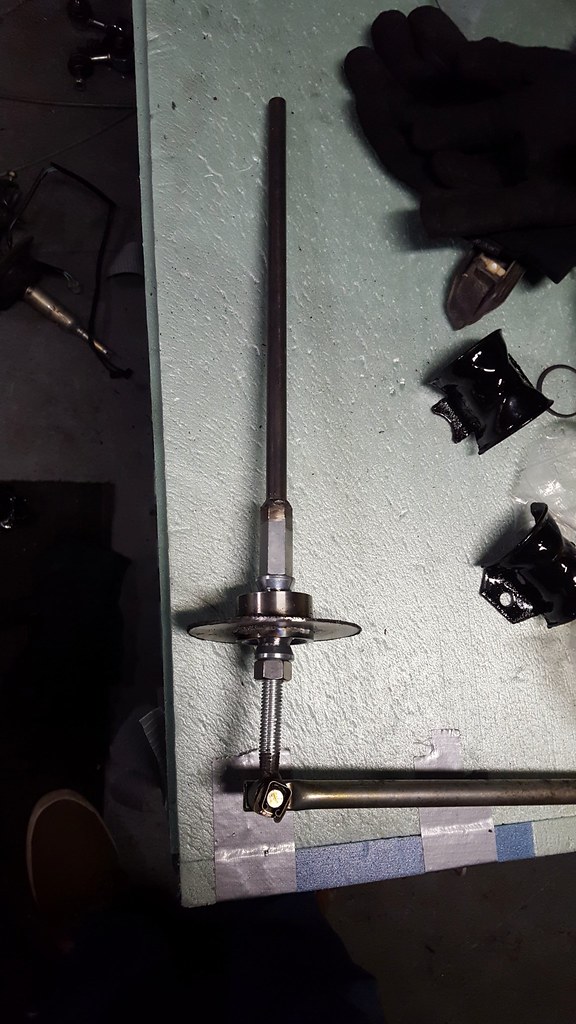
    Here is where I'm at, with everything assembled to start test fitting. The actual mounting to the car is still in progress and I am attempting to key off of features already existing in the sheet metal to avoid drilling new holes in case I ever want to return to stock, but what I have so far is a round steel plate with a bearing weld cup in the center. This holds the bearing tightly with a circlip, which is awesome because it has allowed me to design this to be serviceable. The lower half passes through the bearing and threads into the socket on the upper half (loctite so it doesn't come loose on accident), then a nut on the lower half (again, loctite) clamps the whole assembly to the spherical bearing. 
    33651361566773014ddb0b.jpg

    I'm hoping to have it finished up by the end of the week. Its a bit heavy, but it should be nice and strong. 

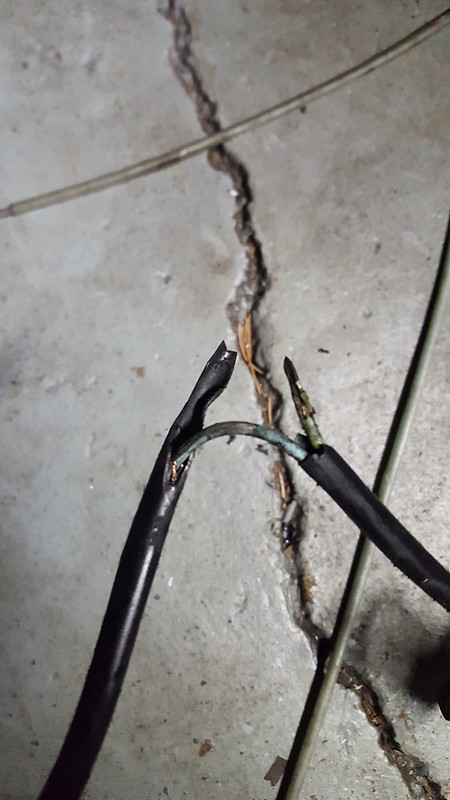
    While I was under the car, I figured out why my reverse lights weren't working, looks like it snagged the driveshaft at some point. 
    335628907017e9e03a3bcc.jpg

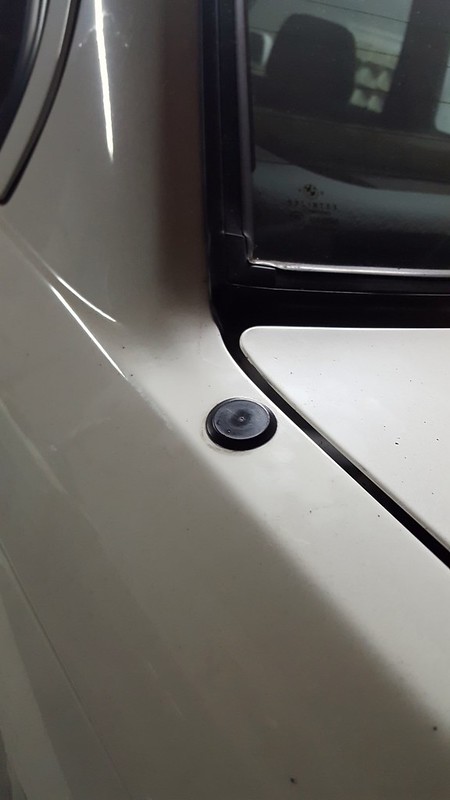
    I also popped in an antenna plug that I got from a guy on r3v (http://www.r3vlimited.com/board/showthread.php?t=371625). Most of the plugs I have seen are plastic and require silicone, this one is a more pliable material and it fits nice and tight so it shouldn't leak. I have all the parts for the z3/318ti mast antenna conversion, but this was cheap and easy and got it done sooner haha. 
    33651368686e939418204c.jpg

    1991 318is, 1991 318i, 2022 Bronco

    1 Reply Last reply
    2
    • KaiserRollsK
      KaiserRollsK
      KaiserRolls
      wrote on last edited by
      #289

      In all serious, I want to see how that turns out!

      1 Reply Last reply
      1
      • m42b32M
        m42b32M
        m42b32
        wrote on last edited by
        #290

        I should mention, the KBS came out kinda crappy because I rushed it and applied it a little too heavy, not because KBS rustseal is crappy.

        1991 318is, 1991 318i, 2022 Bronco

        1 Reply Last reply
        0
        • JdesignJ
          JdesignJ
          Jdesign
          wrote on last edited by
          #291

          Now that's creative. Nice work. Care to share where you ordered the materials and part cost?

          SumBunny.jpg

          https://www.instagram.com/_jdesigner_/                                          http://nevertoolow.tumblr.com/

          🥳SOLD BMW E24 633CSI - BMW M30B32                                          🧪SOLD HCH  ES9 - 1.3 LDA
          👽BMW E30 325IC - Toyota 1JZ-GTE                                                     ⏰ HONDA EF9 CIVIC SI - JDM B18C5
          ☠️BMW E36 318i - Ford 5.0 FE302                                                         🚴‍♂️ GT-Labomba - 26x2.75 Freeride
          🤹‍♀️SOLD BMW E36/7 Z3 - BMW M54B25                                                🧓SOLD BMW E10 2002 - BMW M10M05

          1 Reply Last reply
          0
          • m42b32M
            m42b32M
            m42b32
            wrote on last edited by
            #292

            Jdesign said:

            Now that's creative. Nice work. Care to share where you ordered the materials and part cost? 

            Depending on how it works out I can make a diy/write-up on it. I think overall I have less than $80 into the whole thing, with over half of the cost being the bearing and weld cup.

            1991 318is, 1991 318i, 2022 Bronco

            1 Reply Last reply
            0
            • m42b32M
              m42b32M
              m42b32
              wrote on last edited by
              #293

              Couldn't start testing the shifter setup with the engine hanging free so...

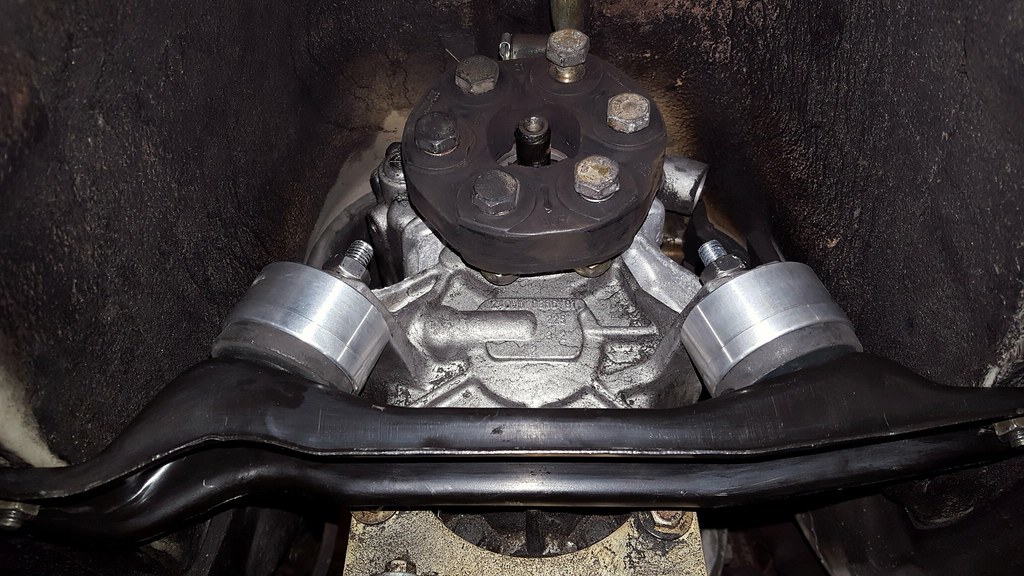
              E21 trans mounts with AKG cups installed
              3367426272140f7ee5f5bb.jpg

              Put in the front subframe with a z3 steering rack and Revshift poly motor mounts. I haven't modified the firewall yet so I held off on installing the sway bar for a bit more access. While I was at it: new control arms, condor offset eyeball arms, ground control adjustable sway bar links, and the rebuilt m3 struts with yogurtland springs, bilsteins, and e90 drop hats. 
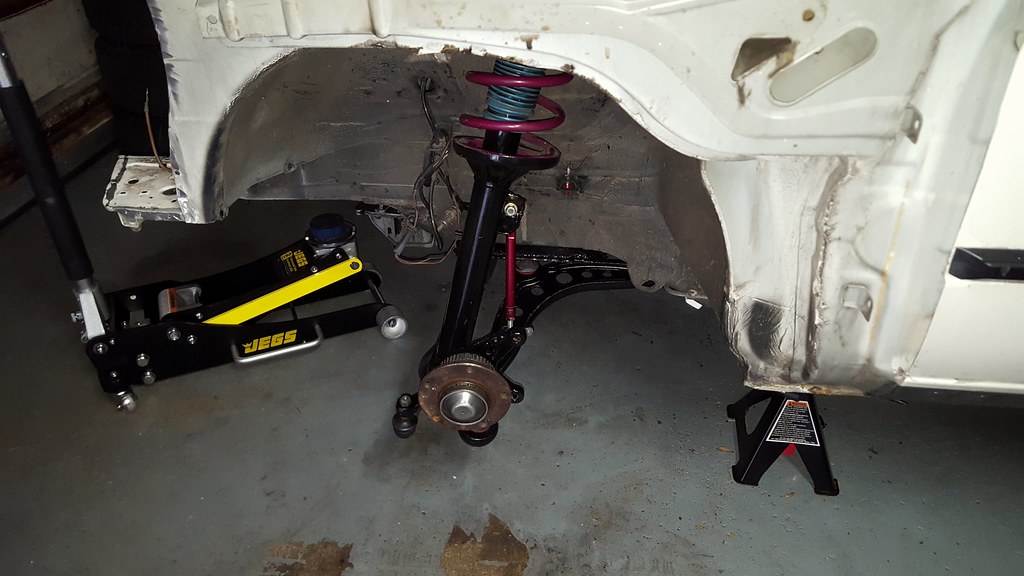
              33418930610f2d1570f0fb.jpg

              With the engine finally bolted down nice and solid I was able to test the shifter. The initial setup was insanely short, I think it was like a 1" throw from 1st to 2nd. I ended up trimming things down and ended up with a 3" throw from 1st to 2nd and the knob is at a comfortable height. It feels super solid, no flex anywhere and it should be really tight with new washers and rod joint. I tore it apart for paint and I'll get some pics of the final result this week. 

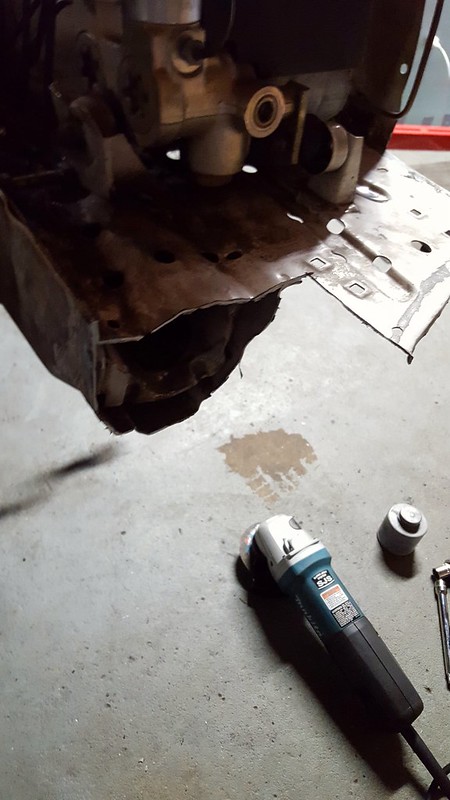
              On Sunday I turned my attention to the frame rail...and chopped it out
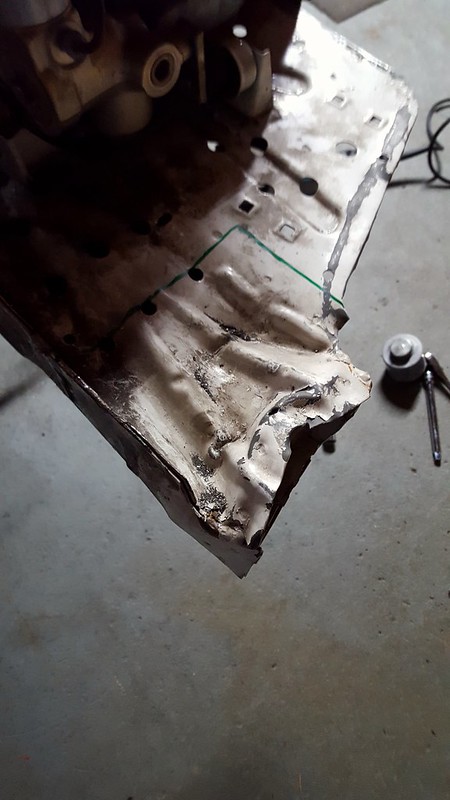
              33674271131edb4ec2322c.jpg336742760215488a89a26c.jpg

              Its a bit hard to see but the internal support for the bumper shock is pretty mangled. Replacing it will require totally dissecting the frame rail so I am going to try renting a slide hammer and massaging it back into shape, hopefully that works and then I can start fitting the new frame rail piece. I ordered a new OEM core support from Umansky and should have it next week.

              1991 318is, 1991 318i, 2022 Bronco

              1 Reply Last reply
              0
              • B
                B
                B C
                wrote on last edited by
                #294

                1" throw[emoji38] wow

                Im also running the AKG E21 mounts. Its a good way to go.

                Make sure the rubber bumper that rams into the back of the subframe and bolts to the lower flywheel cover is intact while you are in there.

                1 Reply Last reply
                1
                • m42b32M
                  m42b32M
                  m42b32
                  wrote on last edited by
                  #295

                  Snap said:

                  Make sure the rubber bumper that rams into the back of the subframe and bolts to the lower flywheel cover is intact while you are in there.

                  Do m42 cars have one of those? I'll have to look, I can't remember haha

                  1991 318is, 1991 318i, 2022 Bronco

                  1 Reply Last reply
                  0
                  • B
                    B
                    B C
                    wrote on last edited by
                    #296

                    Ah they might not since you have a more generous amount of space for the fan

                    1 Reply Last reply
                    0
                    • m42b32M
                      m42b32M
                      m42b32
                      wrote on last edited by
                      #297

                      Was at the garage after work, forgot to look for the bumper, next time haha. 

                      Over the last few days I finished the mounting setup, painted everything textured black, and I did the final assembly today. 

                      Shift lever painted and assembled:
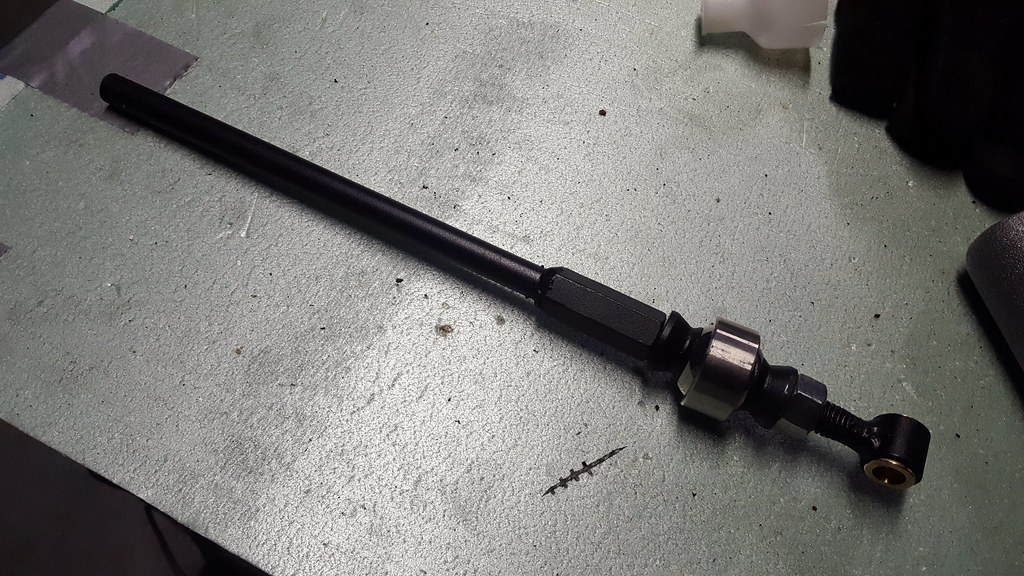
                      33022894454b1f41bb919b.jpg

                      This was my solution for mounting the shifter base to the chassis without drilling holes:
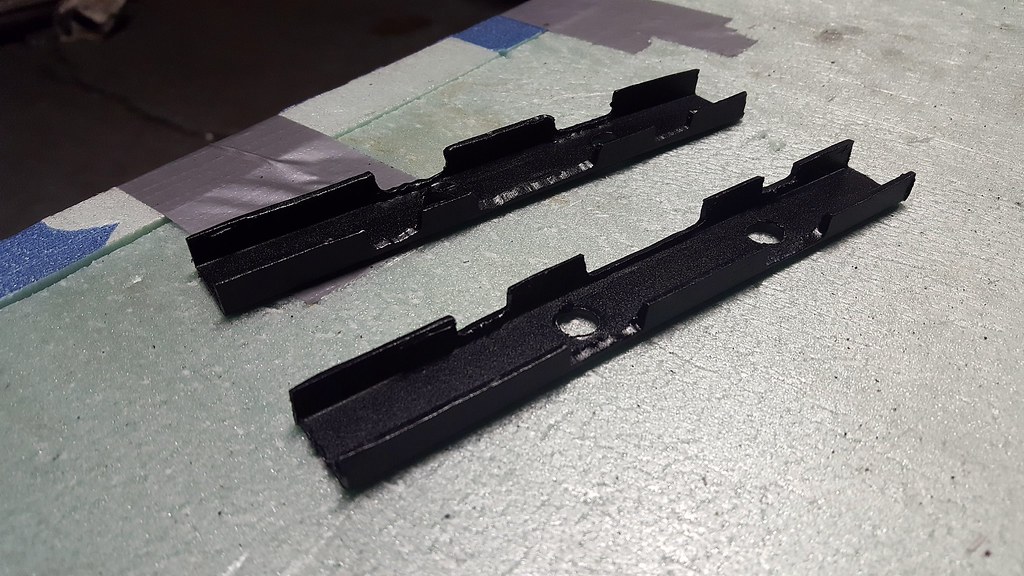
                      33022897334ef705ce928b.jpg

                      There are notches cut to fit on the flange around the edge of the hole the rubber boot usually sits in. Then they bolt to the upper half with the bearing cup via studs, sandwiching the body in-between:
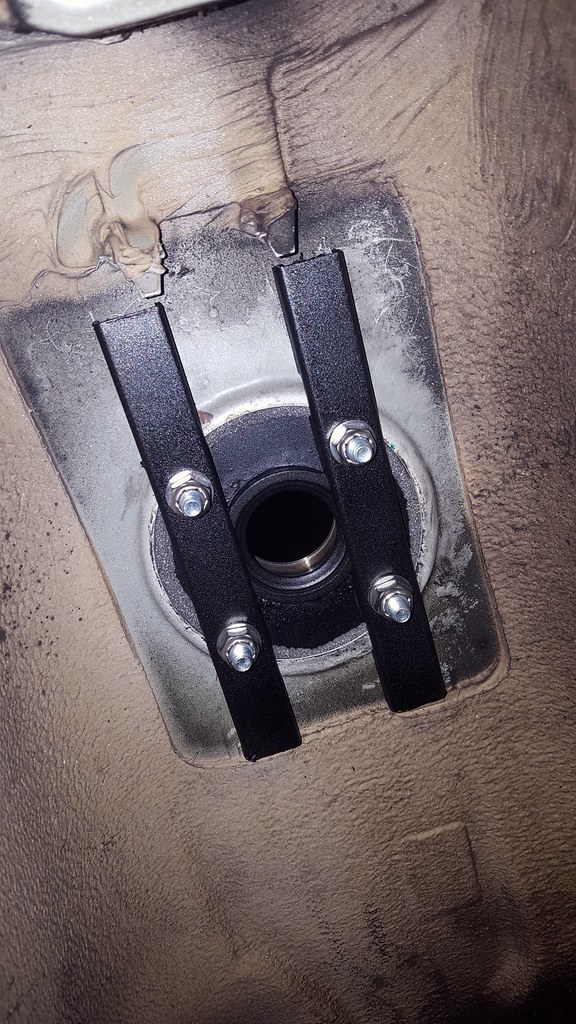
                      33022900224156b962a73b.jpg

                      I put an adhesive backed foam gasket around the edge to seal the hole, and secured everything with some stainless lock nuts/washers.

                      Top view of bearing cup with everything assembled:
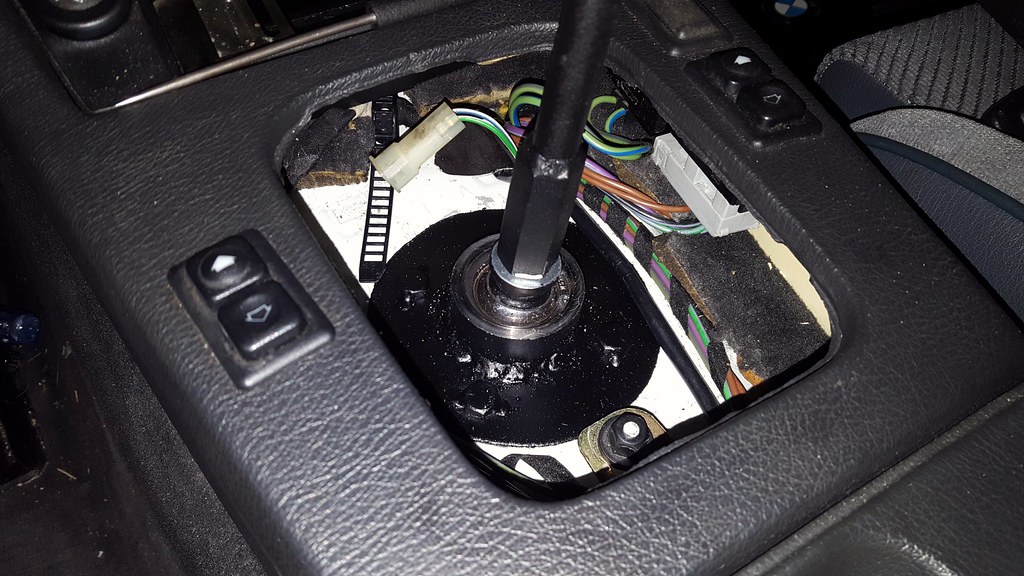
                       33022904624aec6843d2ab.jpg

                      While I had everything apart, I replaced the shift shaft seal (what a pain in the ass...), shift rod joint, and the yellow plastic washers. 
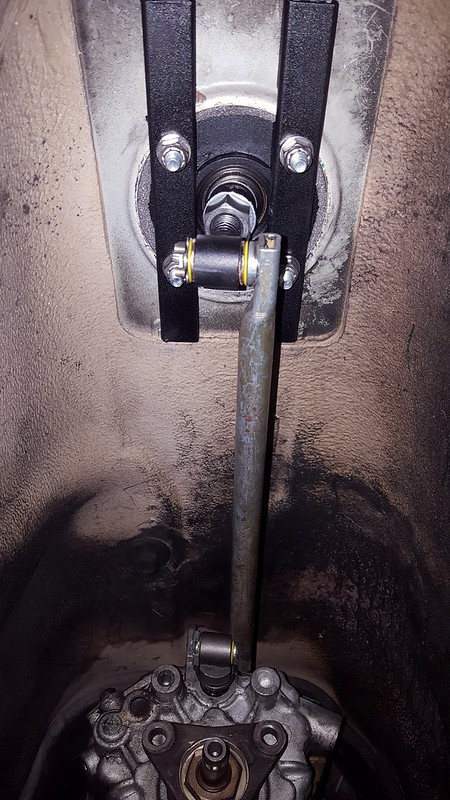
                      3302290375483db74e66fc.jpg

                      Final touch: BMW Motorsport golfball shift knob!
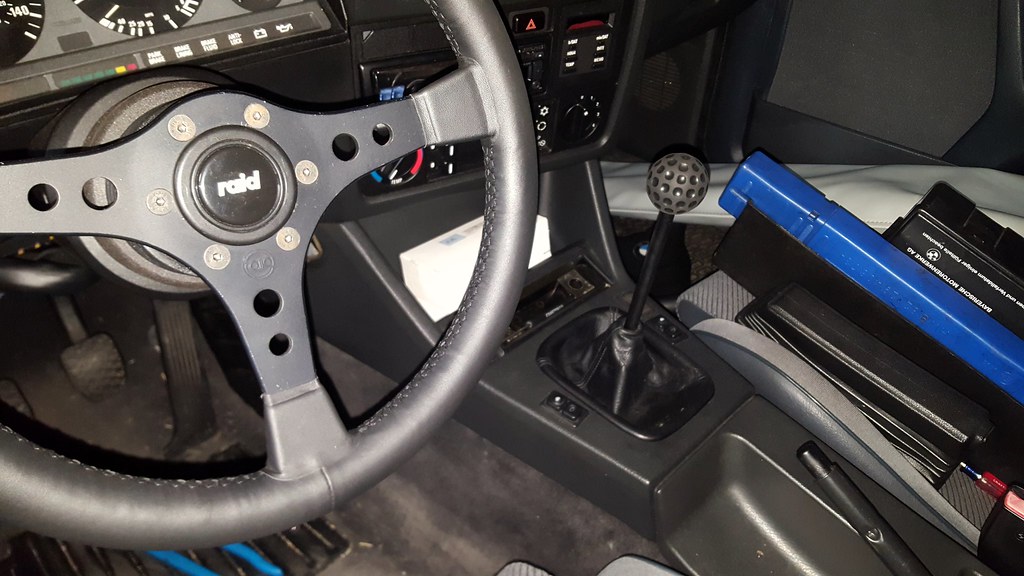
                      330229058146ec8492477b.jpg

                      Really pleased with how it came out. There is next to zero play and everything is super solid, the shifts are pretty short but don't take too much force to get into gear, and the knob height is really comfortable. I can write up a DIY and post a parts list if people are interested.

                      1991 318is, 1991 318i, 2022 Bronco

                      1 Reply Last reply
                      1
                      • YoungCRY
                        YoungCRY
                        YoungCR
                        wrote on last edited by
                        #298

                        What a great looking set up! I'd be interested in making one.

                        Chris Young
                        BMWCCA #458972
                        1986 528e/5  | 1994 530i/5 | 1995 540i/6 | 2013 X5 35d | 1998 C1500 Suburban | 1995 K2500 Suburban

                        1 Reply Last reply
                        1
                        • jc43089J
                          jc43089J
                          jc43089
                          wrote on last edited by
                          #299

                          Me too, I get the idea from the pictures, where did you buy the bearing, and now that you see the travel amount would you have still needed to do the grinding you did?

                          2/94 325i Sedan, Arctic Gray: UUC LTW FW, EVO 3 and DSSR, +.020 Maxsil pistons, ASC delete, Eibach shocks/springs, 16" contour reps 238k
                          3/93 325i Coupe, Schwarz 2, Sketchy stance action, ebay turbo, 300k
                          '89 325i Vert, Alpine White: 5spd swapped, sold.

                          '04 Toyota Sienna: 24V to 24V swap in progress

                          '05 Volvo V70R, 6spd.  200k
                          '85 Toyota LandCruiser: Lifted, gas hog. 205k
                          '99 Nissan Maxima: 5spd, Rusty but trusty winter beater. 252k RIP.

                          1 Reply Last reply
                          0
                          • m42b32M
                            m42b32M
                            m42b32
                            wrote on last edited by
                            #300

                            Sure! I'll make a separate thread with all the info so it doesn't get lost in this one. I took a video when it was finished that I can post too

                            1991 318is, 1991 318i, 2022 Bronco

                            1 Reply Last reply
                            0
                            • JdesignJ
                              JdesignJ
                              Jdesign
                              wrote on last edited by
                              #301

                              That turned out great!!!!! Awesome work, I really liked that you worked around not modifying the chassis.

                              SumBunny.jpg

                              https://www.instagram.com/_jdesigner_/                                          http://nevertoolow.tumblr.com/

                              🥳SOLD BMW E24 633CSI - BMW M30B32                                          🧪SOLD HCH  ES9 - 1.3 LDA
                              👽BMW E30 325IC - Toyota 1JZ-GTE                                                     ⏰ HONDA EF9 CIVIC SI - JDM B18C5
                              ☠️BMW E36 318i - Ford 5.0 FE302                                                         🚴‍♂️ GT-Labomba - 26x2.75 Freeride
                              🤹‍♀️SOLD BMW E36/7 Z3 - BMW M54B25                                                🧓SOLD BMW E10 2002 - BMW M10M05

                              1 Reply Last reply
                              2
                              • m42b32M
                                m42b32M
                                m42b32
                                wrote on last edited by
                                #302

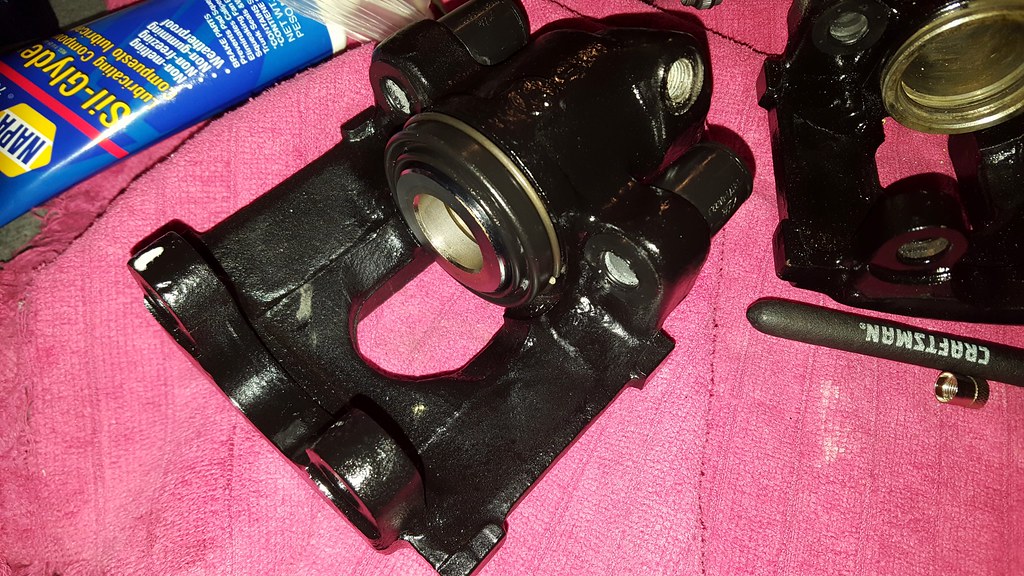
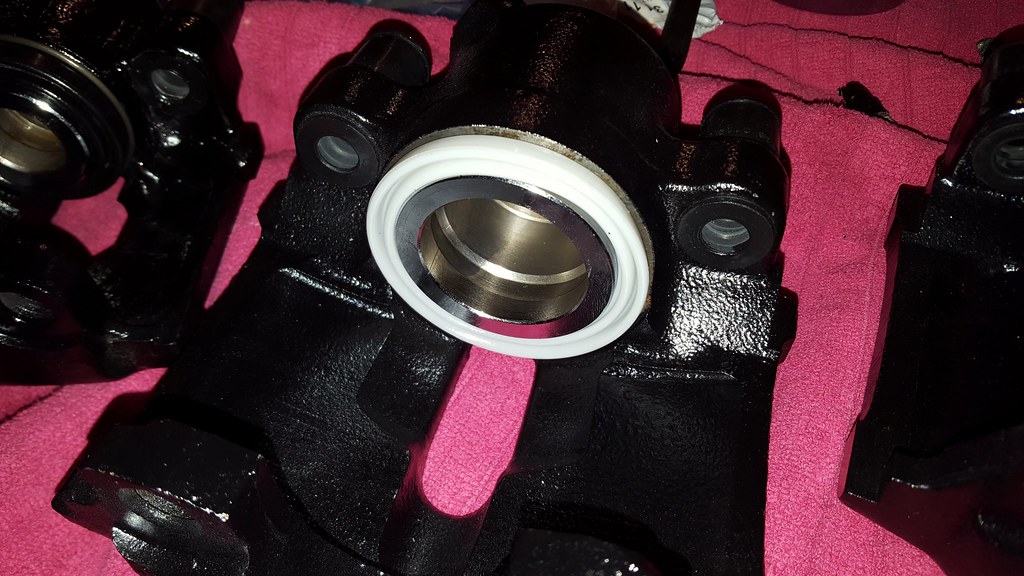
                                Finally finished rebuilding my M3 brake calipers:

                                33600998550cdff6dc187b.jpg

                                33856511611b13993cf05b.jpg

                                Painted the calipers and carriers with gloss black caliper paint and along with a re-seal kit I used new pistons, guide pin bushings, bleed screws and anti-rattle clips for all 4 corners. 

                                Next up: rear axles

                                1991 318is, 1991 318i, 2022 Bronco

                                1 Reply Last reply
                                1
                                • jc43089J
                                  jc43089J
                                  jc43089
                                  wrote on last edited by
                                  #303

                                  Looks great!  I need to rebuild the calipers on my Volvo with new seals before I have one get seized, they are 400$ each, scary.  They are 4 piston Brembos.

                                  2/94 325i Sedan, Arctic Gray: UUC LTW FW, EVO 3 and DSSR, +.020 Maxsil pistons, ASC delete, Eibach shocks/springs, 16" contour reps 238k
                                  3/93 325i Coupe, Schwarz 2, Sketchy stance action, ebay turbo, 300k
                                  '89 325i Vert, Alpine White: 5spd swapped, sold.

                                  '04 Toyota Sienna: 24V to 24V swap in progress

                                  '05 Volvo V70R, 6spd.  200k
                                  '85 Toyota LandCruiser: Lifted, gas hog. 205k
                                  '99 Nissan Maxima: 5spd, Rusty but trusty winter beater. 252k RIP.

                                  1 Reply Last reply
                                  0
                                  • straight6pwrS
                                    straight6pwrS
                                    straight6pwr
                                    wrote on last edited by
                                    #304

                                    can you enlighten me on m3 calipers? are you going 5-lug?

                                    Dan

                                    yajsYRL.jpg.e5f350b4dfe961d76ac8b32efce2e1a6.jpg

                                    1 Reply Last reply
                                    0
                                    • m42b32M
                                      m42b32M
                                      m42b32
                                      wrote on last edited by
                                      #305

                                      straight6pwr said:

                                      can you enlighten me on m3 calipers? are you going 5-lug?

                                      Yup! I am in the middle of an e30 M3 5-lug conversion so I'll be running the stock M3 brakes all around as it is required by the swap. I'm also changing to an e32 750il brake master cylinder (slightly larger bore than the OEM M3, but with the correct threads for non-m e30 brake line fittings) to compensate for the bigger calipers.

                                      1991 318is, 1991 318i, 2022 Bronco

                                      1 Reply Last reply
                                      0
                                      • straight6pwrS
                                        straight6pwrS
                                        straight6pwr
                                        wrote on last edited by
                                        #306

                                        nice! i'm a bit dense - the weds you posted were 5-lug and I didn't put 2 and 2 together.

                                        Dan
                                        yajsYRL.jpg.e5f350b4dfe961d76ac8b32efce2e1a6.jpg

                                        1 Reply Last reply
                                        1
                                        • m42b32M
                                          m42b32M
                                          m42b32
                                          wrote on last edited by
                                          #307

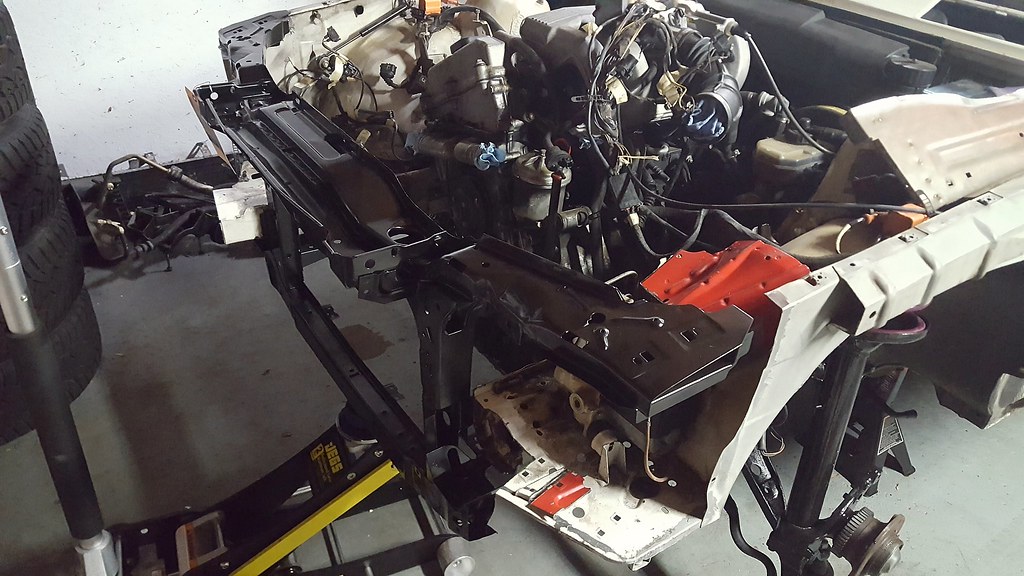
                                          Picked up a new core support from Umansky to replace the bent replacement (also I cut that to pieces getting the new frame rail section out haha), these things are pricey but knowing it's straight is worth the premium. I'm hoping to finish fitting all the patch parts and start welding things back together this weekend! My overall goal is to have the body repair done by the end of April. 
                                          3399103685681c0f9ce11b.jpg

                                          1991 318is, 1991 318i, 2022 Bronco

                                          1 Reply Last reply
                                          0

                                          Hello! It looks like you're interested in this conversation, but you don't have an account yet.

                                          Getting fed up of having to scroll through the same posts each visit? When you register for an account, you'll always come back to exactly where you were before, and choose to be notified of new replies (either via email, or push notification). You'll also be able to save bookmarks and upvote posts to show your appreciation to other community members.

                                          With your input, this post could be even better 💗

                                          Register Login
                                          Reply
                                          • Reply as topic
                                          Log in to reply
                                          • Oldest to Newest
                                          • Newest to Oldest
                                          • Most Votes


                                          • Login

                                          • Don't have an account? Register

                                          • Login or register to search.
                                          Powered by NodeBB Contributors
                                          • First post
                                            Last post
                                          0
                                          • Categories
                                          • Recent
                                          • Tags
                                          • Popular
                                          • Users
                                          • Groups