Skip to content
  • Categories
  • Recent
  • Tags
  • Popular
  • Users
  • Groups
Skins
  • Light
  • Brite
  • Cerulean
  • Cosmo
  • Flatly
  • Journal
  • Litera
  • Lumen
  • Lux
  • Materia
  • Minty
  • Morph
  • Pulse
  • Sandstone
  • Simplex
  • Sketchy
  • Spacelab
  • United
  • Yeti
  • Zephyr
  • Dark
  • Cyborg
  • Darkly
  • Quartz
  • Slate
  • Solar
  • Superhero
  • Vapor

  • Default (No Skin)
  • No Skin
Collapse
WIBIMMERS logo

WIBIMMERS

  1. Home
  2. General Discussion
  3. Members BMWs
  4. Alpine e30 progress/build thread

Alpine e30 progress/build thread

Scheduled Pinned Locked Moved Members BMWs
821 Posts 31 Posters 2 Views 1 Watching
  • Oldest to Newest
  • Newest to Oldest
  • Most Votes
Reply
  • Reply as topic
Log in to reply
This topic has been deleted. Only users with topic management privileges can see it.
  • m42b32M
    m42b32M
    m42b32
    wrote on last edited by
    #269

    KaiserRolls said:

    Wheel looks great, will your car be that low? :0

    Thanks! It will most likely sit a bit higher, the wheel wouldnt stay in place so I just wedged it in there haha. Those tires are way oversized and will be replaced (they came off an e24) so it probably makes it look a little lower too

    1991 318is, 1991 318i, 2022 Bronco

    1 Reply Last reply
    0
    • B
      B
      B C
      wrote on last edited by
      #270

      Let me know if you need a shop that will stretch the tires.

      I know of one that operates in a back alley on the north side at 1am.

      Tip: You can also get expedited service if you shout the coupon code: "White Power" when you arrive

      1 Reply Last reply
      3
      • m42b32M
        m42b32M
        m42b32
        wrote on last edited by
        #271

        Snap said:

        Let me know if you need a shop that will stretch the tires.

        I know of one that operates in a back alley on the north side at 1am.

        Tip: You can also get expedited service if you shout the coupon code: "White Power" when you arrive

        No streching happening here!

        1991 318is, 1991 318i, 2022 Bronco

        1 Reply Last reply
        0
        • m42b32M
          m42b32M
          m42b32
          wrote on last edited by
          #272

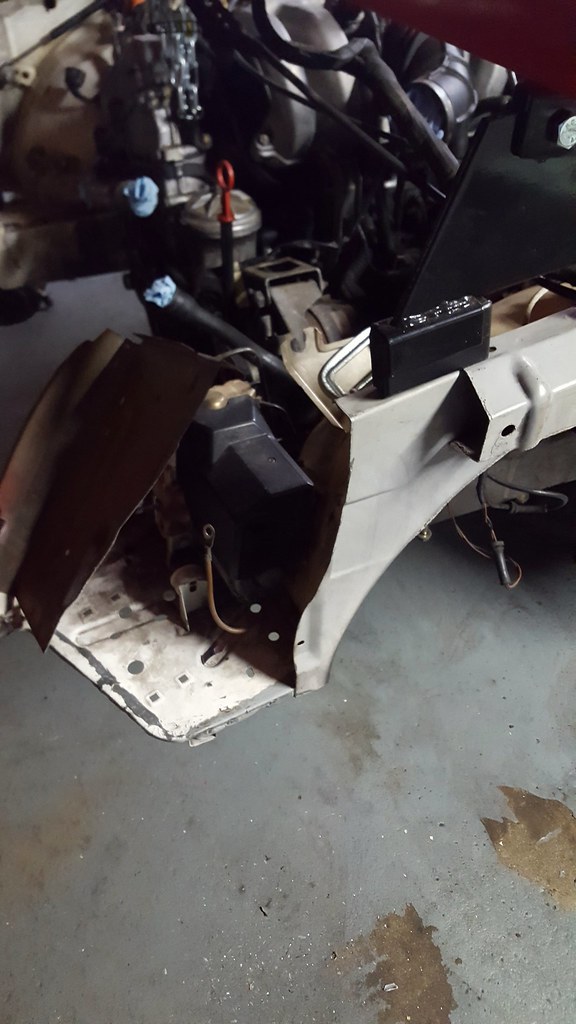
          Stripped down the front end of the sedan over the weekend, got a whole bunch of pieces pulled:

          10d3d2405f1f99753ee216619928292c.jpg

          7a5c21f4a7e32fbcd71be51b701513c9.jpg

          Im hoping the weather warms up soon so I can start making faster progress! Thanks to travelling for work the chances of having this done by the picnic are pretty slim... my backup goal is the brew city cruise night BMW show on 8/15

          1991 318is, 1991 318i, 2022 Bronco

          1 Reply Last reply
          0
          • straight6pwrS
            straight6pwrS
            straight6pwr
            wrote on last edited by
            #273

            m42b32 said:

            ! Thanks to travelling for work the chances of having this done by the picnic are pretty slim... my backup goal is the brew city cruise night BMW show on 8/15

            aww no! the white e30s are dropping like flies.

            Dan

            yajsYRL.jpg.e5f350b4dfe961d76ac8b32efce2e1a6.jpg

            1 Reply Last reply
            0
            • andyhundleyA
              andyhundleyA
              andyhundley
              wrote on last edited by
              #274

              You'll have it done by the Picnic.

              Sent from my iPhone using Tapatalk

              1 Reply Last reply
              0
              • m42b32M
                m42b32M
                m42b32
                wrote on last edited by
                #275

                I will still be pushing for it! losing three weeks unexpectedly just really sucked. I have nine weeks left to completely go through the rear suspension, reassemble the front suspension, run all new brake lines, repair the driver's side bumper mounts, fabricate a removable core support, replace all the wheel bearings, etc.... Its a long list! What I want to avoid is rushing things and having to re-do them right away

                1991 318is, 1991 318i, 2022 Bronco

                1 Reply Last reply
                0
                • EarlE
                  EarlE
                  Earl
                  wrote on last edited by
                  #276

                  If you need to borrow tools for doing the rear wheel bearings or need a hand let me know=)

                  museum sig 2earl.jpg

                  1 Reply Last reply
                  2
                  • andyhundleyA
                    andyhundleyA
                    andyhundley
                    wrote on last edited by
                    #277

                    Earl said:

                    If you need to borrow tools for doing the rear wheel bearings or need a hand let me know=)

                    Same.

                    Sent from my iPhone using Tapatalk

                    1 Reply Last reply
                    1
                    • B
                      B
                      Boris3
                      wrote on last edited by
                      #278

                      Make it a party? I've done fronts but not rears and would be interested in learning.

                      1990 325i racecar (ITS, former Spec E30); 2004 330i ZHP

                      1 Reply Last reply
                      1
                      • m42b32M
                        m42b32M
                        m42b32
                        wrote on last edited by
                        #279

                        Thanks Earl/Andy! Ill reach out when the time comes, probably in a week or two. I probably won't be pulling and replacing them in the same day as I will be cleaning and painting the trailing arms, so I don't know if it would be worth doing as a group for learning, but if you're interested you are more than welcome to swing by the shop when I give it a go!

                        I continued work on the remaining damage to the front end after work today. I started stripping the excess parts off my salvaged core support and came to the conclusion that I can't use it. I am pretty convinced it is bent a bit. There are a few small kinks I found that I hadn't noticed before that I'm pretty sure shouldn't be there:
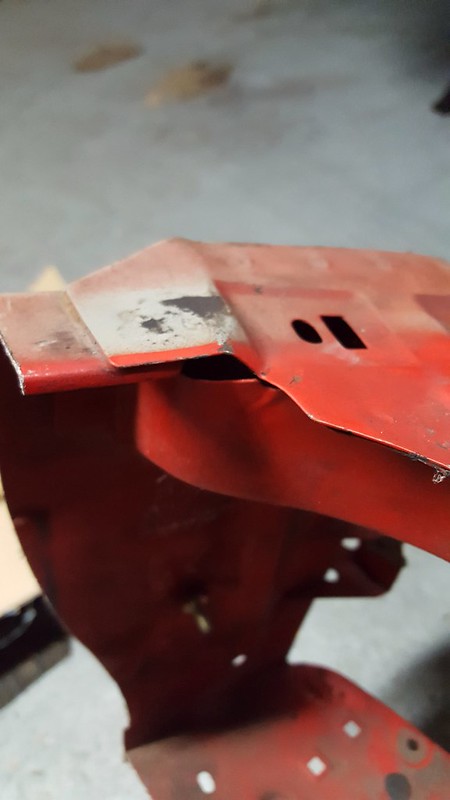
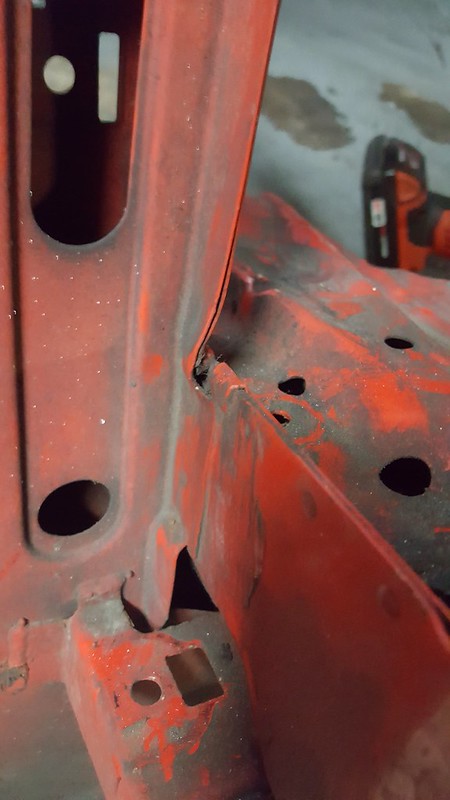
                        33426095756d24f6b505dc.jpg

                        32652386533cafd5fa8d6c.jpg

                        From the top down it looks straight, but I just don't want to take a chance and have problems down the road so I won't be using it anymore. I'll likely order a new one from the dealer. 

                        I turned my attention to the headlight mount area:
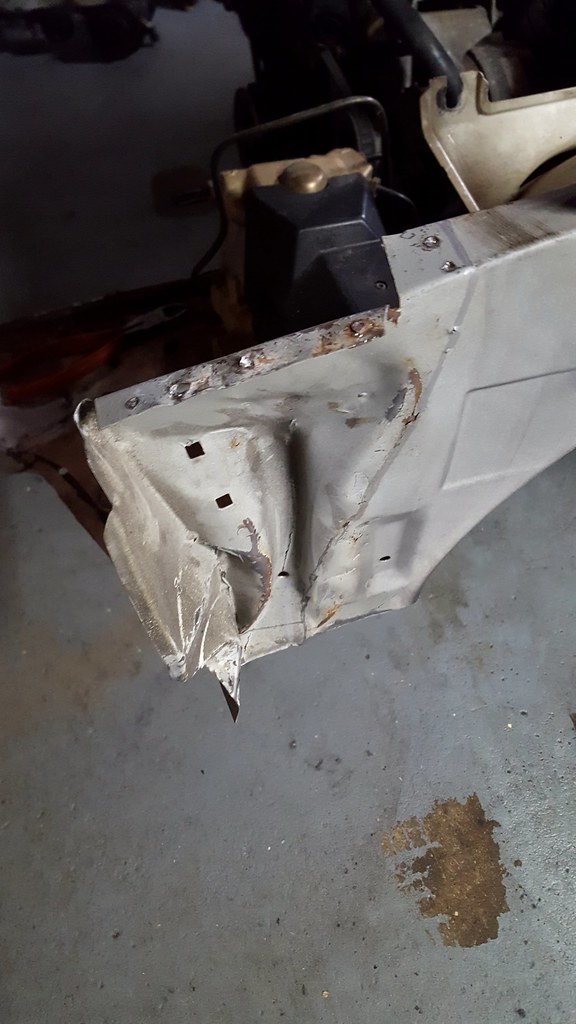
                        334261136764dc40499fdb.jpg

                        Removed this piece from the core support cutout, thankfully it and the frame rail end are definitely good and straight:
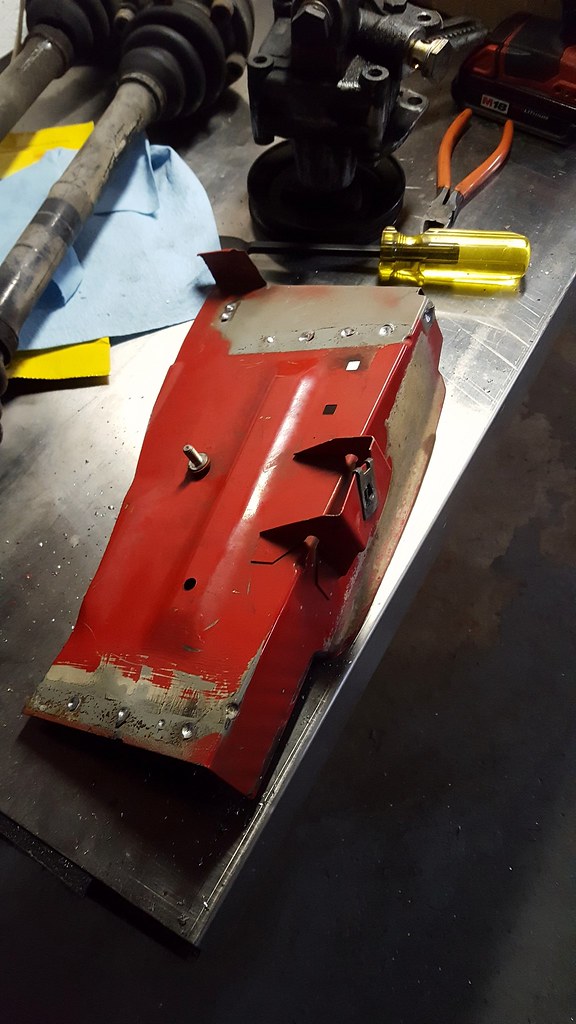
                        326523896737c912cc152b.jpg

                        Chopped the damaged sheet metal out:

                        3342612101617ff6f40c0b.jpg

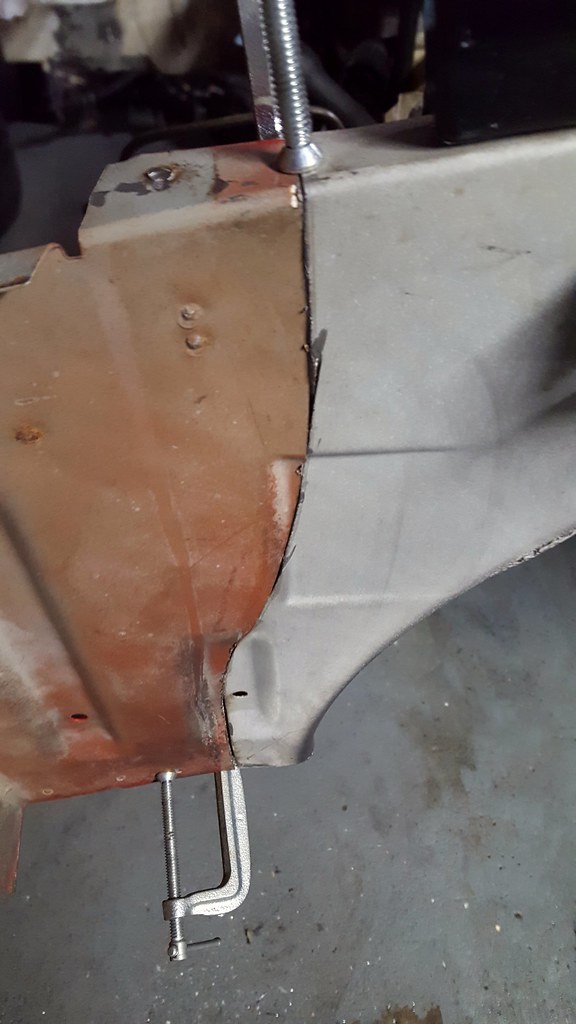
                        I started by just roughly hacking out the majority of the damage and leaving an overlap with the new panel. Then I carefully trimmed it back until the new part fit right where it needed to go. The top is within a millimeter of where it needs to be, ran out of time with the bottom but it is only long by a few mm. With some minor adjustments it will be spot on:
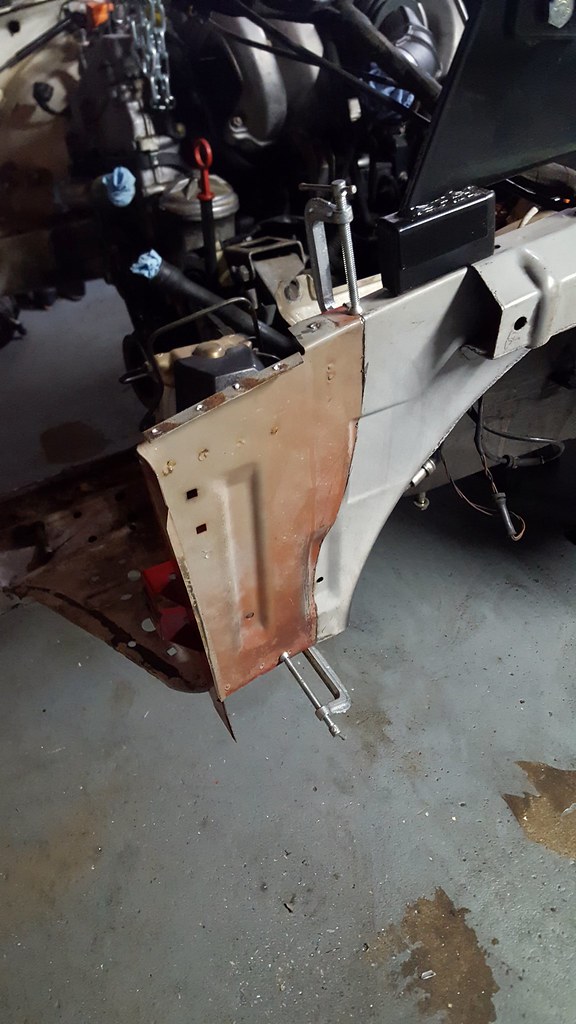
                        3342612653607052cdc57b.jpg

                        334261351368057ba7083b.jpg

                        The gaps are looking really good for welding, less than a mm max! The areas where it looks like there are gaps it is actually just a shadow, it is pretty much touching the whole way down. Now I just need to line it up as best I can and weld it in without ruining it...

                        1991 318is, 1991 318i, 2022 Bronco

                        1 Reply Last reply
                        1
                        • m42b32M
                          m42b32M
                          m42b32
                          wrote on last edited by
                          #280

                          Got some things done over the weekend, didn't get any pictures though. Cut the replacement piece of frame rail out of the spare core support and cleaned it up, started taking measurements on where to cut the damaged section out. This will be the trickiest part of the whole repair by far, hopefully I can get it right.

                          I also fab'd up a puller for the rear subframe bushings similar to this DIY: https://www.bimmerforums.com/forum/showthread.php?1389953-A-better-subframe-bushing-puller

                          Instead of modifying a pitman arm puller, I just welded some 5/8" steel square tube in a U with the correct spacing to fit in the bushing cutouts. With the help of a little heat from a torch I had them both out in 10 minutes!

                          1991 318is, 1991 318i, 2022 Bronco

                          1 Reply Last reply
                          0
                          • straight6pwrS
                            straight6pwrS
                            straight6pwr
                            wrote on last edited by
                            #281

                            want to do my core support next year :D

                            also, how much to rent your bushing tool?

                            nice progress!

                            Dan
                            yajsYRL.jpg.e5f350b4dfe961d76ac8b32efce2e1a6.jpg

                            1 Reply Last reply
                            1
                            • B
                              B
                              Boris3
                              wrote on last edited by
                              #282

                              I still have the wandering modified pitman arm / pipe cap subframe bushing puller setup if anyone needs.

                              1990 325i racecar (ITS, former Spec E30); 2004 330i ZHP

                              1 Reply Last reply
                              1
                              • m42b32M
                                m42b32M
                                m42b32
                                wrote on last edited by
                                #283

                                straight6pwr said:

                                want to do my core support next year :D

                                also, how much to rent your bushing tool?

                                nice progress!

                                It would cost a lot to get me to do it again haha, Is yours damaged? 

                                You can borrow the bushing tool for free if you want it, it's ugly but it worked. I didn't use thick enough tubing and the puller started to crush the tube in the center, so I can't promise that it will make it through another two bushings.... Sounds like Boris3 has a more durable setup haha

                                1991 318is, 1991 318i, 2022 Bronco

                                1 Reply Last reply
                                0
                                • B
                                  B
                                  Boris3
                                  wrote on last edited by
                                  #284

                                  The one I've got was used for removing the bushings with the subframe not fully dropped. The Pitman arms go on the edges of the bushing housing, cap goes against the bushing and puller arms go on the bottom edges of the bushing. You provide your own puller with the puller screw bracing against the Pitman unit, and hope the edges of the stock bushing hold up. Heat helps, and when all else fails drills and air chisel...or drop the subframe and burn em.

                                  Much easier if not dealing with the original bushings!

                                  1990 325i racecar (ITS, former Spec E30); 2004 330i ZHP

                                  1 Reply Last reply
                                  1
                                  • straight6pwrS
                                    straight6pwrS
                                    straight6pwr
                                    wrote on last edited by
                                    #285

                                    m42b32 said:

                                    It would cost a lot to get me to do it again haha, Is yours damaged? 

                                    You can borrow the bushing tool for free if you want it, it's ugly but it worked. I didn't use thick enough tubing and the puller started to crush the tube in the center, so I can't promise that it will make it through another two bushings.... Sounds like Boris3 has a more durable setup haha

                                    damaged, yes. hoping a shop can just pull it close to straight and deal with a full replacement way down the line.

                                    sounds like your tool was a one time use!

                                    Boris3 said:

                                    The one I've got was used for removing the bushings with the subframe not fully dropped. The Pitman arms go on the edges of the bushing housing, cap goes against the bushing and puller arms go on the bottom edges of the bushing. You provide your own puller with the puller screw bracing against the Pitman unit, and hope the edges of the stock bushing hold up. Heat helps, and when all else fails drills and air chisel...or drop the subframe and burn em.

                                    Much easier if not dealing with the original bushings!

                                    i think i've seen that homemade version before, sounds familiar.  but yeah probably will borrow it at some time

                                    Dan
                                    yajsYRL.jpg.e5f350b4dfe961d76ac8b32efce2e1a6.jpg

                                    1 Reply Last reply
                                    0
                                    • m42b32M
                                      m42b32M
                                      m42b32
                                      wrote on last edited by
                                      #286

                                      straight6pwr said:

                                      damaged, yes. hoping a shop can just pull it close to straight and deal with a full replacement way down the line.

                                      sounds like your tool was a one time use!

                                      Thats a bummer... It's really not that bad to remove though. It would probably cost you the same (maybe even less) to have a shop straighten it as it would be to replace it yourself. The difficult/time consuming part on my car has been dealing with the additional damage, If it was just a core support I'd be done already. 

                                      And most likely, the hope was to make a reusable one but Lowes didn't stock anything with a decent wall thickness

                                      1991 318is, 1991 318i, 2022 Bronco

                                      1 Reply Last reply
                                      0
                                      • Bassboy3313B
                                        Bassboy3313B
                                        Bassboy3313
                                        wrote on last edited by
                                        #287

                                        m42b32 said:

                                        And most likely, the hope was to make a reusable one but Lowes didn't stock anything with a decent wall thickness

                                        Speedy Metals in New Berlin is your friend!

                                        CHECK OUT >>> RAGE DRIFT DESIGNS <<< FOR DECALS AND MORE!

                                        1 Reply Last reply
                                        1
                                        • m42b32M
                                          m42b32M
                                          m42b32
                                          wrote on last edited by
                                          #288

                                          Made more progress:

                                          Struts are assembled! The KBS came out kinda crappy, but I'm not going for a pebble beach level of perfection on the underside. I plan to drive this car as much as possible, so it'll get buried in dirt anyway. One wheel bearing needs to be replaced so I'll be doing both soon. 
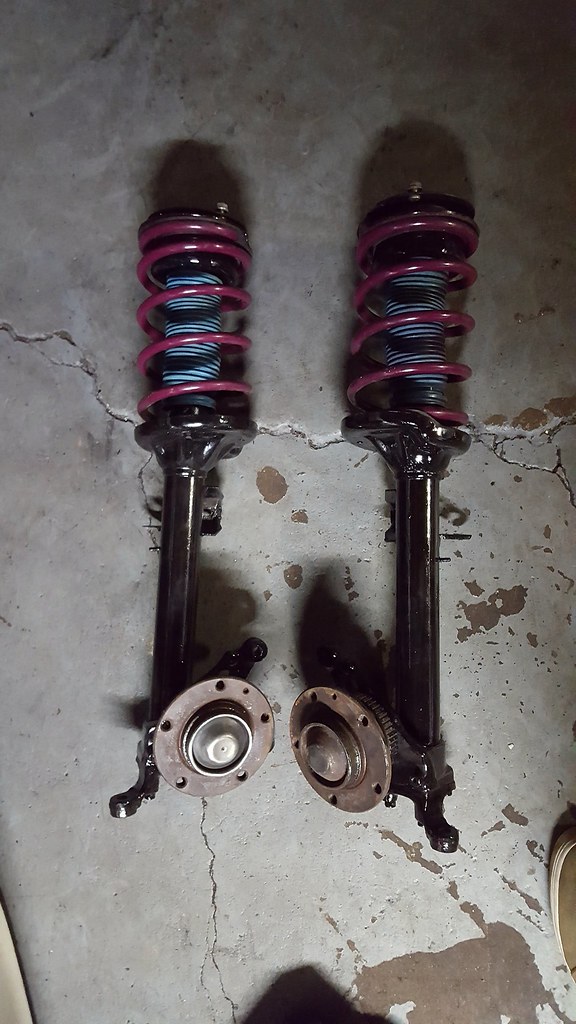
                                          32849394484a4947c337cb.jpg

                                          While I had the driveshaft out, I figured it would be a good time to rebuild the shift linkage and install a short shifter. I didn't want a z3/etc shifter as they tend drop the shift knob into the console further, and shifters that raise the knob height (akg stage 2, bimmerworld race, etc) are $350+, so I decided to make my own DTM style floor mounted shifter. How hard could it be, right? 

                                          There really isn't much for information on building your own shift lever on the internet, so I just started measuring things and formulating a plan. I got all my parts in last week and started putting it together over the weekend. 

                                          The pivot point is a spherical bearing typically used in off-road suspension, with high misalignment spacers from tie-rod ends. Typically, high misalignment spacers don't fit in plain spherical bearings, but I needed the additional angle capability.
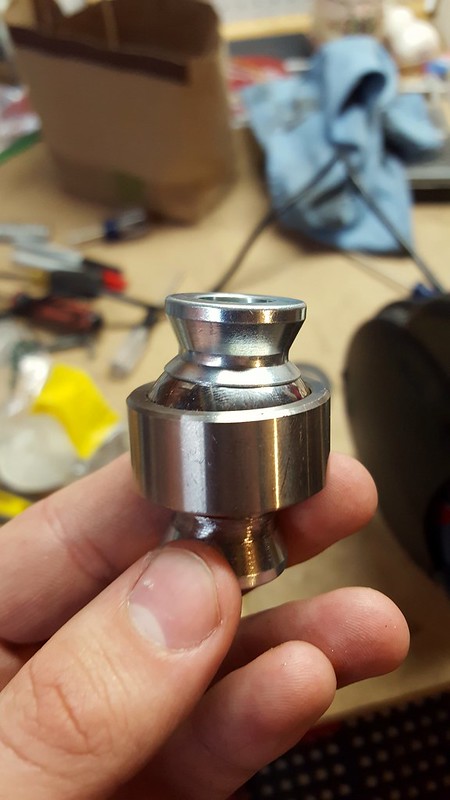
                                          333081358604ae513ba21c.jpg

                                          As you can see, the spacers stick out and won't allow the bearing to rotate beyond it's normal limit. As I don't have access to a lathe, I made a jig to chuck the spacer in a drill and then used a bench grinder to trim the excess material off the spacer. The surface finish is rough so I went a little past the edge of the bearing so it wouldn't chew up the bearing liner. 
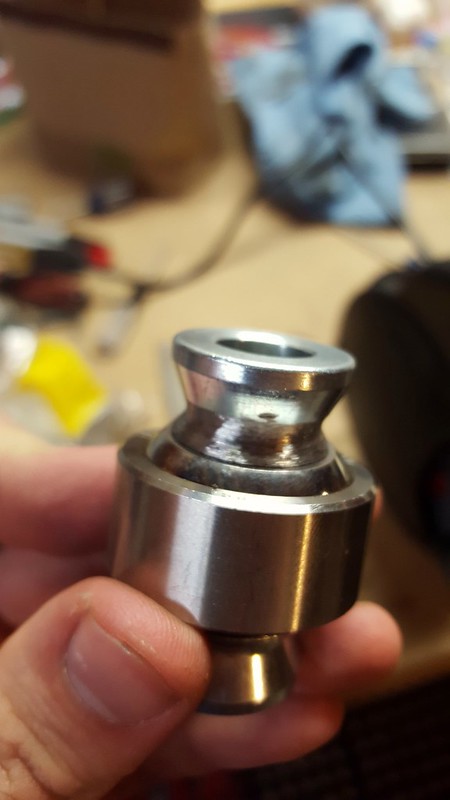
                                          33562876321becaeefd43c.jpg

                                          I then welded the parts of the upper and lower halves of the shift lever together (I ground off any zinc plating prior to welding, don't worry). I left the lengths long on each so that I can fine tune the knob height and shift throw once it's all mounted up in the car. I worked on calculating a desired throw and planning the dimensions ahead of time, but ultimately I don't know what I want so I'm just starting at too short of a throw, and too tall of a lever, and trimming each till I'm happy. 
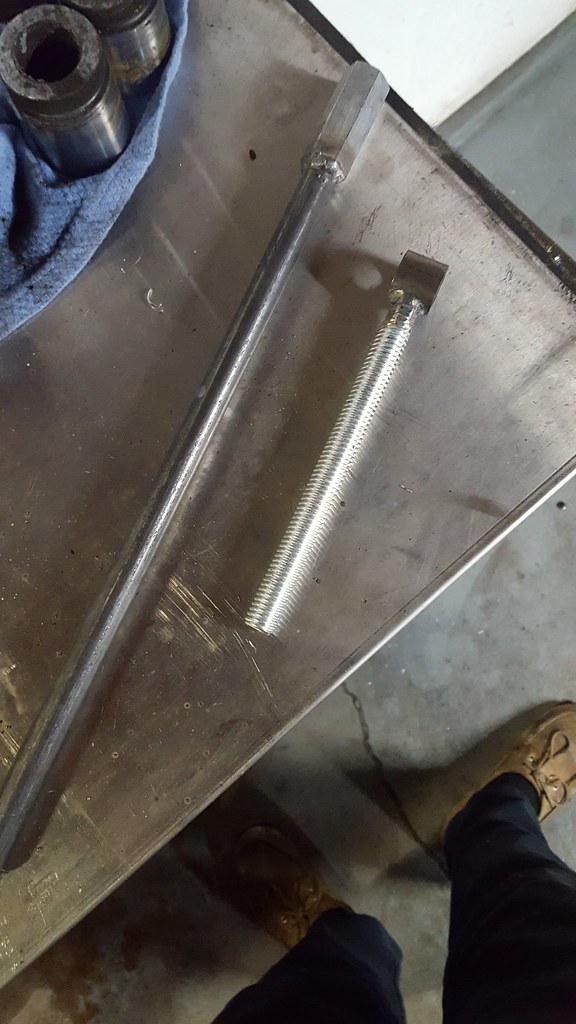
                                          335628830917cc4971ea3b.jpg

                                          I got some bronze bushings and pressed them into the bottom half of the shift lever to mate with the selector rod. The fit is super tight and there is absolutely zero play. 
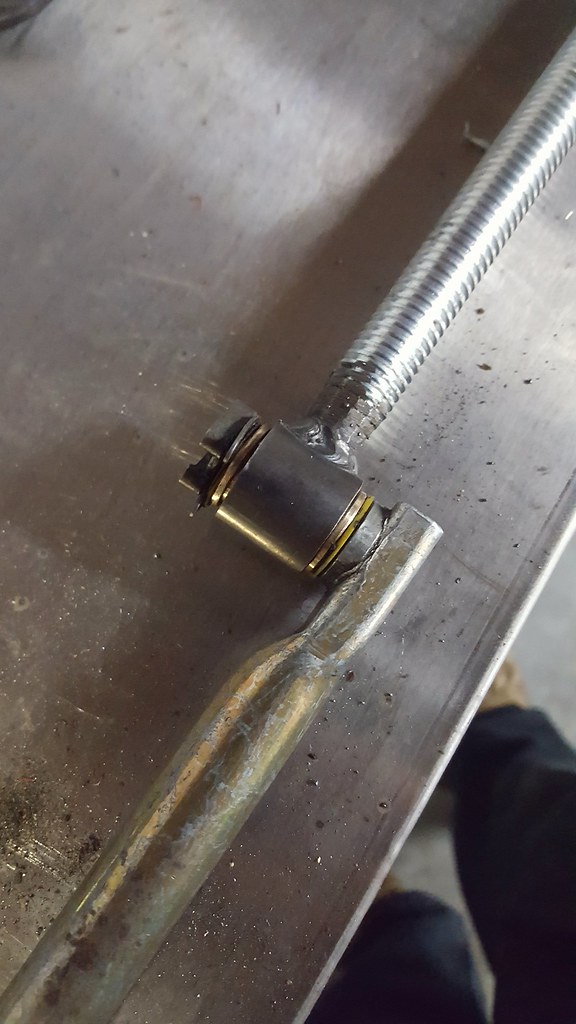
                                          328788690439d366e6cbbb.jpg

                                          Here is where I'm at, with everything assembled to start test fitting. The actual mounting to the car is still in progress and I am attempting to key off of features already existing in the sheet metal to avoid drilling new holes in case I ever want to return to stock, but what I have so far is a round steel plate with a bearing weld cup in the center. This holds the bearing tightly with a circlip, which is awesome because it has allowed me to design this to be serviceable. The lower half passes through the bearing and threads into the socket on the upper half (loctite so it doesn't come loose on accident), then a nut on the lower half (again, loctite) clamps the whole assembly to the spherical bearing. 
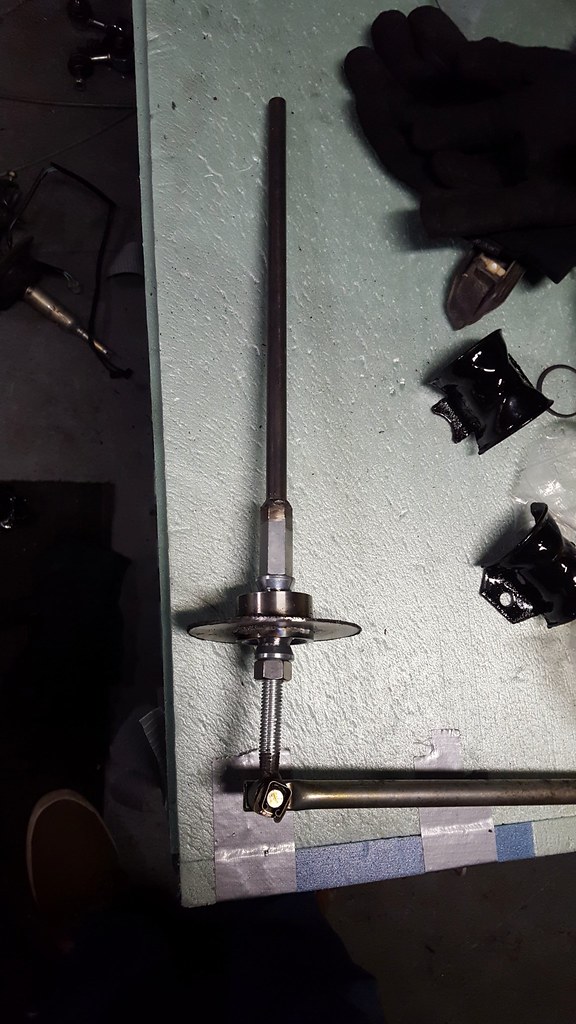
                                          33651361566773014ddb0b.jpg

                                          I'm hoping to have it finished up by the end of the week. Its a bit heavy, but it should be nice and strong. 

                                          While I was under the car, I figured out why my reverse lights weren't working, looks like it snagged the driveshaft at some point. 
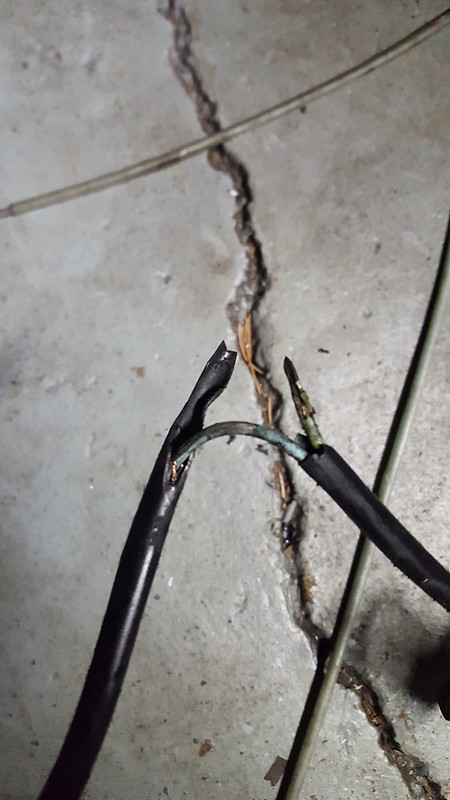
                                          335628907017e9e03a3bcc.jpg

                                          I also popped in an antenna plug that I got from a guy on r3v (http://www.r3vlimited.com/board/showthread.php?t=371625). Most of the plugs I have seen are plastic and require silicone, this one is a more pliable material and it fits nice and tight so it shouldn't leak. I have all the parts for the z3/318ti mast antenna conversion, but this was cheap and easy and got it done sooner haha. 
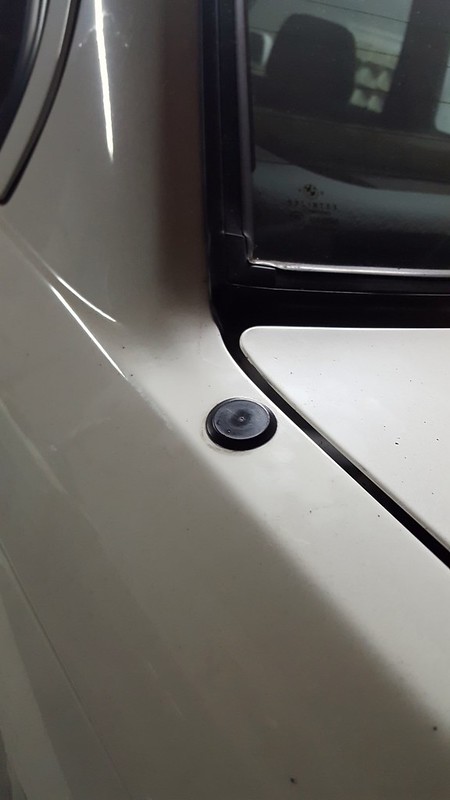
                                          33651368686e939418204c.jpg

                                          1991 318is, 1991 318i, 2022 Bronco

                                          1 Reply Last reply
                                          2

                                          Hello! It looks like you're interested in this conversation, but you don't have an account yet.

                                          Getting fed up of having to scroll through the same posts each visit? When you register for an account, you'll always come back to exactly where you were before, and choose to be notified of new replies (either via email, or push notification). You'll also be able to save bookmarks and upvote posts to show your appreciation to other community members.

                                          With your input, this post could be even better 💗

                                          Register Login
                                          Reply
                                          • Reply as topic
                                          Log in to reply
                                          • Oldest to Newest
                                          • Newest to Oldest
                                          • Most Votes


                                          • Login

                                          • Don't have an account? Register

                                          • Login or register to search.
                                          Powered by NodeBB Contributors
                                          • First post
                                            Last post
                                          0
                                          • Categories
                                          • Recent
                                          • Tags
                                          • Popular
                                          • Users
                                          • Groups