
My name is Earl, and I have a Stainless Steel bolt fetish =)
-
Got something done I've been meaning too.
I finally got the hole cut properly to route my headlight harness back out of. Glad I had the right tools this time=) I also got the harness pulled through.


I also wrestled with the crank bolt for about an hour and still havent gotten it off. I figured the only way to lock it from turning is a wood block in between the crank and block. I didn't want to wrench too hard because I don't need a cracked block. I tried head. a deadblow, a 3 foot cheater bar and still it wouldn't budge.
How are you supposed to get this sucker off when the engine is on a stand? There has to be something I'm overlooking. I've tried a nice large electric impact and that did absolutely nothing besides make noise.
For those who were curious, here is a shot aired out on the 15's. This is with the bags fully compressed. To get lower would require pocketing the arms and frame. I won't be anywhere near this low so no worries for me=)


Also if you haven't noticed, the all reds are back on. I need to reclear the top of the drivers side and then I need to lay into them with a buffer to get them nice and shiny.

More to come Saturday
-
Your supposed to get the nut off with the engine in the car ... I made the same mistake. You need to hold the crank from moving and apply a lot of leverage and heat. I could not believe how tight the one on my car was. We had over a 4 foot bar and we were hanging off of it. I think the heat finally did the trick.
-
Well I was lucky enough to borrow the bmw tool and was able to wedge it against a steel cabinet. Then I heated the nut up for about 2 beers and laid on top of the engine while a 200 lb person hung off the cheater bar ... the noise it made was amazing...
If you have the flywheel on you can hold the crank from turning there but I am sure you don't have that on anymore ...
You need to build / buy one of these
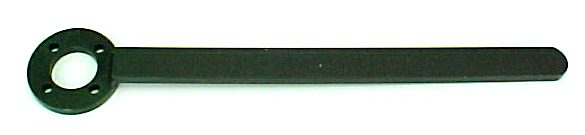

-
Well I was lucky enough to borrow the bmw tool and was able to wedge it against a steel cabinet. Then I heated the nut up for about 2 beers and laid on top of the engine while a 200 lb person hung off the cheater bar ... the noise it made was amazing...
If you have the flywheel on you can hold the crank from turning there but I am sure you don't have that on anymore ...
You need to build / buy one of these
Now to find someone to borrow one of these suckers from. No one comes to mind though unfortunately=( This is truly frustrating.
-
Some slight updates from the weekend.
I didn't get quite as much as I wanted done but it is okay. The only thing I didn't get done is running some airline for the front, but that is a quick affair.
I started by getting the car off the ground and removing the coils.

The fender wells just needed a little cleaning. It was hard to capture but they were very dusty and there was a layer of road debris on everything.
Before:

After:

Out with the old and in with the new=)

I then forgot to take pictures of them completely installed with the new ///M style extended sway bar endlinks. The only thing I don't quite like the design of is the camber plates. There is plenty of adjustment, but the camber adjustment can only be done with them dropped down. You cannot access the screw once they're installed.
After that I threw on the remaining front studs, the fenders, and mounted the Breytons.

Then I lowered it on some wood to get the jack out from under the subframe.

This is with zero camber dialed in. I have to say that a 17x9.5 et14 fits perfect. I can camber these in just how I want. I also noticed that I have over an inch of clearance between the strut body and the barrels. That means I can go at least an inch wider up front. We will see if that happens=)
Josh (Merl) also came over to help me remove the crank bolt with the bmw tool. We snapped the handle off.....oops. My buddy Kyle (kyletime666) works at an engine shop so I threw him some money and had him get it off. It took him a ton of heat and a 3/4" impact to get it off. I also had him board sand my head to give it some bite into the new headgasket.


I then removed the timing cover and called it a day because it was 11:30pm=D

I will inspect the chain guides Wednesday and order any that I need. I'll also run the air line for the front struts so everything is ready to be plugged into the VU4 manifold when the time comes.
Sometime during the day I ran and picked up the bumper. I threw it on and got a crappy picture around 11:00pm. lol

I am a fan=) It made me decide that the wiper needs to be shaved now though. lol
More to come after Wednesday.
-
Still don't like the stretch, but that front fitment looks really cool. What is blocking the camber adjustment screw? Can it be modified or cut away to gain access? Dropping the assembly every time for sdjustment is retarded.
Do you have an ETA yet? you think it will be on the road before you have to put it away for winter?
-
I need it done for H20 which is September 26th. Hopefully I make it.
The front will get cambered for the fender to sit between the lip and tire. Should look nice=)
The strut tower hole isn't large enough to show the screws, but I would rather leave it to keep my bay nice and tidy.








Hello! It looks like you're interested in this conversation, but you don't have an account yet.
Getting fed up of having to scroll through the same posts each visit? When you register for an account, you'll always come back to exactly where you were before, and choose to be notified of new replies (either via email, or push notification). You'll also be able to save bookmarks and upvote posts to show your appreciation to other community members.
With your input, this post could be even better 💗
Register Login