
DIY: Refinishing alloy wheels (polished lip)
-
Refinishing alloy wheels DIY by straight6pwr
You are not a professional painter.
You are not using high-quality paint.
If you are unhappy with anything but perfect for your wheels, turn back now.
That being said, you CAN make some really nice wheels all by yourself. They wont be perfect, but damn near. This will be the 3rd set I've refinished, so I'm getting better. This DIY could help you sell your otherwise crappy-looking wheels for more monies!

STEP 1: PREPPING FOR PAINT
In my case, the wheels I started with had many layers of old paint and someone had attempted to start stripping the paint off. The best thing to do in this scenario is to get the wheels media blasted. It will take many, many frustrating hours to get a nice surface with paint stripping, scrapers, sand paper, grinder, etc. I dropped my wheels off at the blaster and had them back in a few days all nice and stripped.
Finish before blasting: (This was the BEST of the 4 wheels. Notice the orange paint layer in the barrel.)

Sand blasted surface:


STEP 2: GATHERING SUPPLIES
What I used-
180 grit sandpaper
300 grit sandpaper
600 grit sandpaper
1000 grit sandpaper
0 coarseness steel wool
aluminum polish
clothes, rags, etc
power drill paint stripper attachment
clean metal primer (3 cans)
duplicolor wheel paint (4 cans)
duplicolor wheel clear (4 cans)
I think I spent about $100 in supplies.

STEP 3: POLISHING THE LIP
If you arent polishing anything, skip this step. But since you are a classy fellow, you probably are.
Basically, you'll work your way from course sand paper to the steel wool and finally a cloth to polish the wheel lips. If the blaster missed any primer (mine did, that bum) take your paint stripped wheel (power tools, huzzah!) and make quick work of it before starting. Also, if your wheel has any curb rash, try grinding it as smooth as possible without taking huge portions of metal off. I used a Dremel to smooth them.
180 - 300 - 600 - 1000 - steel wool with polish - cloth with polish - cloth dry
This is the hardest part of this DIY. Lots of sore shoulder breaks, quitting, etc. To avoid complete muscle failure, I tried to keep my polishing sessions to about an hour a day after work for a couple weeks whenever I had a chance.
After 180 grit:

After 300 grit:

After 600 grit:

After 1000 grit:

Dan

-
After steel wool and cloth:

Now, relish in your mighty ability to turn rough metal into something worthy of Nelly's grill. To protect your awesome work, tape over your polished area with painters tape for the painting.
Do the edge where the paint will meet first, and very carefully

Then do the rest

STEP 4: LET THE AEROSOL FLOW
Now that you have your wheels stripped, and the lip polished, its time for paint.
Start with your clean metal primer on the inside of the wheel. I chose white because silver will cover over white easily. You arent doing body work so you dont need high-contrast. Silver primer would make it hard to see your coverage.
First coat do lightly, concentrating first on getting any hard-to-reach areas like in lug holes, side of spokes, etc.
Second coat lay on heavy
Primed:

Wait for the primer to dry enough to flip it and rest it on the primer. Mine was dry enough for this after a couple hours.
Repeat the process on the front of the wheel.
Face primed:

Make sure to wait the required time before applying your base/clear. The primer I used required 48 hours of dry time before applying any other paint. ITS VERY IMPORTANT AND NOT JUST A SUGGESTION. There are well-educated chemical engineers deciding on the instructions on your cans of paint. I was in no rush to finish my wheels so I used this schedule for painting each wheel:
Day 1: primer back of wheel
Day 2: prime front of wheel
Day 3: base/clear back of wheel
Day 4: base/clear front of wheel
If you are trying to get the wheels done in a more reasonable amount of time so you can start pimping your wheels STAT, you could polish all the wheel lips first, then follow the above schedule but do all 4 wheels at once. You could probably do a set of wheels in a week properly that way.
OK where was I? Oh yeah base/clear:
Make sure there is no dust/debris that found its way onto the surface.
I like to do two light coats followed by a heavy coat for the base. Follow it up immediately with your clear. You can apply many coats (4-7) within the 1 hour typically allotted for spray paint. If you let the base dry, you will have to wait for it to completely cure before doing the clear (7 days or some such crap). For the clear, I usually do one light coat, followed by a heavy coat. Make the heavy coat as heavy as you can without the paint running. That part takes practice, i still screw it up.
Inside with base/clear:

Again, wait for the paint to be a little more than dry to the touch to flip it over. I waited overnight, but a couple hours should suffice.
Face with base/clear:
(IMAGE COMING SOON)
IMPORTANT: Try and remove any masking tape which touches your new paint as soon as possible. You'll have to be super careful (much like playing the board game Operation. BZZZZZT!) to not touch the wet paint, but if you let it dry it may peel away your new paint if you remove it later.
STEP 5: DRINK AND BE MERRY
You've probably f*ed something up, but unlike committing a felony, you can have a do-over so dont sweat it. With this particular set of wheels, I did not follow the proper drying times on the first wheel, so I had to sand down and re-clear the first wheel.
Have a victory beer anyways. (You should have been drinking beer from the get-go, but better late than never)
VICTORY:


Dan
-
Did this last winter but wish I had them blasted. Did it with the tires on and had the bloody fingers to prove it. Stock paint is a bitch to get off, I used 3 different strippers and none took the primer off.
Just the polished lip:

All done:

On the car:

After the drop with the Blizzaks:


1998 328is 5sp projectors w/HIDs and angel eyes, strut brace, x-brace, Prosport gauges, all lights smoked.
2003 325xi auto nothing special but a beast in the snow
-
yeah the oem paint/primer are especially tough to remove. its best to leave it on and just scuff it up before painting. i did my last set with tires on, also makes it more difficult (worth the remounting fee)
Dan
-
I love these threads! Looks like they turned out pretty good.
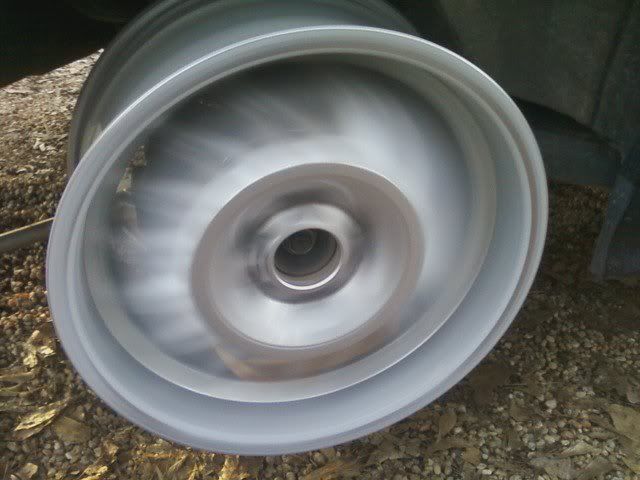
There was a guy on bimmerforums that sanded his lip while the wheel was spinning on his car. Seems like an easier route if anyone else is thinking about doing this. Just watch your fingers!
-
i'd have broken knuckles! the spokes hang out over the lip too much on DS1 wheels (mine) as well as the DS2 pictured spinning. wouldnt dare!
Dan
-
It's definately riskier than the old fashioned way!
-
that was sick, very nice. You should shoot a little video come next time around. you can show off your technique!
-
straight6pwr said:
yeah the oem paint/primer are especially tough to remove. its best to leave it on and just scuff it up before painting. i did my last set with tires on, also makes it more difficult (worth the remounting fee)
Kinda tough to polish the lip with the primer still on. LOL
1998 328is 5sp projectors w/HIDs and angel eyes, strut brace, x-brace, Prosport gauges, all lights smoked.
2003 325xi auto nothing special but a beast in the snow


Hello! It looks like you're interested in this conversation, but you don't have an account yet.
Getting fed up of having to scroll through the same posts each visit? When you register for an account, you'll always come back to exactly where you were before, and choose to be notified of new replies (either via email, or push notification). You'll also be able to save bookmarks and upvote posts to show your appreciation to other community members.
With your input, this post could be even better 💗
Register Login