
Finally Joined the Longroof Club
-
Thats a pretty epic pic!

https://www.instagram.com/_jdesigner_/ http://nevertoolow.tumblr.com/
🥳SOLD BMW E24 633CSI - BMW M30B32 🧪SOLD HCH ES9 - 1.3 LDA
👽BMW E30 325IC - Toyota 1JZ-GTE ⏰ HONDA EF9 CIVIC SI - JDM B18C5
☠️BMW E36 318i - Ford 5.0 FE302 🚴♂️ GT-Labomba - 26x2.75 Freeride
🤹♀️SOLD BMW E36/7 Z3 - BMW M54B25 🧓SOLD BMW E10 2002 - BMW M10M05 -
In my quest for maximum practicality I added a trailer hitch over the weekend. I went with a Curt 11771 1.25" class 1 hitch receiver. It basically bolts right up and only some slight trimming of one of the underbody panels is required which is nice. Apparently you don't need to remove the bumper cover to do this, but the person writing the instructions either had tiny hands or some magic combination of extensions...

My main reason for this is to switch from my roof bike rack to a hitch mounted bike rack, but the ability to also use a cargo tray and pull small trailers (if I add some trailer light wiring) will be really useful. It may not be the prettiest addition, but it honestly doesn't look nearly as bad as I thought it would.

-
Nice! I've never been able to install a BMW hitch that didn't require removing the bumper. Mighty mouse must have written the instructions.
-
super functional upgrade!
for the roof rack t-slot: in the world of fishing kayaks, t-slot rails have become quite popular. there are probably several iterations of the 't-bolt' but this is what you can find:
they fit the t-slot on my e34 roof rails perfectly.
search 't-bolt' or 't-slot bolt' on amazon, ebay, etc.
Dan

-
Fits great, well worth the practicality for sure. Any big road trips planned?
Not at the moment, might be taking it out to the east coast in November but that's the only one on my radar for now!
super functional upgrade!
for the roof rack t-slot: in the world of fishing kayaks, t-slot rails have become quite popular. there are probably several iterations of the 't-bolt' but this is what you can find:
they fit the t-slot on my e34 roof rails perfectly.
search 't-bolt' or 't-slot bolt' on amazon, ebay, etc.
Thanks for the info! I had tried to do some looking and didn't come up with much. I ended up cobbling together some random bits from the hardware store a few weeks ago, but I'm not loving how it came out. At best it will hold me over until I have the funds to buy the hitch adapter bit for my rack. A better solution would be fantastic for when I have other things to mount up there
-
I ended up cobbling
Didn't realize you knew how to fix shoes. Does that make you related to Micheal Schumacher?

E91 328xi - F15 X5 40e - Hopes and dreams of eventually having a cool car
-

https://www.instagram.com/_jdesigner_/ http://nevertoolow.tumblr.com/
🥳SOLD BMW E24 633CSI - BMW M30B32 🧪SOLD HCH ES9 - 1.3 LDA
👽BMW E30 325IC - Toyota 1JZ-GTE ⏰ HONDA EF9 CIVIC SI - JDM B18C5
☠️BMW E36 318i - Ford 5.0 FE302 🚴♂️ GT-Labomba - 26x2.75 Freeride
🤹♀️SOLD BMW E36/7 Z3 - BMW M54B25 🧓SOLD BMW E10 2002 - BMW M10M05 -
I know the pain... Never mind the price tag... https://www.bimmerworld.com/BimmerWorld-E8X-E9X-Race-Oil-Pan-Assembly.html
They make an S65 oil pan with dipstick retrofit for $1500 that's almost worth it for me.
-
I know the pain... Never mind the price tag... https://www.bimmerworld.com/BimmerWorld-E8X-E9X-Race-Oil-Pan-Assembly.html
They make an S65 oil pan with dipstick retrofit for $1500 that's almost worth it for me.
Lolololol, buy your own dipsticks

-
Lolololol, buy your own dipsticks
You're expectations are way to high.
-
I know the pain... Never mind the price tag... https://www.bimmerworld.com/BimmerWorld-E8X-E9X-Race-Oil-Pan-Assembly.html
They make an S65 oil pan with dipstick retrofit for $1500 that's almost worth it for me.
Ugh, I figured there was something out there, and I can't say I'm surprised that it's a $2k bimmerworld race part...
-
If someone came up with a kit that added an actual dipstick to an n52 I would buy it.
Ugh, I figured there was something out there, and I can't say I'm surprised that it's a $2k bimmerworld race part...
So when's the order getting placed? lol
-
So when's the order getting placed? lol
If I find an extra 2 grand laying around that I didn't know I had and have no other use for I'll let you know haha
-
90.8k
After having a replacement upper windshield trim piece sitting in my garage for at least a year, I finally got around to installing it. The old trim piece was pretty much toast...
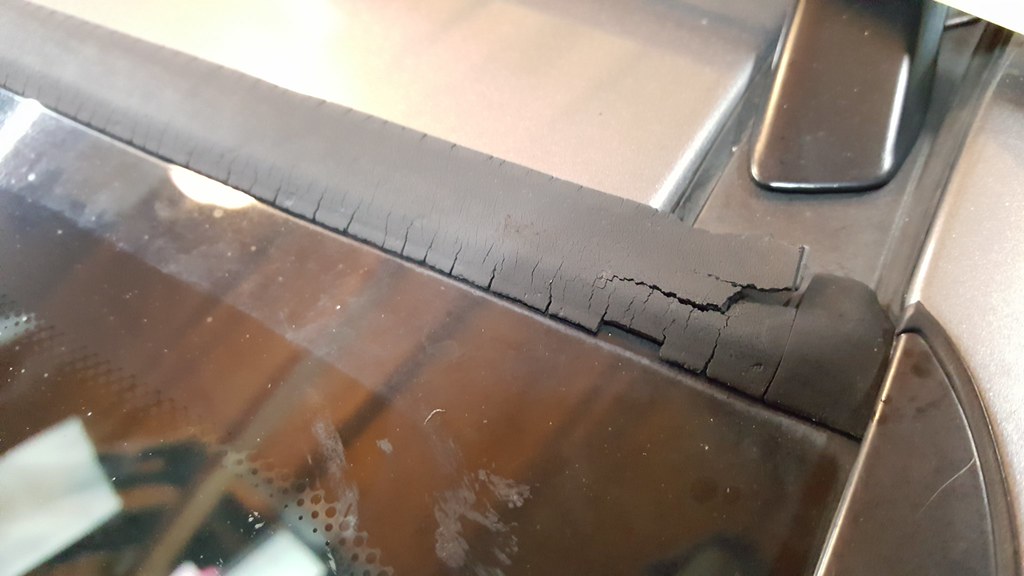
Getting the old one out was a bit of a pain as it came out a lot of tiny pieces. The trim hooks onto the windshield from the top and is held down on the roof by some strong adhesive, so getting the groove and mating surfaces clean is pretty important. Ready for the new trim:
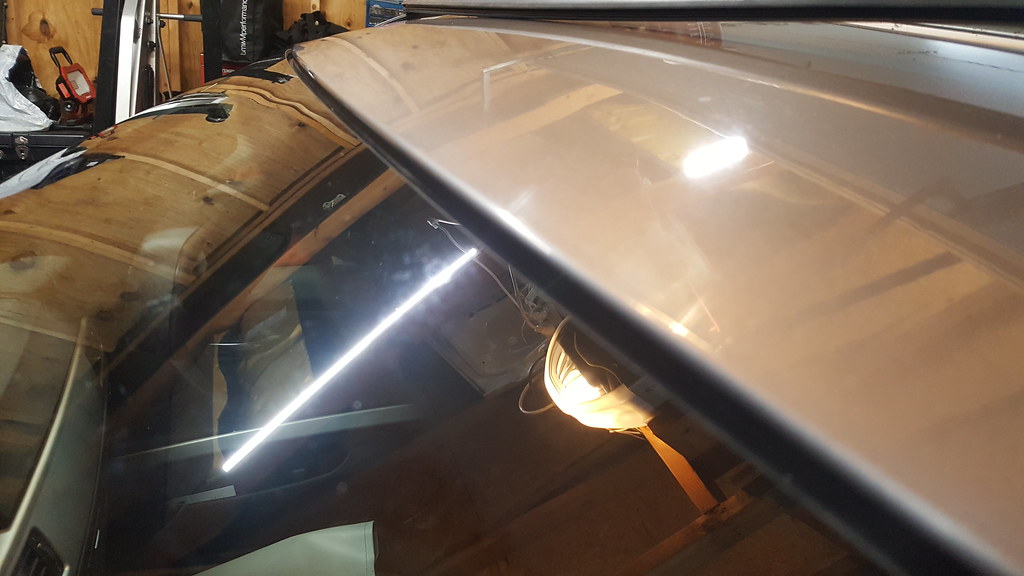
When installing the new piece I found that once you have each end hooked in place, you can work the rest of it into the groove by rocking the top of a dead blow hammer along the front edge of the trim (pressing towards the back of the car). This method got it sitting nice and flat. Last step is to remove the red adhesive backing to stick it to the roof. It looks way better now










Hello! It looks like you're interested in this conversation, but you don't have an account yet.
Getting fed up of having to scroll through the same posts each visit? When you register for an account, you'll always come back to exactly where you were before, and choose to be notified of new replies (either via email, or push notification). You'll also be able to save bookmarks and upvote posts to show your appreciation to other community members.
With your input, this post could be even better 💗
Register Login