
Alpine e30 progress/build thread
-
I would imagine it’s identical to bleeding brakes.
I think it can be done similarly, but the struggle comes from BMW putting the slave bleed valve on the bottom where air doesn't like to go... people try everything from pressure/vacuum bleeding, reverse bleeding, gravity bleeding, removing the slave and compressing it by hand with the bleeder pointed upwards, etc. etc. There are probably as many threads on clutch bleeding as there are for "what oil should I use?"...
-
I think it can be done similarly, but the struggle comes from BMW putting the slave bleed valve on the bottom where air doesn't like to go... people try everything from pressure/vacuum bleeding, reverse bleeding, gravity bleeding, removing the slave and compressing it by hand with the bleeder pointed upwards, etc. etc. There are probably as many threads on clutch bleeding as there are for "what oil should I use?"...
I’ve done it a few times and I’ve always just done it like brakes
-
I think it can be done similarly, but the struggle comes from BMW putting the slave bleed valve on the bottom where air doesn't like to go... people try everything from pressure/vacuum bleeding, reverse bleeding, gravity bleeding, removing the slave and compressing it by hand with the bleeder pointed upwards, etc. etc. There are probably as many threads on clutch bleeding as there are for "what oil should I use?"...
I got one of those reverse bleeders because the last time I tried bleeding it didn't go so well.
-
If you are patient the clutch will usually bleed itself. Fill with fluid and work on other things. Walk past and pump the pedal a few times every 15 minutes. You will see the bubbles rising into the reservoir. Before you get everything else done your clutch will be air free and work perfect. Sounds crazy but I have done it that way on everything from an e24 to e36 including when master, slave, and lines are all brand new.
Good info on the hose to the bottom of the tank. What tank part number did you use?
-
This^

https://www.instagram.com/_jdesigner_/ http://nevertoolow.tumblr.com/
🥳SOLD BMW E24 633CSI - BMW M30B32 🧪SOLD HCH ES9 - 1.3 LDA
👽BMW E30 325IC - Toyota 1JZ-GTE ⏰ HONDA EF9 CIVIC SI - JDM B18C5
☠️BMW E36 318i - Ford 5.0 FE302 🚴♂️ GT-Labomba - 26x2.75 Freeride
🤹♀️SOLD BMW E36/7 Z3 - BMW M54B25 🧓SOLD BMW E10 2002 - BMW M10M05 -
If you are patient the clutch will usually bleed itself. Fill with fluid and work on other things. Walk past and pump the pedal a few times every 15 minutes. You will see the bubbles rising into the reservoir. Before you get everything else done your clutch will be air free and work perfect. Sounds crazy but I have done it that way on everything from an e24 to e36 including when master, slave, and lines are all brand new.
Good info on the hose to the bottom of the tank. What tank part number did you use?
So do you open the bleed screw at all? Or basically just pump the pedal a bunch of times over a day or two?
For the tank, I used a Canton 80-202. It has a 2 quart capacity so should be more than big enough for the M54 and other BMW I6's based on their sizing guidelines.
-
Nope, I don't open the bleed screw at all. I suppose you could open it until fluid comes out which might speed up the process.
Excellent I will pick one of those tanks up. I overhauled everything in my cooling system except the tank itself. Thanks for the info.
-
I spent some nights after work last week (flickr was down for maintenance, no pics is no fun) and the long weekend getting things done on the car.
Intake support and hot air intake built! I used a K&N filter, 3.5" 45 degree silicone elbow, a piece of 3.5" exhaust tube, and some flat bar to secure the filter in place. I have since painted the mount black and reinstalled. It will need a heat shield eventually but for now this will work perfectly.

I also finished the oil catch can setup and mounting. The catch can is one from Turner with a Radium Engineering PCV valve on the output. It uses a 1/2" hose from the valve cover and then a 3/8" hose as a return back to the vacuum distribution manifold on the intake. The catch can came with a few universal mounts that I used to mount it near the strut tower on the passenger side with a bit of tweaking. Access to drain the can is great as well.

I also painted and re-installed the passenger side headlight cover I made recently and got the coolant expansion tank mounted. I put some thin foam material between the tank and headlight panel to prevent any rattling as well. With it all bolted down tight it is super secure. I finished routing the hoses as well, lots of zip ties but it looks nice. I might try and find something better than a million zip ties in the future, but for now it works perfectly.

I got the skid plate mounts welded to the chassis too. Mocked everything up and used a wire wheel to take the surfaces to be welded down to bare metal. I didn't love how the mounts covered some of the holes in the frame rail so I notched them out to allow proper drainage. One hole is completely covered so I closed it off with seam sealer before fitting up the mounts for final welding. I'm hoping to avoid any water getting trapped between the mounts and the frame and causing rust issues down the road.
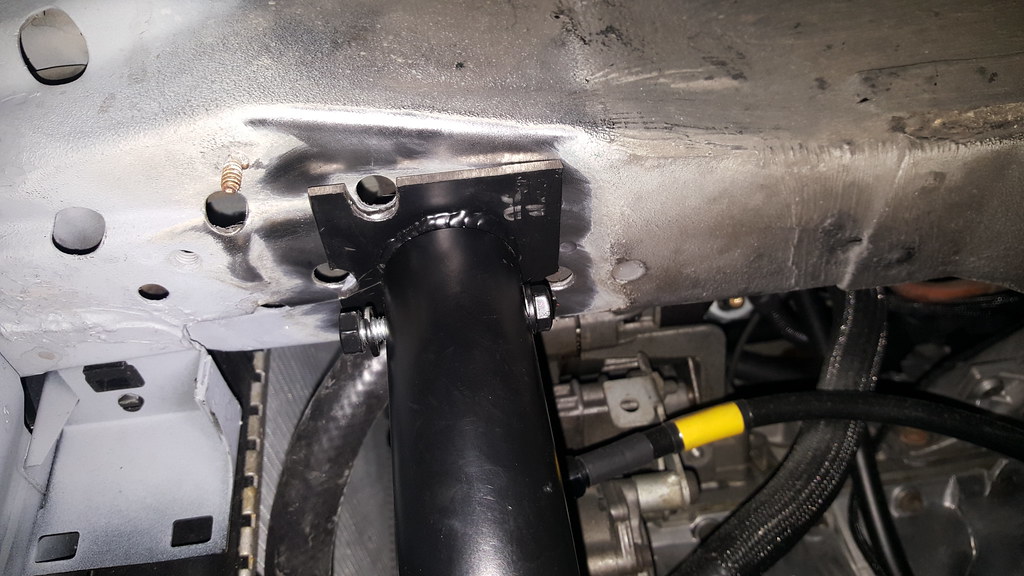
Broke out the really hot glue gun and got them welded up for good. Started the car on fire a few times, but other than that it went fairly smoothly. Some angles (not to mention being upside down) made it a bit difficult, but overall it went well. I'm definitely improving with this welding stuff but still have a long ways to go.

Once they cooled off and I could confirm the car wasn't going to start on fire anymore, I got them masked up and primed followed by a coat of seam sealer over the welds and around the drain holes to close everything off. Once that is dry I'll hit it with a coat or two of rubberized undercoating and it will be good to go!
Other things accomplished but don't have pics:
- Changed the transmission fluid with a fresh fill of Redline D4 ATF (and a little bit of Redline 75w90ns because I ran out of ATF, they're ok to mix).
- Worked on bleeding the clutch with @jc43089's method over the last few days. I am starting to get a half decent pedal feel but the first inch or two of travel still feels super light. I will keep at it for the next few days.
- Driver's side of the interior reassembled, just need to tidy up the ECU wiring a bit and reinstall the glovebox.
- Grilles are reinstalled (removed the Hella horns for now, will finish the wiring later).
- I started working on the exhaust. I will be running dual 2.25" pipes from the headers back to a Y merge under the center of the car, then a single 3" pipe with a narrow-body glasspack/resonator right after the merge and a magnaflow-style muffler in the usual location at the rear. I had to dent and trim one of the lower pipes on the headers to clear the transmission but it fits decently now. I also started working on muffler placement and routing the header outlets to the merge under the center of the car, planning hanger locations, etc. I am trying to keep the exhaust as tight as possible to the underside of the car so hopefully I don't have any additional ground clearance issues.
Updated to-do list for making it to the picnic (11 days remaining):
- Finish bleeding clutch
- Finish exhaust
- Undercoat skid plate mounts and reinstall plate
- Bleed cooling system
- Reinstall glovebox
- Reinstall hood
- If I have time, swap in the new diff
-
What psi cap did you go with for your overflow? Also the “lev-r-vent” caps make bleeding nice.
If you want max respect at car shows:
-
What psi cap did you go with for your overflow? Also the “lev-r-vent” caps make bleeding nice.
If you want max respect at car shows:
I put an 18PSI cap on (stock for an M54 is a 29psi), which is what German Auto Solutions sells as a "tested improvement", https://germanautosolutions.com/bmw_solutions/cooling_system/12_bar_coolant_cap/product_bmw_12_bar_cap.php. They seem to take their time engineering things instead of just selling random crap as an upgrade so I figured I would give it a shot. I figure worst case scenario it prematurely releases some pressure and I get another cap with a slightly higher rating. The lev-r-vent caps are great, cheap too!
-
Skid-plate is in for good!

With that in I was able to get the cooling system completely plumbed (and secured better than in the pic)and ready to be filled. I also continued to pump the clutch pedal through the evening and all the sudden got a really good pedal feel towards the end of the night. Not sure if it is completely bled yet but the dead spot at the top of the travel is gone and it feels pretty decent. I will just continue to pump it every once in a while until it's time for the first drive.
Updated to-do list for making it to the picnic (8 days remaining):
- Finish exhaust
- Bleed cooling system
- Reinstall glovebox
- Reinstall hood
- If I have time, swap in the new diff
-
Skid-plate is in for good!
With that in I was able to get the cooling system completely plumbed (and secured better than in the pic)and ready to be filled. I also continued to pump the clutch pedal through the evening and all the sudden got a really good pedal feel towards the end of the night. Not sure if it is completely bled yet but the dead spot at the top of the travel is gone and it feels pretty decent. I will just continue to pump it every once in a while until it's time for the first drive.
Updated to-do list for making it to the picnic (8 days remaining):
- Finish exhaust
- Bleed cooling system
- Reinstall glovebox
- Reinstall hood
- If I have time, swap in the new diff
MUST BE NICE

-
No regerts with the Hik Fab skid plate. Money well spent.
What is the gameplan for exhaust ? Are you welding things up or taking it somewhere?
No regerts at all, its a beast! I have absolutely zero concerns about the oil pan now haha
Exhaust plan is to do it all myself. I've got a pile of pipe and some flanges/mufflers/etc to get the job done, I'd say I'm about 20% done at the moment. I'm doing it all out of mild steel to keep costs down for this first attempt. The pan is dual 2.25" piping from the headers to a merge under the center of the car behind the transmission, then single 3" the rest of the way.
-
cosigned on the

Besides internal rusting of the muffler/areas condensation can pool up, I honestly see no issue with a mild steel exhaust system. You can spray high temp clear on it to help with cosmetic surface rust.
I figure that by the time rust becomes a concern I will hopefully have the ability to make a proper full stainless system that will last a long time. I'm considering this a practice run that will hopefully last at least a few years.
-
This weekend was exhausting...
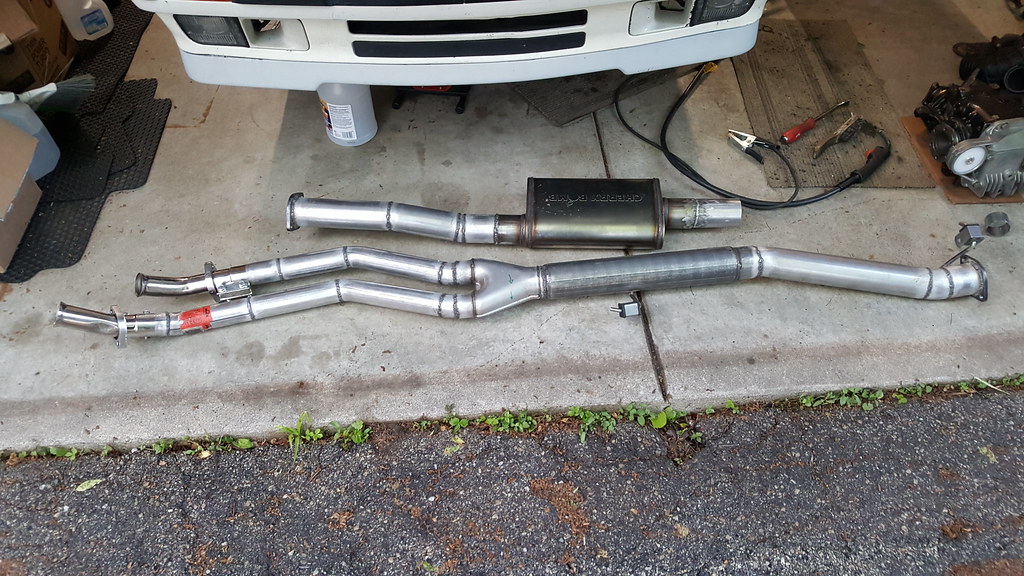
The picture is pre-paint, and without the hanger on the rear section. Despite my ugly welds I'm really happy with how it turned out. The majority of the system is a mix of aluminized steel mandrel beds and straight sections, and the rear muffler and flanges that connect to the headers are stainless. I used some lap-joint band clamps to connect the mid-section to the pipes coming off the headers, and some 309 stainless flux core wire to weld on the muffler. The 309 wire was really difficult to dial in, but is apparently the best way to join dissimilar metals.
And the end result after getting a coat of black high-temp paint:

I managed to keep it pretty snug against the body so I hopefully minimized any ground clearance issues.

Seen here is a post-paint adjustment since the tip was sitting too high and hitting the body. Also seen here is the final install of the newly rebuilt 3.15 LSD (huge thanks to @TehRaydarlover) with a condor diff bushing to match the rest of the car. Just needs a fresh fill of gear oil and the drivetrain will be ready to go!
For the exhaust hangers, I used some generic exhaust hangers and mounted them to one of the heat shield bolts in the middle of the car, the original hanger location on the rear subframe, and then added two nutserts to the frame rail under the trunk floor. They are pretty stiff so the exhaust basically feels like it is solid mounted. Not sure if I love that but the engine is also solid mounted so it should be ok. If it ends up cracking I'll know where to add a flex joint haha.

While I was waiting for paint to dry I mounted the strut brace to finish off the engine bay!

With the exhaust mounted I was able to bleed the cooling system without pissing off all the neighbors. It bled very easily, but unfortunately I need to drain it all again to fix a leak in the upper radiator hose. Bleeding the cooling system was also the first time I ran the engine for an extended period of time. The lifters were pretty loud at first but after a minute or two above 1500 rpm they quieted nicely. It got up to a steady operating temp of around 200F according to the ecu, oil pressure is right in spec too. The exhaust is definitely on the loud side, but its manageable and sounds pretty good so far.
I also decided to make sure everything clears the hood since the PS reservoir and coolant expansion tank sit pretty high, so I got that mounted back up. Maybe not the smartest move because I need to mess with the cooling system still, but it felt good seeing it looking like a complete car again (bonus super cluttered garage shot)
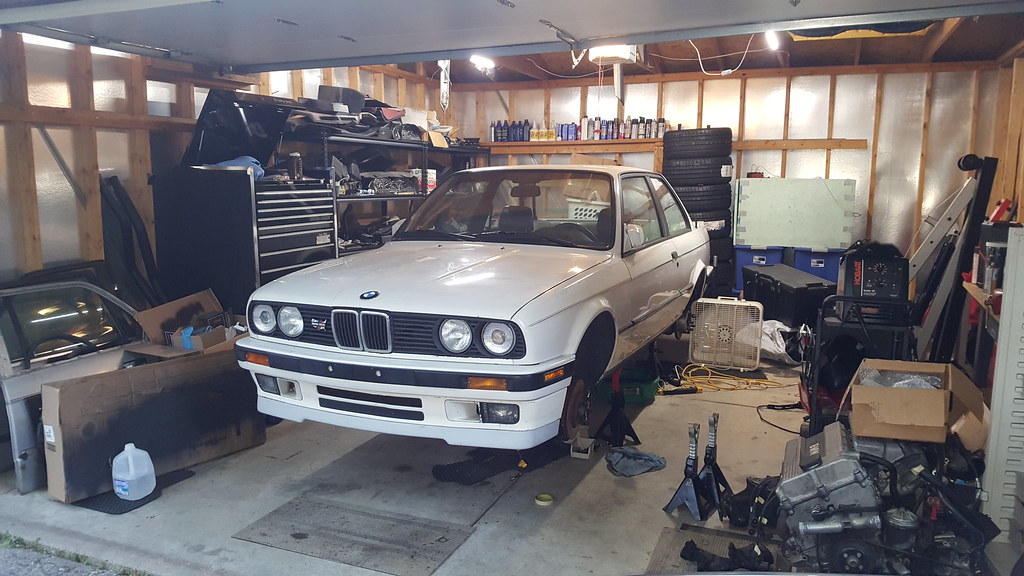
Another issue I've come across is the bleeder screws on the front calipers...again. I just can't get them to seal. I'm hoping there is just some dirt or something causing the leak, but I have a feeling there might be an issue with the caliper itself as this has been a recurring problem with multiple different bleed screws. Hopefully I can get that sorted.
Picnic hit list (5 days remaining):
- Fix leaks and re-bleed cooling system
- Get the front brake caliper bleeders to seal
- Fill the diff
-
Filled the diff with Valvoline synthetic 75w140 so that's ready to go.
I also did some screwing around with the brake caliper bleeders. I pulled both front bleeders out and let the fluid run for a bit to try and flush out any dirt. There was a little bit of dirt and wear on the seats so I cleaned up some newer bleeders as best I could and swapped them in. Held some decent pressure on the brakes and they seem to be sealed so far, haven't tried with the engine running yet though. Fingers crossed that it's resolved!
I noticed that the brake lights are always on unless I pull up on the pedal, so I'll need to adjust the brake light switch a bit before any driving.
Picnic hit list (3 days remaining):
- Fix leaks and re-bleed cooling system
- Verify brakes aren't leaking
- Adjust brake light switch
- Maybe clean it
-
Sounds like you are right on schedule!
Hopefully! Can't work on it tonight, but the o-rings I need to fix the radiator hose leak are showing up today (thanks mcmaster!) and I can work on it tomorrow-Friday in the evenings. I am planning to go to the garage tomorrow after work and not quit till I've at least driven it around the block.





Hello! It looks like you're interested in this conversation, but you don't have an account yet.
Getting fed up of having to scroll through the same posts each visit? When you register for an account, you'll always come back to exactly where you were before, and choose to be notified of new replies (either via email, or push notification). You'll also be able to save bookmarks and upvote posts to show your appreciation to other community members.
With your input, this post could be even better 💗
Register Login