Skip to content
  • Categories
  • Recent
  • Tags
  • Popular
  • Users
  • Groups
Skins
  • Light
  • Brite
  • Cerulean
  • Cosmo
  • Flatly
  • Journal
  • Litera
  • Lumen
  • Lux
  • Materia
  • Minty
  • Morph
  • Pulse
  • Sandstone
  • Simplex
  • Sketchy
  • Spacelab
  • United
  • Yeti
  • Zephyr
  • Dark
  • Cyborg
  • Darkly
  • Quartz
  • Slate
  • Solar
  • Superhero
  • Vapor

  • Default (No Skin)
  • No Skin
Collapse
WIBIMMERS logo

WIBIMMERS

  1. Home
  2. General Discussion
  3. Members BMWs
  4. Alpine e30 progress/build thread

Alpine e30 progress/build thread

Scheduled Pinned Locked Moved Members BMWs
821 Posts 31 Posters 2 Views 1 Watching
  • Oldest to Newest
  • Newest to Oldest
  • Most Votes
Reply
  • Reply as topic
Log in to reply
This topic has been deleted. Only users with topic management privileges can see it.
  • m42b32M
    m42b32M
    m42b32
    wrote on last edited by
    #609

    Thanks for the tips guys! I'll have to look and see what kind of space I have. Pulling the car into the driveway could block one of the people who lives in the house from getting their car in/out of their parking spot so that may be a problem... I'll have to investigate and take some measurements. I just picked up the welded up oil pan so I can get back on this as soon as I get back!

    straight6pwr said:

    joe!!! https://www.r3vlimited.com/board/showthread.php?t=423153

    Ugh... why do these things always have to come up when I just bought something else! That's a pretty decent price, especially since it includes shipping

    1991 318is, 1991 318i, 2022 Bronco

    1 Reply Last reply
    0
    • JdesignJ
      JdesignJ
      Jdesign
      wrote on last edited by
      #610

      Ohhh man. Those style 15's😍

      SumBunny.jpg

      https://www.instagram.com/_jdesigner_/                                          http://nevertoolow.tumblr.com/

      🥳SOLD BMW E24 633CSI - BMW M30B32                                          🧪SOLD HCH  ES9 - 1.3 LDA
      👽BMW E30 325IC - Toyota 1JZ-GTE                                                     ⏰ HONDA EF9 CIVIC SI - JDM B18C5
      ☠️BMW E36 318i - Ford 5.0 FE302                                                         🚴‍♂️ GT-Labomba - 26x2.75 Freeride
      🤹‍♀️SOLD BMW E36/7 Z3 - BMW M54B25                                                🧓SOLD BMW E10 2002 - BMW M10M05

      1 Reply Last reply
      1
      • m42b32M
        m42b32M
        m42b32
        wrote on last edited by
        #611

        Haven't had much time to work on this, but was able to sneak away for an hour today. Got the oil pan back from the welder a week ago, mounted it up with a new gasket for good today:
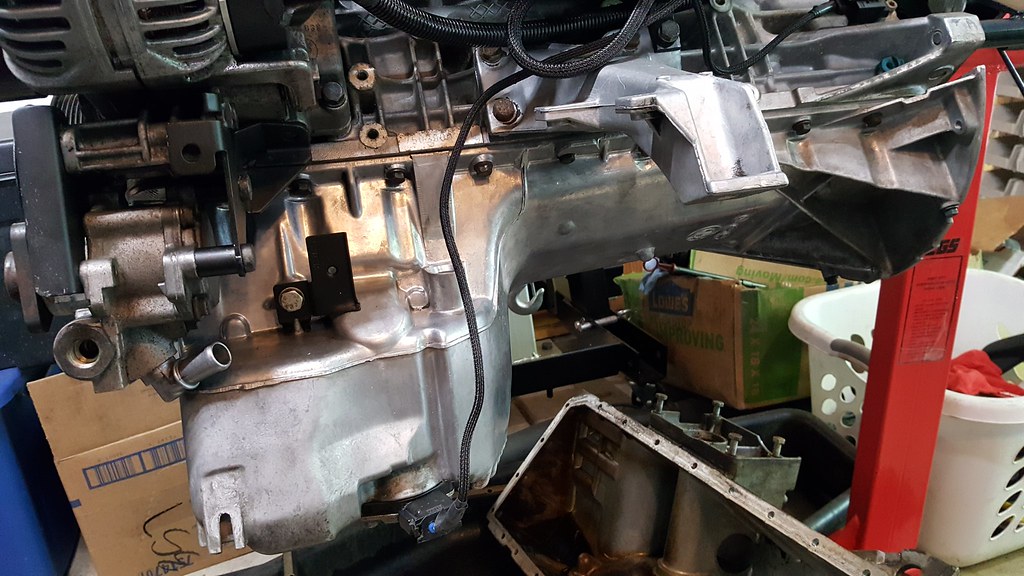
        42385283145abdd10dacbb.jpg

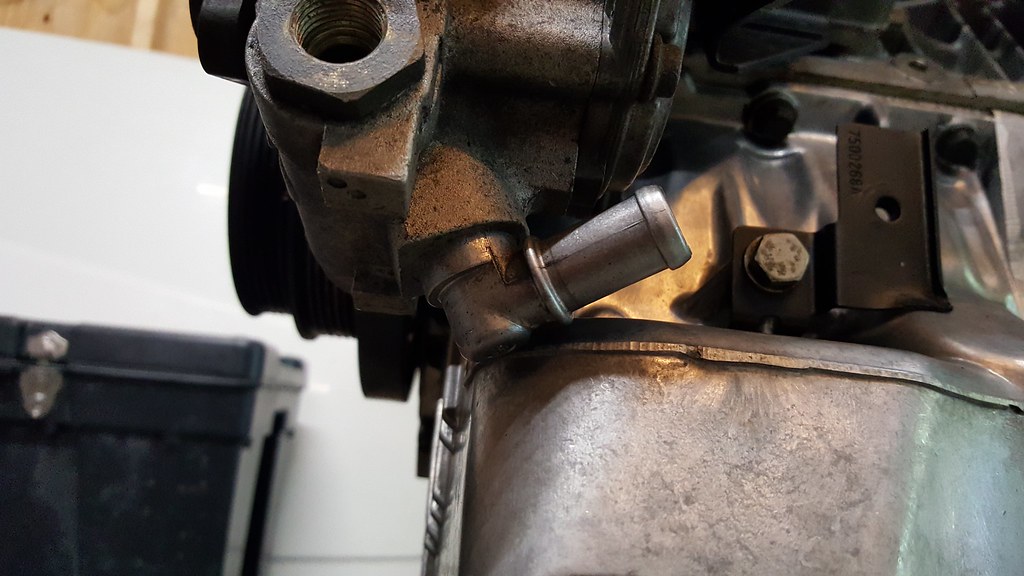
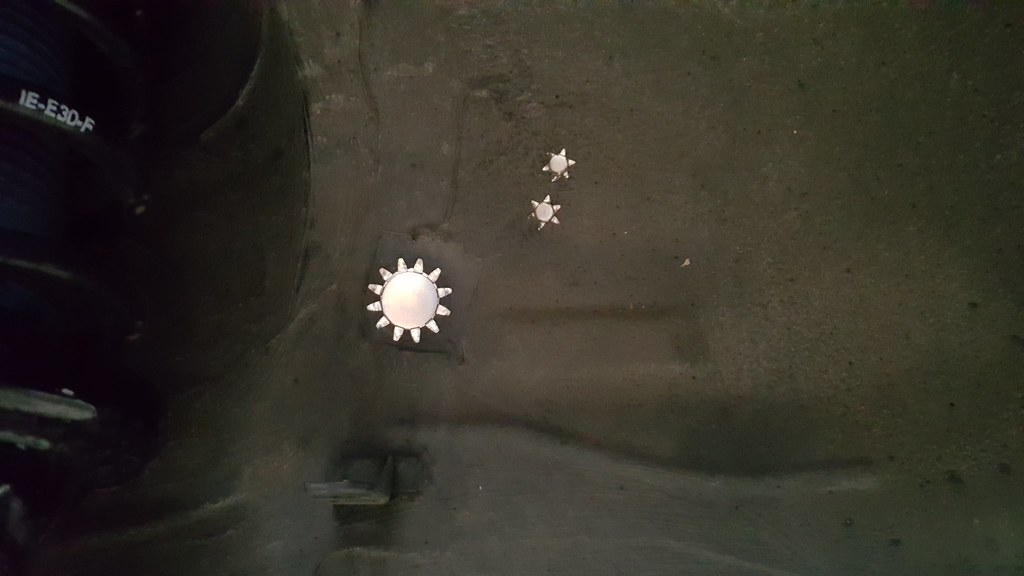
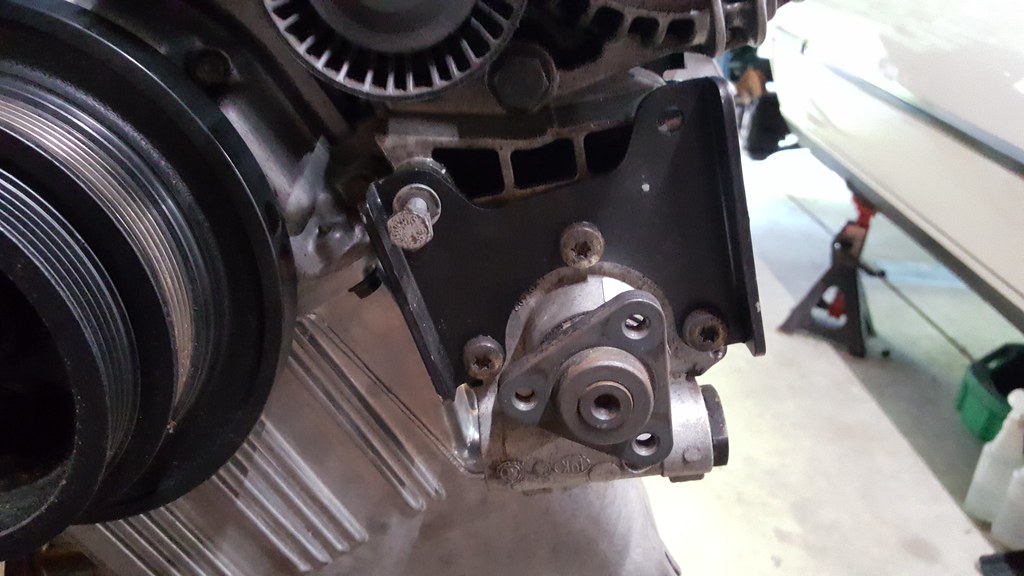
        Then went to test fit the power steering pump:
        2841960852735b049944bb.jpg

        284196085477547597cd8b.jpg

        Damn. The feed line to the pump contacts the oil pan, causing the outer mounting bolt to be misaligned by around 3/4". I haven't heard of anyone having pump mounting issues with the e34 oil pan, so I checked realOEM, and found that BMW has a different part number for the RWD and AWD e46's. You can apparently use both the Luk LF-20 and LF-30 pumps (I have the 30) with this swap, and I would be very surprised if there were actual differences in the pump itself between the different drive types. You can't buy the brackets separately, so I'm thinking the mounting brackets place the pump in a slightly different spot, hence the different part numbers.

        1991 318is, 1991 318i, 2022 Bronco

        1 Reply Last reply
        0
        • EarlE
          EarlE
          Earl
          wrote on last edited by
          #612

          Couldn't you just make yourself a new mounting bracket?

          museum sig 2earl.jpg

          1 Reply Last reply
          0
          • jc43089J
            jc43089J
            jc43089
            wrote on last edited by
            #613

            Redrill the one hole in the mounting bracket?

            2/94 325i Sedan, Arctic Gray: UUC LTW FW, EVO 3 and DSSR, +.020 Maxsil pistons, ASC delete, Eibach shocks/springs, 16" contour reps 238k
            3/93 325i Coupe, Schwarz 2, Sketchy stance action, ebay turbo, 300k
            '89 325i Vert, Alpine White: 5spd swapped, sold.

            '04 Toyota Sienna: 24V to 24V swap in progress

            '05 Volvo V70R, 6spd.  200k
            '85 Toyota LandCruiser: Lifted, gas hog. 205k
            '99 Nissan Maxima: 5spd, Rusty but trusty winter beater. 252k RIP.

            1 Reply Last reply
            1
            • m42b32M
              m42b32M
              m42b32
              wrote on last edited by
              #614

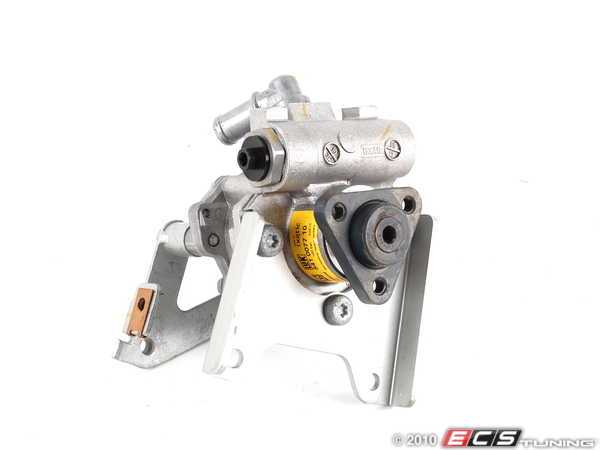
              If I can't get a cheap set of brackets from a rwd car the cut/bend/weld route will be the best bet. The front bracket would be really simple, the rear has a weld nut for the outer bolt, as well as a 90 degree flange that will have to be adjusted to compensate for the rotation of the pump assembly relative to the block. 

              I did some more research and based on pictures comparing my brackets with the brackets from a RWD M54 (and E36 M52, same part), it looks like those will rotate the pump up closer to the underside of the alternator and give me the clearance I need. This picture from ECS (sorry for the upside down comparison) shows the top bolt of the pump much closer to the inner mount hole, compared to my picture above:
              161982x600.jpg

              1991 318is, 1991 318i, 2022 Bronco

              1 Reply Last reply
              0
              • straight6pwrS
                straight6pwrS
                straight6pwr
                wrote on last edited by
                #615

                jc43089 said:

                Redrill the one hole in the mounting bracket?

                yeah, this seems like a no-brainer. if the bolt ends up too close to that side flange to get a wrench on it, you could switch to a socket cap bolt.

                Dan

                yajsYRL.jpg.e5f350b4dfe961d76ac8b32efce2e1a6.jpg

                1 Reply Last reply
                0
                • m42b32M
                  m42b32M
                  m42b32
                  wrote on last edited by
                  #616

                  straight6pwr said:

                  yeah, this seems like a no-brainer. if the bolt ends up too close to that side flange to get a wrench on it, you could switch to a socket cap bolt.

                  The problem is the rear bracket, since that outer bolt just passes through the oil filter housing casting and threads into a second bracket on the back side of the pump.
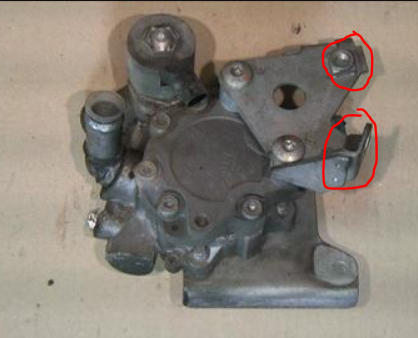
                  image.png

                  Modifying that bracket to match is definitely doable, its just more than drilling a hole since the weld nut either needs to be moved or a new nut welded on, and then once the pump is rotated that flange needs to be cut and welded at the correct angle to mate up with the corresponding hole in the block for that bolt. I think the cleanest solution is just to get the right brackets from a RWD e46 or m52 e36.

                  1991 318is, 1991 318i, 2022 Bronco

                  1 Reply Last reply
                  0
                  • m42b32M
                    m42b32M
                    m42b32
                    wrote on last edited by
                    #617

                    Haven't made any progress on the car in the last few weeks between too many things to do and not enough motivation, BUT I finally ordered a swap harness! This will integrate everything from the gauges to the fuel pump relay, as well as provide an OBD2 port to read data and codes from the ECU and flash new partial tunes without pulling it out of the car. This should greatly simplify the electrical side of things once the motor is in the car. It isn't cheap, but it will save me huge amounts of time over sourcing all the needed pigtails from various e46/e39 body harnesses and getting everything right when wiring it up. I am hoping to spend more time on this again soon, with the goal being having the engine and trans in the car by the end of August.

                    1991 318is, 1991 318i, 2022 Bronco

                    1 Reply Last reply
                    2
                    • m42b32M
                      m42b32M
                      m42b32
                      wrote on last edited by
                      #618

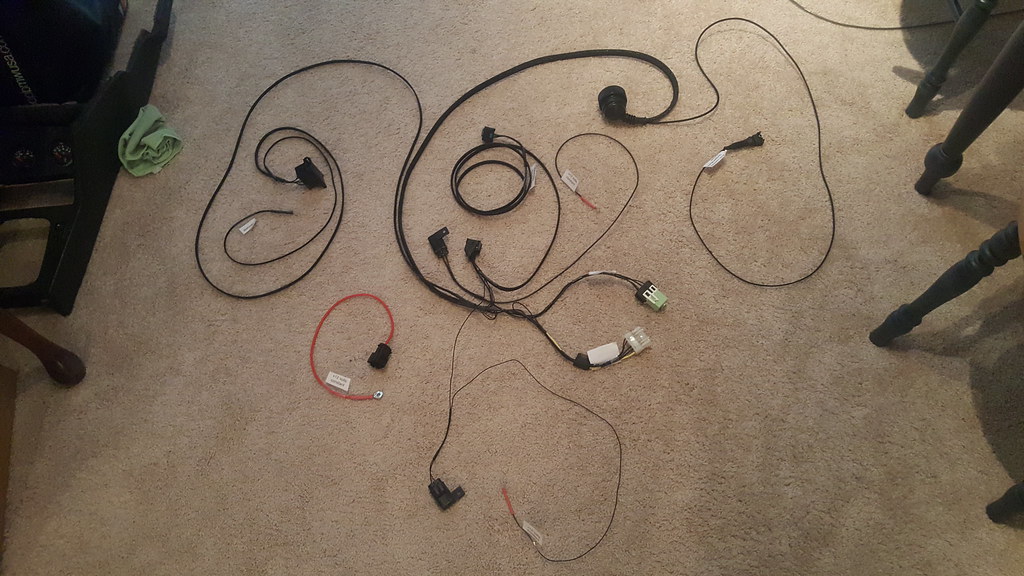
                      Swap harness arrived! The only additional thing I needed to source was the cable running from the B+ junction on the firewall to the positive starter terminal from an m20 car, as the one on a 318is is part of the engine wire harness. 
                      43284392704ea1119beb6b.jpg

                      I decided that the power steering pump brackets can wait until the engine is in the car, so I skipped that for now. Last thing to do while it was on the stand was install the e34 m50 dipstick after a few minor modifications to it's bracket. With that done, I removed the engine from the stand for the last time and started fitting the Gripforce chromoly flywheel and stage 2 clutch (lightest duty option with a sprung hub). However, I was unprepared and didn't have my torque wrench with me for the flywheel bolts, or the appropriate grease for the clutch fork/throwout bearing/etc, so that's where I left off on that. 
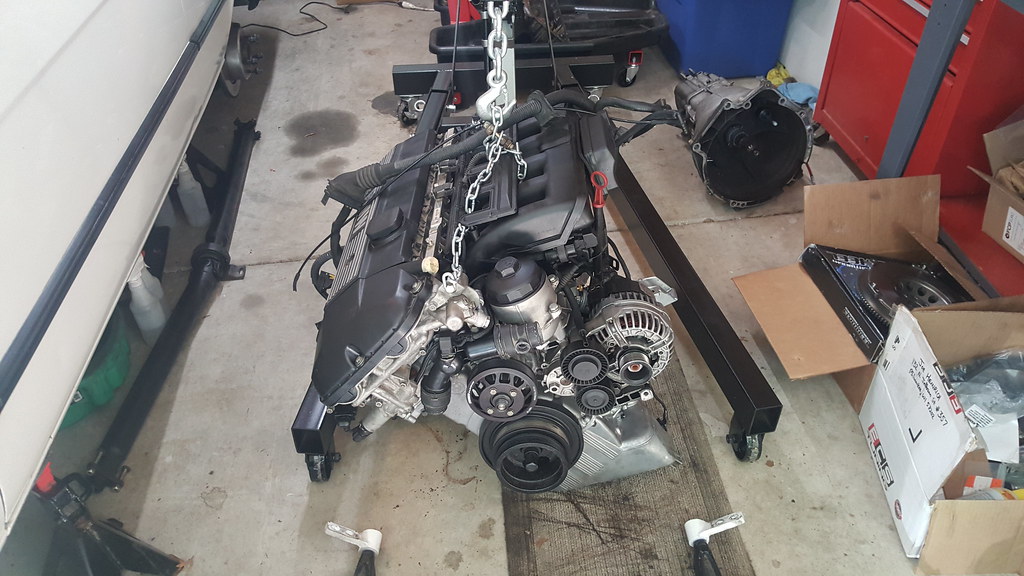
                      432843925043c292f80c5b.jpg

                      I decided that given the overhead room and lack of space in the driveway outside my garage, that the only way this engine is getting into the car is through the bottom. I pulled the front subframe and installed the Condor UHMW swap mounts. All that's left to do in the bay is remove the m42 coil pack brackets on the passenger side strut tower and it will be ready for the engine. 
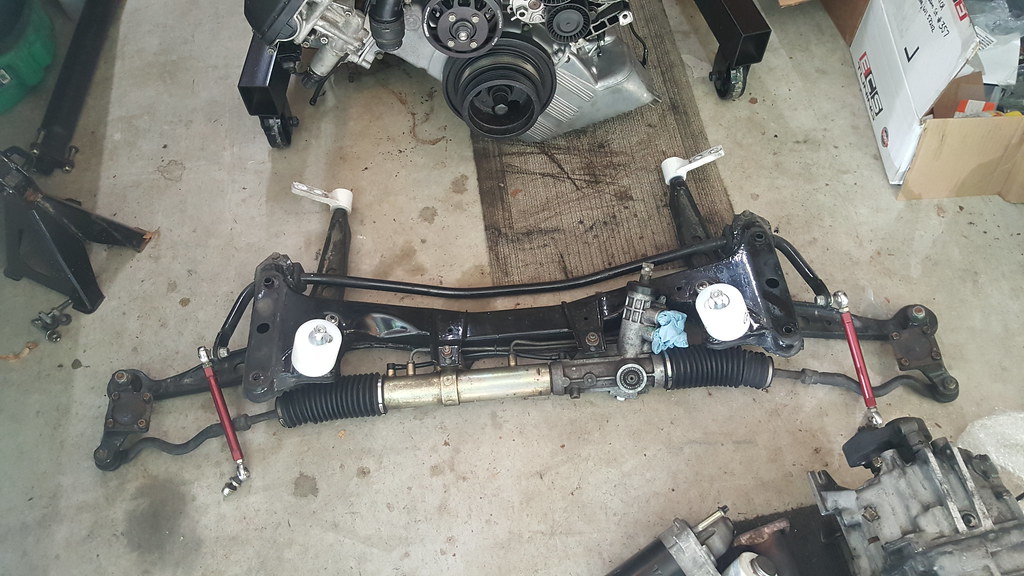
                      432843927645b979df891b.jpg

                      1991 318is, 1991 318i, 2022 Bronco

                      1 Reply Last reply
                      2
                      • m42b32M
                        m42b32M
                        m42b32
                        wrote on last edited by
                        #619

                        After a few very busy months this summer, I was able to get a few nights of working on this after work over the last two or three weeks. Things are finally moving again!

                        I removed the m42 coil pack mounting brackets from the strut tower and inner fender. I also cleaned up some surface rust on the washer tank mount and primed all the bare metal. Had a bit of a mishap on the inner fender and ended up popping two holes where the welds were. 
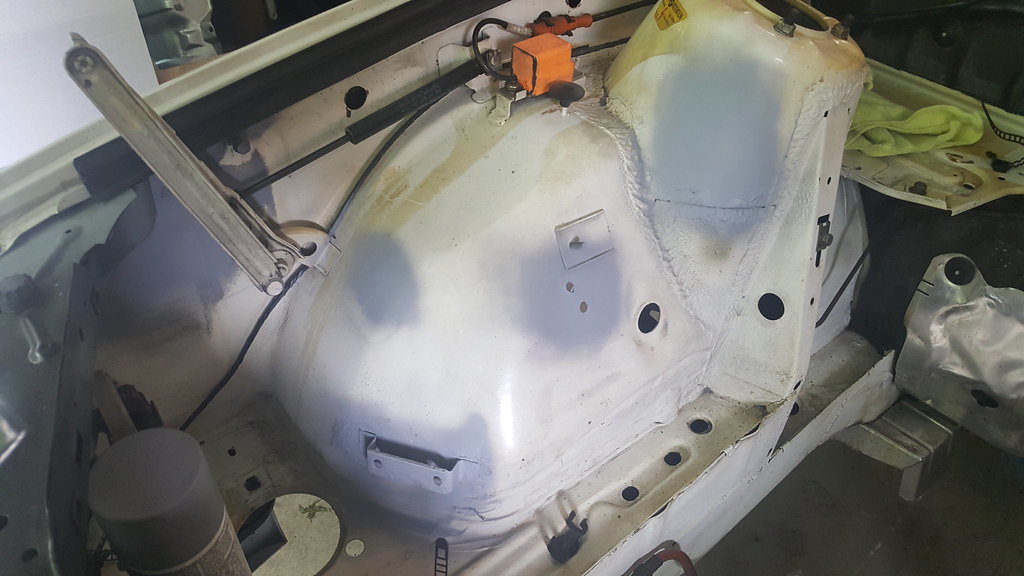
                        4369615621456fb4309a4b.jpg

                        I plugged the holes with some flat steel plugs. Because I deleted ABS I also plugged the holes where the wheel speed sensors passed through on both sides. I like these metal plugs because you can fold the ears flat on the back and lock them into place, they sit flush, and can be removed any time you want the hole back. 
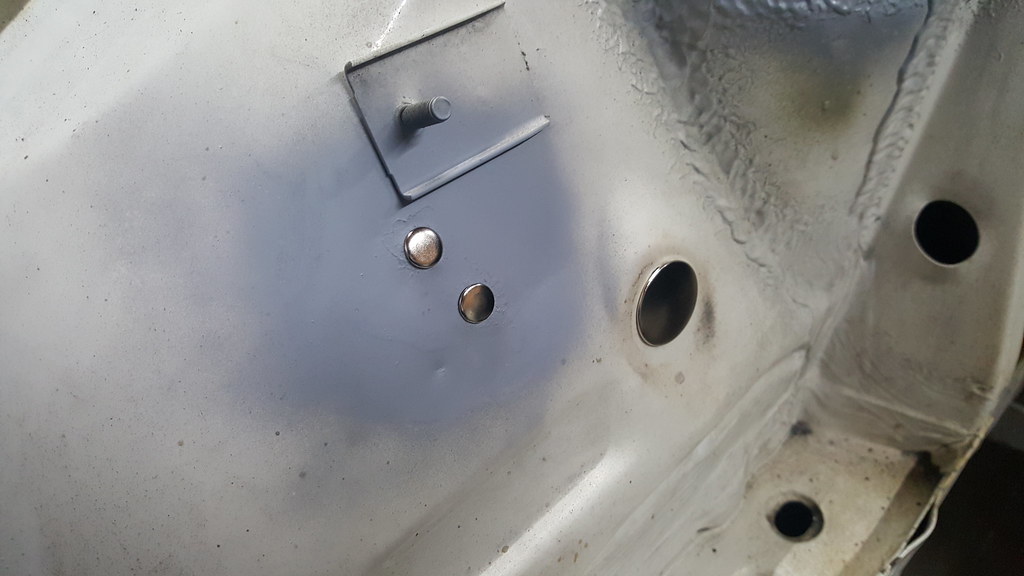
                        448088925917aefb7e349b.jpg

                        29871917117298b87d88ab.jpg

                        I also sprayed a coat of undercoating on the backs to seal everything up. 

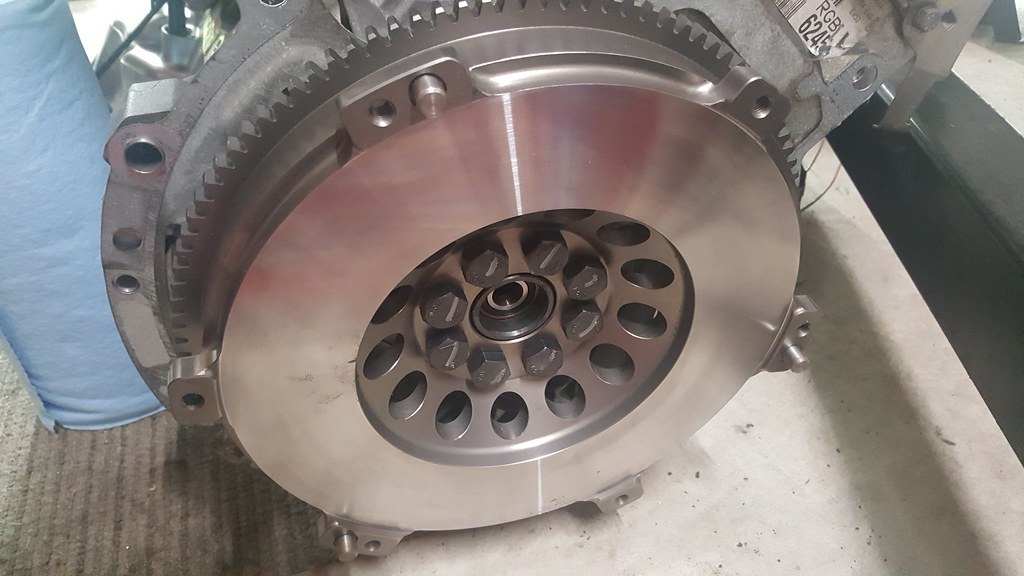
                        With the engine bay ready to go, I got to work on prepping the engine. Pilot bearing installed, Gripforce chromoly flywheel cleaned, installed with loctite and torqued to spec:
                        30545387958975d8f95d7b.jpg

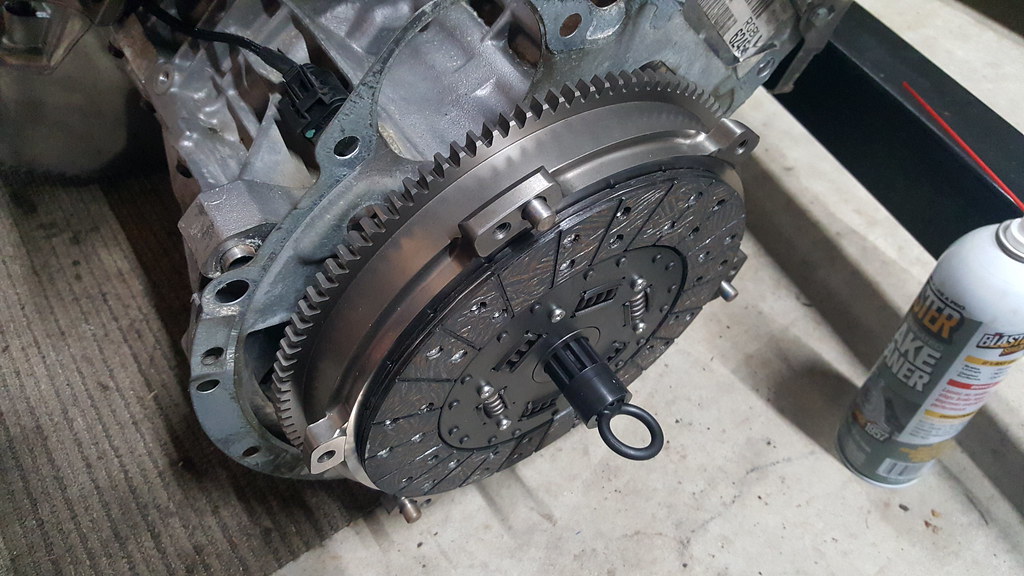
                        There was a lot of conflicting information on which way to install the Gripforce stage 2 (sprung hub) clutch disk, but this orientation seemed to be the majority of responses. Hopefully that's correct...
                        44808890501243436ea34b.jpg

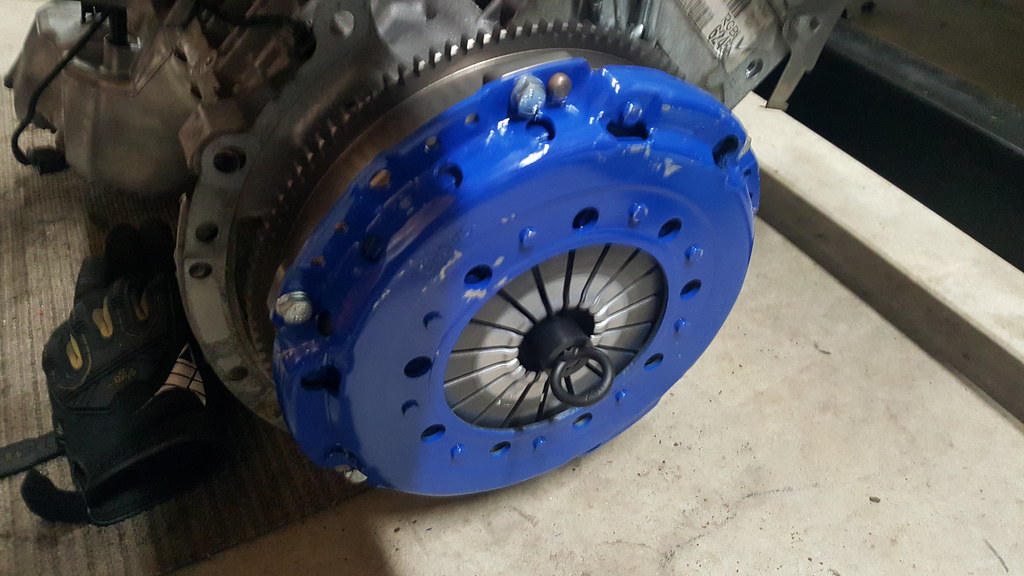
                        Pressure plate installed with loctite and torqued.
                        4475905447205456099d9b.jpg

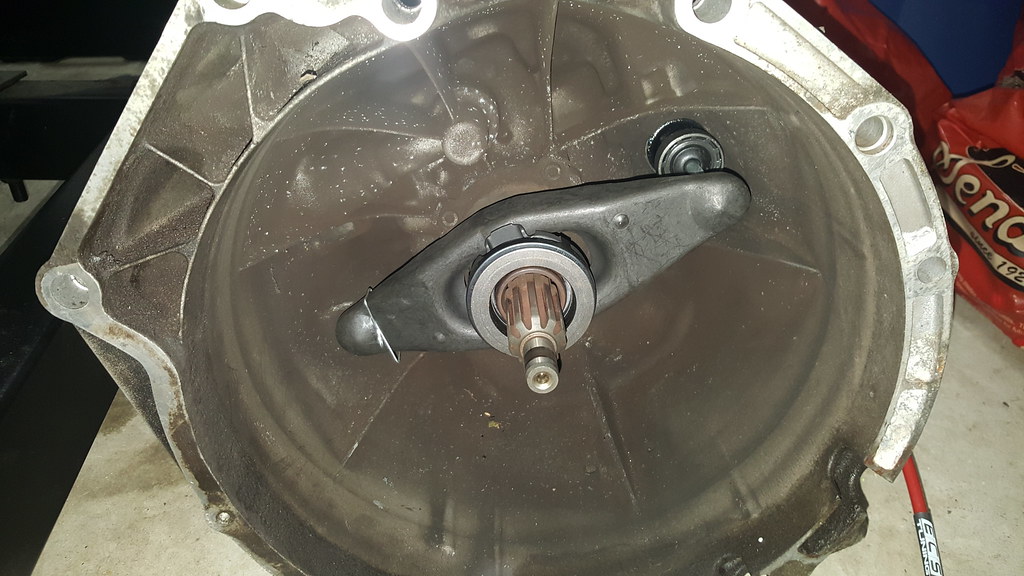
                        Got everything sorted on the transmission side as well with a new clutch fork, quality throwout bearing, and a steel pivot pin from an e39 540i. 
                        44808887091d0830aaf2bb.jpg

                        I didn't have a furniture dolly to roll the engine under the car with the transmission attached, and didn't have enough room to hoist the engine into the car with the garage door open, so I had to take a bit of a convoluted route... Here is a bit of a DIY if you're in this exact scenario with the same tools:

                        Step one: Hoist engine into the bay from the side with the garage door closed
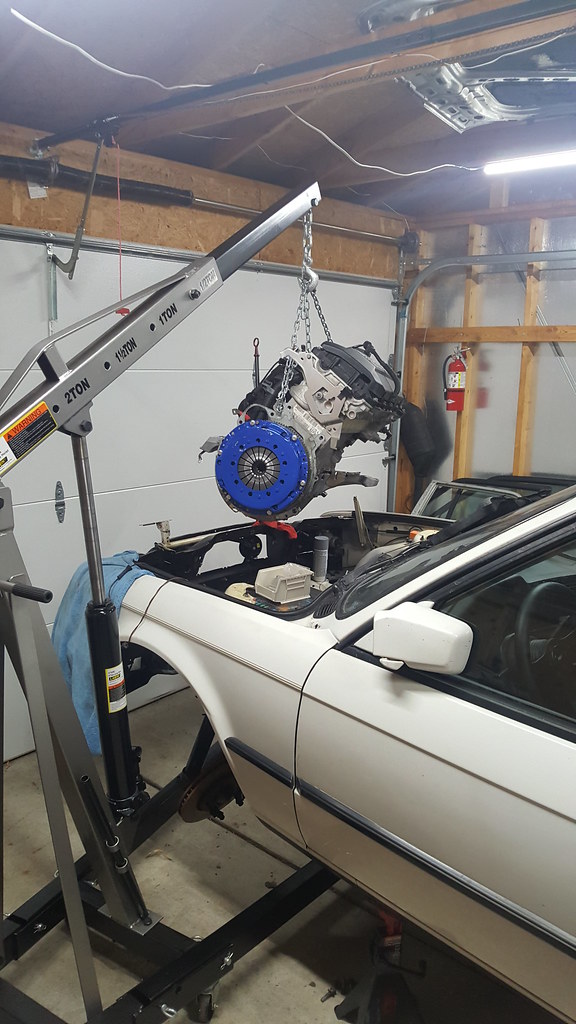
                        4475904781256f8925846b.jpg

                        Step two: Lower the engine as low as it can go without sitting on the arms of the hoist, support weight with engine support bar
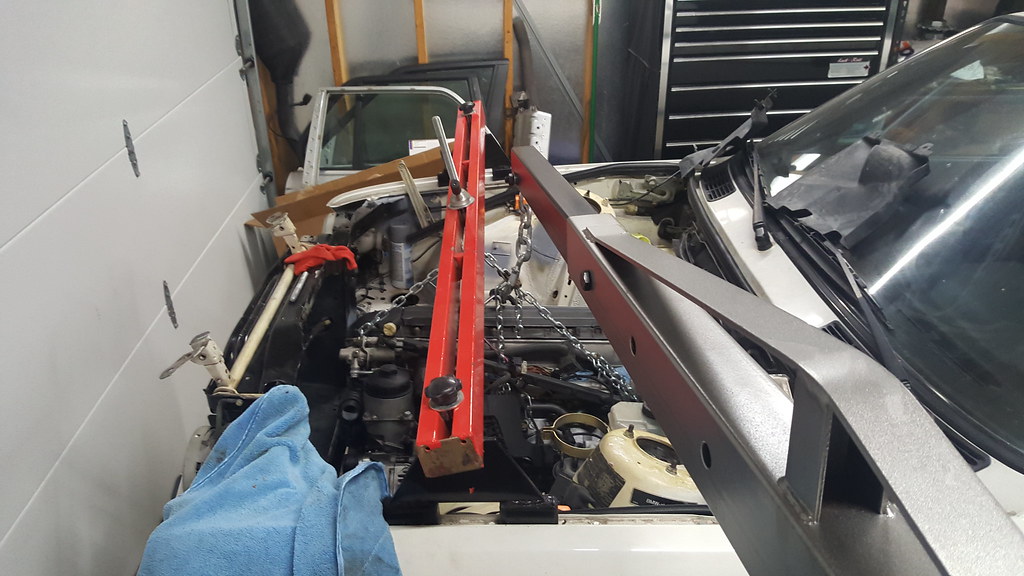
                        29871902577aaf2526c0eb.jpg

                        Step three: Open garage door, rotate hoist to front of car and lower engine all the way through the bay onto the floor:
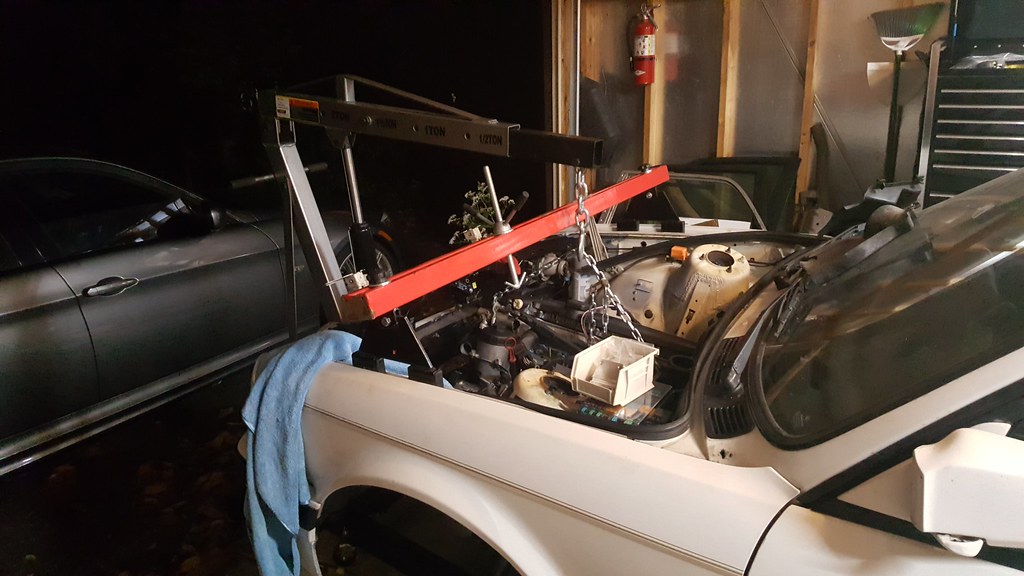
                        43898779485832135b27cb.jpg

                        Step four: Move transmission underneath the car and struggle to mate it up with the engine, succeeding eventually:
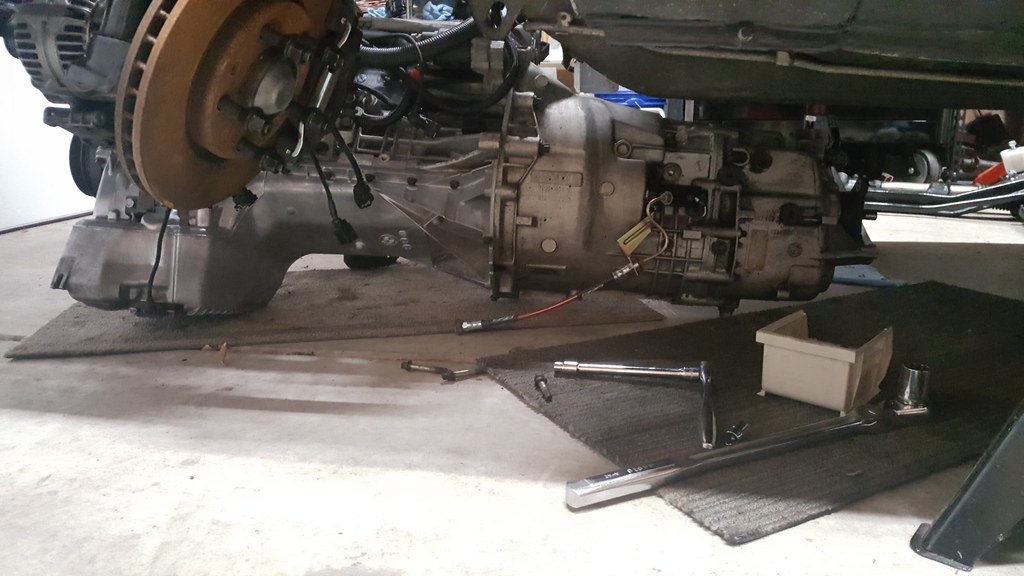
                        44808878621c8dd4463bfb.jpg

                        Step five: Realize you're an idiot and forgot to grease the clutch splines, pull it apart and apply light coat of moly grease. I have never done a clutch on my own (last time I helped with one was at least 5 or 6 years ago at my old job)... everything I read said use a very light coat to avoid having grease flung into the clutch. Hopefully this is enough.
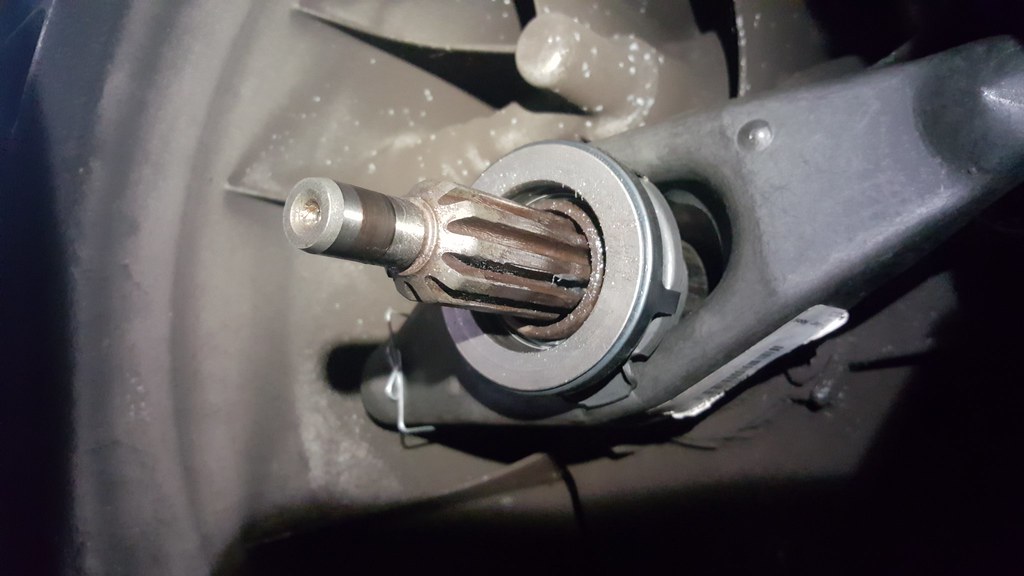
                        440891689446bda4488a6b.jpg

                        Step six: Reinstall transmission, install starter, realize it's after midnight, leave it at that and go to bed. 
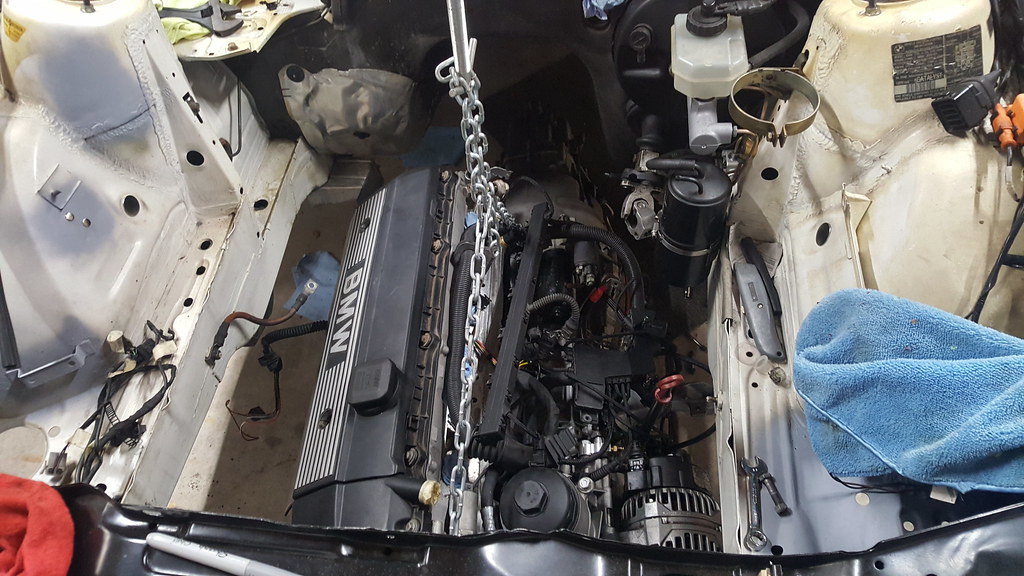
                        42997700400e20224e7e8b.jpg

                        Step seven: Return about a week later, full of energy, and lift engine into place and reinstall front subframe underneath engine. 

                        I had to remove one of the plastic clips holding the passenger front brake line to the firewall as well as a wire harness mount from the back of the head to get the engine to sit back far enough. I also had a bit of a fight with the condor swap mounts to get things to line up properly. They didn't seem to sit flat despite putting them in various different orientations. I ended up finding a note on a forum post somewhere from them stating to leave everything loose, and tighten down the bottom nuts on the engine mounts one turn at a time (alternating sides) to center the engine, then trans mounts, and then top nuts on the engine mounts. I got the trans mount installed loosely to keep everything straight, and then went through and tightened everything down per their instructions. I did have one of the engine mount bolts start to spin, but it's tight and not going anywhere so it should be fine. If I do need to get it off, there is more than enough resistance for an impact to zip it off. 

                        And with that, it's in!! 
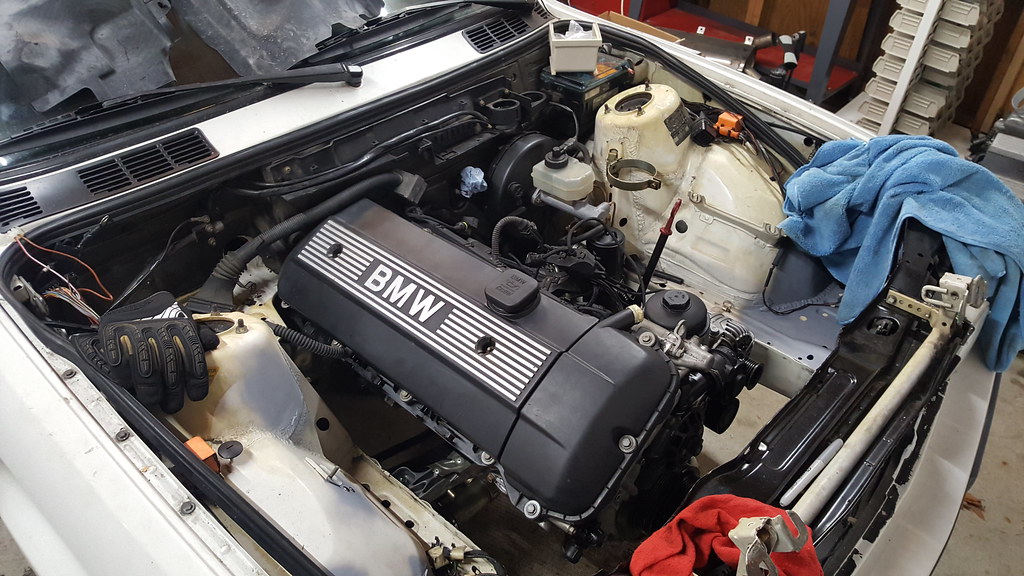
                        29985218797d85439baf6b.jpg

                        Supported by it's own mounts for the first time:
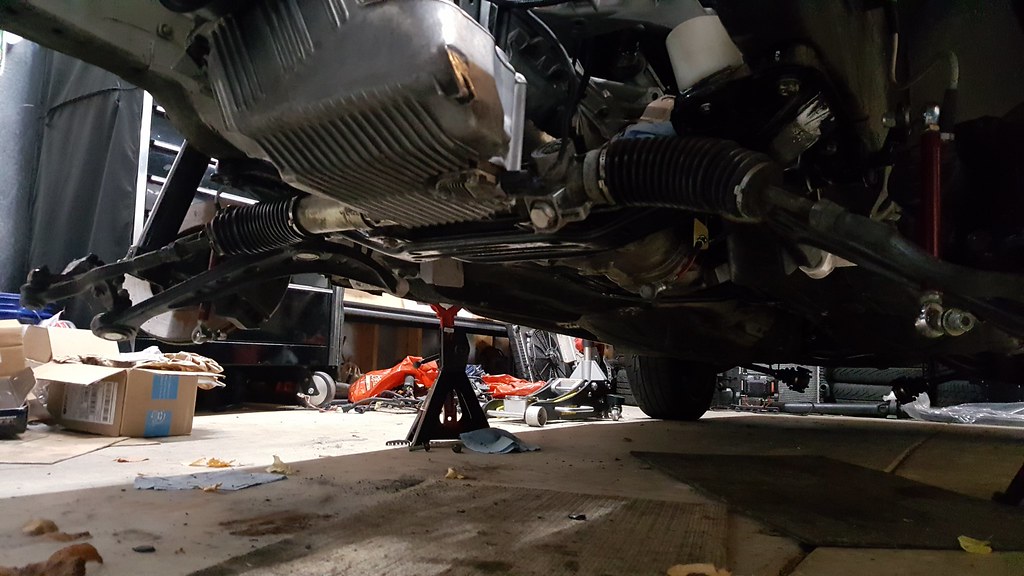
                        440093241454cc545f558b.jpg

                        1991 318is, 1991 318i, 2022 Bronco

                        1 Reply Last reply
                        3
                        • jc43089J
                          jc43089J
                          jc43089
                          wrote on last edited by
                          #620

                          Excellent!

                          2/94 325i Sedan, Arctic Gray: UUC LTW FW, EVO 3 and DSSR, +.020 Maxsil pistons, ASC delete, Eibach shocks/springs, 16" contour reps 238k
                          3/93 325i Coupe, Schwarz 2, Sketchy stance action, ebay turbo, 300k
                          '89 325i Vert, Alpine White: 5spd swapped, sold.

                          '04 Toyota Sienna: 24V to 24V swap in progress

                          '05 Volvo V70R, 6spd.  200k
                          '85 Toyota LandCruiser: Lifted, gas hog. 205k
                          '99 Nissan Maxima: 5spd, Rusty but trusty winter beater. 252k RIP.

                          1 Reply Last reply
                          0
                          • YoungCRY
                            YoungCRY
                            YoungCR
                            wrote on last edited by
                            #621

                            Sittin' pretty! Engine install method seams easier than jacking the front end high enough to clear the motor and dolly.

                            Chris Young
                            BMWCCA #458972
                            1986 528e/5  | 1994 530i/5 | 1995 540i/6 | 2013 X5 35d | 1998 C1500 Suburban | 1995 K2500 Suburban

                            1 Reply Last reply
                            0
                            • P_RoloffP
                              P_RoloffP
                              P_Roloff
                              wrote on last edited by
                              #622

                              Looks great! Getting close now...

                              1 Reply Last reply
                              0
                              • SteelBlueS
                                SteelBlueS
                                SteelBlue
                                wrote on last edited by
                                #623

                                m42b32 said:

                                I also had a bit of a fight with the condor swap mounts to get things to line up properly. They didn't seem to sit flat despite putting them in various different orientations. I ended up finding a note on a forum post somewhere from them stating to leave everything loose, and tighten down the bottom nuts on the engine mounts one turn at a time (alternating sides) to center the engine, then trans mounts, and then top nuts on the engine mounts. I got the trans mount installed loosely to keep everything straight, and then went through and tightened everything down per their instructions. I did have one of the engine mount bolts start to spin, but it's tight and not going anywhere so it should be fine. If I do need to get it off, there is more than enough resistance for an impact to zip it off. 

                                Seems like I am facing the exact same issue as you with these mounts.

                                Did you have the passenger side slide in fine but the driver side wouldn't sit even? I got the stud through on the driver side but didn't try tightening from the bottom. Maybe I will have to try that. It always felt like the motor mount arm was too long on the driver side. 

                                Any other notes on this process would be greatly appreciated.

                                1 Reply Last reply
                                0
                                • m42b32M
                                  m42b32M
                                  m42b32
                                  wrote on last edited by
                                  #624

                                  SteelBlue said:

                                  Seems like I am facing the exact same issue as you with these mounts.

                                  Did you have the passenger side slide in fine but the driver side wouldn't sit even? I got the stud through on the driver side but didn't try tightening from the bottom. Maybe I will have to try that. It always felt like the motor mount arm was too long on the driver side. 

                                  Any other notes on this process would be greatly appreciated.

                                  That's the exact issue I had, except it was the passenger not sitting right. I swapped the mounts left to right and it didn't seem to change anything. I think their mounts are slightly off and they put the top studs too close together. What I did to get it to pinch down and sit correctly was to get everything attached but loose (including the trans mounts), and then tighten the bottom engine mount bolts first (Alternating 1 turn per side until tight), then the trans mount, then the top engine mount bolts. I think there is enough give in the plastic that they deformed into place. I'm not super happy with having to do that because they should just bolt right in and I don't know if I damaged them or something, but they seem to be alright now that they're snugged down.

                                  1991 318is, 1991 318i, 2022 Bronco

                                  1 Reply Last reply
                                  0
                                  • m42b32M
                                    m42b32M
                                    m42b32
                                    wrote on last edited by
                                    #625

                                    I figured I would share because I found this pretty interesting info on my car! Over on Maxbimmer.com, a user named "SickFinga" has access to BMW's production data for all US market models from 1983 onwards. If you provide the last 7 of your VIN he can apparently find out how many were produced in that color combo, rarity of options, etc. He can also find where your car lands in the production of that model.

                                    I asked about my car (EE74776) as I have known that it was fairly late in the production of the US market 318is. What I didn't realize is just how close to the end it was! Apparently, the last one by VIN is EE74778, and the last by actual build date is EE74774. That puts my car as the 3rd to last of 9,779 US spec 318is's ever made, and the 5th to last to roll off the production line! It would be interesting to run the carfax's on the other VINs to see if they are still around.

                                    1991 318is, 1991 318i, 2022 Bronco

                                    1 Reply Last reply
                                    5
                                    • jc43089J
                                      jc43089J
                                      jc43089
                                      wrote on last edited by
                                      #626

                                      Interesting!  I worked on an e36 sedan that was made in the last month of production, 4/98, according to selections available on realoem.

                                      2/94 325i Sedan, Arctic Gray: UUC LTW FW, EVO 3 and DSSR, +.020 Maxsil pistons, ASC delete, Eibach shocks/springs, 16" contour reps 238k
                                      3/93 325i Coupe, Schwarz 2, Sketchy stance action, ebay turbo, 300k
                                      '89 325i Vert, Alpine White: 5spd swapped, sold.

                                      '04 Toyota Sienna: 24V to 24V swap in progress

                                      '05 Volvo V70R, 6spd.  200k
                                      '85 Toyota LandCruiser: Lifted, gas hog. 205k
                                      '99 Nissan Maxima: 5spd, Rusty but trusty winter beater. 252k RIP.

                                      1 Reply Last reply
                                      1
                                      • YoungCRY
                                        YoungCRY
                                        YoungCR
                                        wrote on last edited by
                                        #627

                                        Thats really cool! Glad you saved the car

                                        Chris Young
                                        BMWCCA #458972
                                        1986 528e/5  | 1994 530i/5 | 1995 540i/6 | 2013 X5 35d | 1998 C1500 Suburban | 1995 K2500 Suburban

                                        1 Reply Last reply
                                        1
                                        • JdesignJ
                                          JdesignJ
                                          Jdesign
                                          wrote on last edited by
                                          #628

                                          @m42b32

                                          You think you could ask him to run mine? I tried joining Maxbimmers.com 4 times now and just keep getting errors. 😦

                                          1984 633CSI;

                                          6728547

                                          SumBunny.jpg

                                          https://www.instagram.com/_jdesigner_/                                          http://nevertoolow.tumblr.com/

                                          🥳SOLD BMW E24 633CSI - BMW M30B32                                          🧪SOLD HCH  ES9 - 1.3 LDA
                                          👽BMW E30 325IC - Toyota 1JZ-GTE                                                     ⏰ HONDA EF9 CIVIC SI - JDM B18C5
                                          ☠️BMW E36 318i - Ford 5.0 FE302                                                         🚴‍♂️ GT-Labomba - 26x2.75 Freeride
                                          🤹‍♀️SOLD BMW E36/7 Z3 - BMW M54B25                                                🧓SOLD BMW E10 2002 - BMW M10M05

                                          1 Reply Last reply
                                          0

                                          Hello! It looks like you're interested in this conversation, but you don't have an account yet.

                                          Getting fed up of having to scroll through the same posts each visit? When you register for an account, you'll always come back to exactly where you were before, and choose to be notified of new replies (either via email, or push notification). You'll also be able to save bookmarks and upvote posts to show your appreciation to other community members.

                                          With your input, this post could be even better 💗

                                          Register Login
                                          Reply
                                          • Reply as topic
                                          Log in to reply
                                          • Oldest to Newest
                                          • Newest to Oldest
                                          • Most Votes


                                          • Login

                                          • Don't have an account? Register

                                          • Login or register to search.
                                          Powered by NodeBB Contributors
                                          • First post
                                            Last post
                                          0
                                          • Categories
                                          • Recent
                                          • Tags
                                          • Popular
                                          • Users
                                          • Groups