Skip to content
  • Categories
  • Recent
  • Tags
  • Popular
  • Users
  • Groups
Skins
  • Light
  • Brite
  • Cerulean
  • Cosmo
  • Flatly
  • Journal
  • Litera
  • Lumen
  • Lux
  • Materia
  • Minty
  • Morph
  • Pulse
  • Sandstone
  • Simplex
  • Sketchy
  • Spacelab
  • United
  • Yeti
  • Zephyr
  • Dark
  • Cyborg
  • Darkly
  • Quartz
  • Slate
  • Solar
  • Superhero
  • Vapor

  • Default (No Skin)
  • No Skin
Collapse
WIBIMMERS logo

WIBIMMERS

  1. Home
  2. General Discussion
  3. Members BMWs
  4. My name is Earl, and I have a Stainless Steel bolt fetish =)

My name is Earl, and I have a Stainless Steel bolt fetish =)

Scheduled Pinned Locked Moved Members BMWs
1.8k Posts 58 Posters 0 Views 1 Watching
  • Oldest to Newest
  • Newest to Oldest
  • Most Votes
Reply
  • Reply as topic
Log in to reply
This topic has been deleted. Only users with topic management privileges can see it.
  • EarlE
    EarlE
    Earl
    wrote on last edited by
    #575

    Rotiform makes shit product. If I wanted cracked lips I would have kept my old ones and ran them over a few times. Plus they charge way more than I paid. Each one of their lips costs at least twice as much as my lips.

    Slant lips can look good on certain cars and face styles. I don't like huge slants, like the 16" to 18" ones for RS's, but a 1" slant can look classy. However, Mexican car was very sexy on his RS's (that's the e36 you posted). They didn't look lippy, but they complimented the car well.

    I like stepped lips because they are more complicated than a blah flat lip. They add depth and I like how the light hits off of the stepped portion. It just makes the lip seem more aggressive.

    museum sig 2earl.jpg

    1 Reply Last reply
    0
    • Brian.B
      Brian.B
      Brian.
      wrote on last edited by
      #576

      I didn't post Mexican's E36, I posted Jaycee's WRX lol, unless you're talking about a further back post?

      instagram @howdoyoudrivethat

      1 Reply Last reply
      0
      • EarlE
        EarlE
        Earl
        wrote on last edited by
        #577

        Brian said:

        Brian, on 17 May 2013 - 12:17, said:

        I didn't post Mexican's E36, I posted Jaycee's WRX lol, unless you're talking about a further back post?

        Ope sorry. I forgot Mexican had red bbs caps. I didn't look at the front bumper in the picture. I'm not a fan at all of how that WRX looks. It doesn't look feature worthy to me.

        I did like Mexicans car still though=)
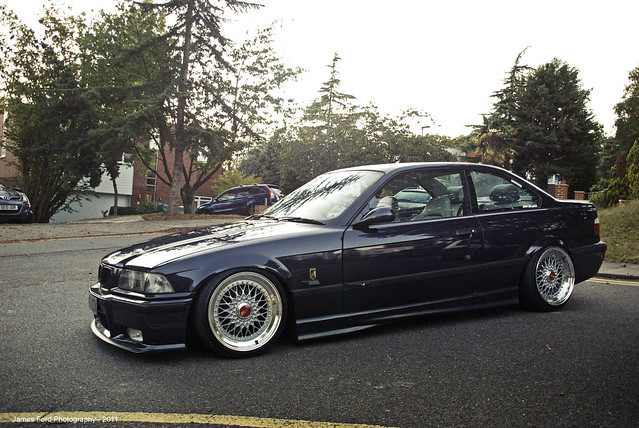
        61932717828ccfbd5c67z.jpg

        museum sig 2earl.jpg

        1 Reply Last reply
        0
        • Brian.B
          Brian.B
          Brian.
          wrote on last edited by
          #578

          Mexicans car pulls off the slants, I will give it that. The WRX doesn't look right, I agree though.

          instagram @howdoyoudrivethat

          1 Reply Last reply
          0
          • EarlE
            EarlE
            Earl
            wrote on last edited by
            #579

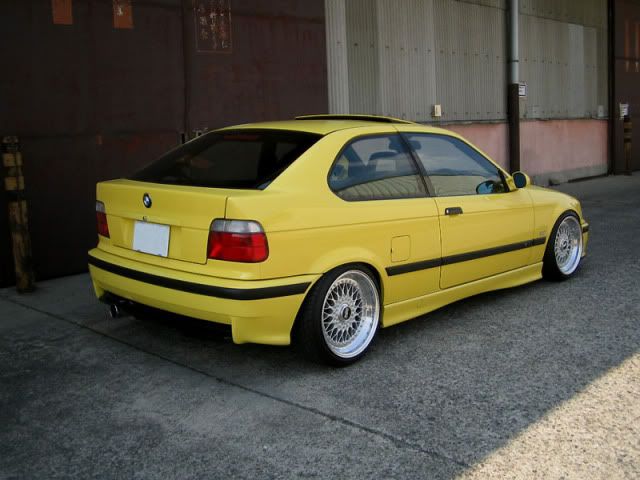
            There is a dakar yellow e36 compact that used to be on RS with slant lips and I hated how it looked. I'll try to find it.

            Found it:

            149727173bb81.jpg

            museum sig 2earl.jpg

            1 Reply Last reply
            0
            • R
              R
              REKIII
              wrote on last edited by
              #580

              I agree with you on your reasons for likeing stepped lipes, and your clain that flat lips look blah and cheap.  However I still choose flat lips as they make the wheel look bigger and deeper.  Seems like you're just cheating the sidewall with stepped lips.  I used to have real BBS LM's and the stepped lipe was the one thing I didn't like about them.

              1 Reply Last reply
              0
              • EarlE
                EarlE
                Earl
                wrote on last edited by
                #581

                Cheating the sidewall?

                museum sig 2earl.jpg

                1 Reply Last reply
                0
                • R
                  R
                  REKIII
                  wrote on last edited by
                  #582

                  Meaning the stepped lip allows the same center that would have been used on an 18" rim  with flat lip, to be used on a 19" rim with a stepped lip.  Mostely semantics, I just like the largest lip and largest center I can get in my wheel size

                  Cool (to me):

                  thruxtonblackbeautypopwhite.jpg

                  Uncool:

                  DSCN5431.JPG

                  1 Reply Last reply
                  0
                  • Brian.B
                    Brian.B
                    Brian.
                    wrote on last edited by
                    #583

                    I think you're misinterpreting something. Or I'm just retarded. Either or are quite viable.

                    instagram @howdoyoudrivethat

                    1 Reply Last reply
                    0
                    • EarlE
                      EarlE
                      Earl
                      wrote on last edited by
                      #584

                      I get what you're saying oe Robert. I agree up until a certain width lip. 1" to 2" stepped lips don't look at good as 1" to 2" stepped lips to me. 2.5" stepped lips on up look good to me because they have depth, and it evens out the amount of lip to face size. With my 3.5" lips, there is at least 2" of flat lip before the step. They then have a 1" step to another 1" flat:) To me that looks better than 4" of flat lip.

                      museum sig 2earl.jpg

                      1 Reply Last reply
                      0
                      • EarlE
                        EarlE
                        Earl
                        wrote on last edited by
                        #585

                        Small updates from Saturday. I had the barrels bead blasted on Thursday so I figured I would paint them. I used Tractor and Implement paint from Fleet Farm. It lays really nice and is pretty durable.

                        IMAG1137zpsa19b2282.jpg
                        IMAG1138zps2fa0e8b7.jpg
                        IMG20130518122106zpse68cbe86.jpg

                        I missed a few spots and ran out of paint. I'll be touching that up tonight. I also noticed that two barrels have a few flat spots in the lips=( Looks like I'll be going wider out back this coming winter.

                        After that I decided to reinstall my RTAB's properly. I had the sleeves bored out correctly at work since Silver Project accidentally missed an operation on them. The funny thing is that the machinist at work didn't bore them all the way through=( Today I will be running a 15/32 bit all the way through so that I can bolt the trailing arms up. I decided I will do the wheel bearing while they're mounted on the car because the car really needs to roll to get the bay welded up at my friends shop. The bushing went in smooth as butter this time though=D

                        IMAG1140zps559d76e7.jpg
                        IMAG1141zpsd18d0ef3.jpg

                        I then decided that since I got the euro glovebox in, why not tackle the driverside cubby. Of course there was yet another stupid metal pad.

                        IMAG1142zpsca657a4f.jpg

                        Then of course a bracket had to be welded to the frame to keep me from a straight bolt on install. (That polkadotted rusty bracket)

                        IMAG1143zps313882a7.jpg

                        I decided that a dremel was smarter than an angle grinder this time.

                        IMAG1145zps2b272f98.jpg

                        After that was off the piece fit well=)
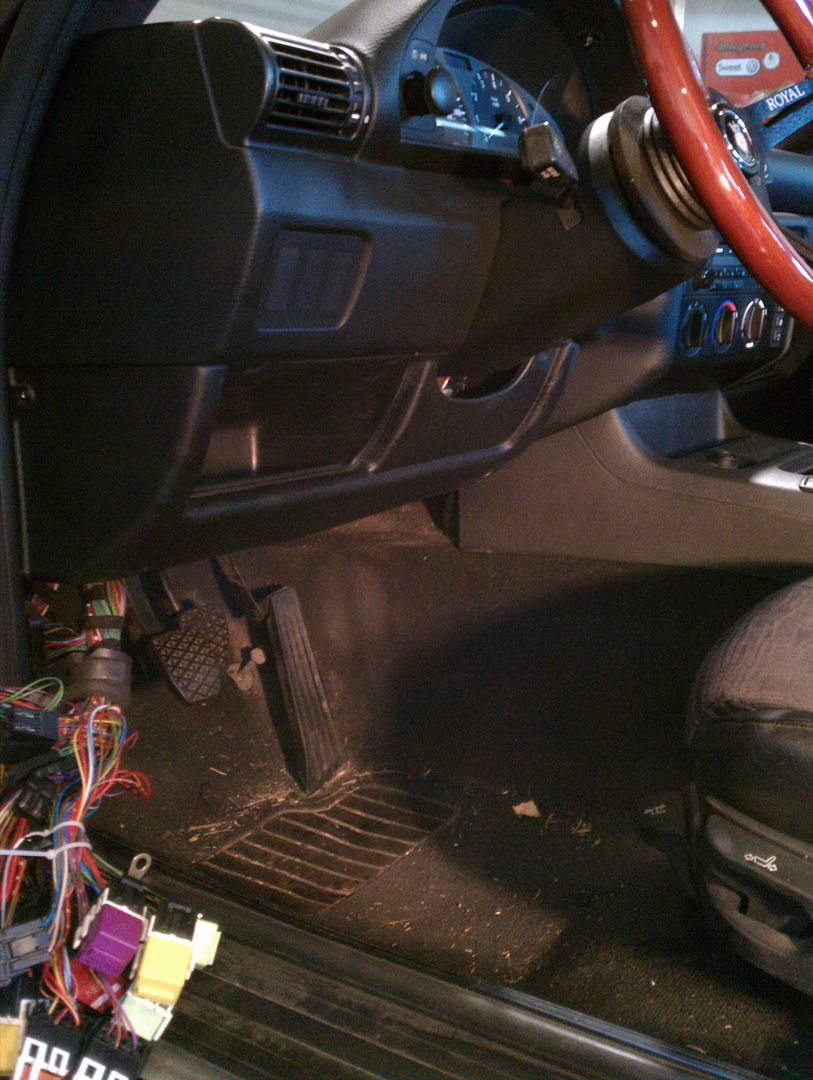
                        IMG20130518140145zps3082b16f.jpg

                        I did notice that you can see through the opening below the column. I believe that is because the metal pad covered that a little before. I'm going to make a little plate to sit there to pretty it up.

                        Tonight I will be out at the shop painting the barrels more, installing the trailing arms, and possibly painting the CV axle shafts. I will also be doing a little fiberglass repair and shaving on some parts. I'll show you what I mean tomorrow=)

                        museum sig 2earl.jpg

                        1 Reply Last reply
                        0
                        • B
                          B
                          B C
                          wrote on last edited by
                          #586

                          Why didnt you make some nice bundt cakes with those wheels before painting them, sheesh. what the hell, those are huge. You're gonna be front and center on StanceWorks in no time 

                          O_____________O

                          1 Reply Last reply
                          0
                          • EarlE
                            EarlE
                            Earl
                            wrote on last edited by
                            #587

                            Snap said:

                            Why didnt you make some nice bundt cakes with those wheels before painting them, sheesh. what the hell, those are huge. You're gonna be front and center on StanceWorks in no time 

                            O_____________O

                            You are a silly man=D

                            museum sig 2earl.jpg

                            1 Reply Last reply
                            0
                            • Brian.B
                              Brian.B
                              Brian.
                              wrote on last edited by
                              #588

                              Snap said:

                              You're gonna be front and center on StanceWorks in no time 

                              O_____________O

                              That takes a brand new 2013 BMW laying frame to make it to their front page, or a fanboi'd out car. Stanceworks got too mainstream, and I'm starting to dislike it.

                              Starting to look good though earl!

                              instagram @howdoyoudrivethat

                              1 Reply Last reply
                              0
                              • EarlE
                                EarlE
                                Earl
                                wrote on last edited by
                                #589

                                Thank you sir=)

                                museum sig 2earl.jpg

                                1 Reply Last reply
                                0
                                • EarlE
                                  EarlE
                                  Earl
                                  wrote on last edited by
                                  #590

                                  I got a tiny bit done yesterday.

                                  My friend couldn't make it out, so fiberglass repair or shaving was done. Hopefully later this week, or sometime next week that can happen.

                                  I did touch up the barrels and now they are finished=) Now I just need the faces and my wheels can be assembled.

                                  I got the sleeves pressed into my RTAB's finally. The bad thing is that no matter how hard I tried, I always pushed part of the bushing out of the arm. I used a c clamp and applied even pressure to get them in. All would look great until I took the clamp off. The bushing would then return to shape but be pushed out about 1/16"-1/8". I didn't want to mess with them anymore and it shouldn't cause any issues. I then threw the trailing arms onto the subframe and placed the bolts in without tightening them. The ends were somewhat of a pain to get in due to the bushings being pressed out a little. Only one of them didn't go in all that great, but it will perform fine. I also attached the diff to feel accomplished=)

                                  IMAG1150zpsd65a82a5.jpg

                                  I think I might clean the bolts up when I put them in for good. While I was at it, I repainted the CV axles. The paint on the shafts was half gone and there was a good amount of surface rust. I cleaned all that up, sprayed on some primer, and then finished with black. They don't look half bad for as little time as I spent on them. They'll look good under the car=)

                                  IMAG1151zps7a731c4e.jpg

                                  I believe I will be going back to the shop on Wednesday. My order from ECS tuning is delayed right now due to a few parts. Hopefully that ships soon.

                                  museum sig 2earl.jpg

                                  1 Reply Last reply
                                  0
                                  • B
                                    B
                                    B C
                                    wrote on last edited by
                                    #591

                                    What's the status of the engine bay shaving? Make sure you have a helper and 2 jacks for re-installing the subframe. Or do like I did and lick some undercoating from under the car, mutate into some sort of beast, and install it by yourself (not recommended)

                                    1 Reply Last reply
                                    0
                                    • EarlE
                                      EarlE
                                      Earl
                                      wrote on last edited by
                                      #592

                                      Snap said:

                                      What's the status of the engine bay shaving? Make sure you have a helper and 2 jacks for re-installing the subframe. Or do like I did and lick some undercoating from under the car, mutate into some sort of beast, and install it by yourself (not recommended)

                                      I just remembered that I would like to redo the undercoating in the back before I put the subframe in....I can do that right quick hopefully. The bay is ready to be welded up, so I need the subframe in so this sucker can roll to a different location to be welded=)

                                      museum sig 2earl.jpg

                                      1 Reply Last reply
                                      0
                                      • Brian.B
                                        Brian.B
                                        Brian.
                                        wrote on last edited by
                                        #593

                                        A rear diff swap is a 2 person job, I couldn't imagine trying to bolt up the entire rear subframe solo.

                                        instagram @howdoyoudrivethat

                                        1 Reply Last reply
                                        0
                                        • EarlE
                                          EarlE
                                          Earl
                                          wrote on last edited by
                                          #594

                                          I made a little progress yesterday.

                                          I started off at work by slimming up the headlight harness to make it easier and nicer to tuck around the back to hide them.

                                          Before:
                                          IMAG1152zpsd16ceff0.jpg

                                          After:
                                          IMAG1153zps040733f3.jpg

                                          I am going to bend the connections to go at a 90 and then make a cap that covers the connection. I ended up breaking a connector from bending it too much, so I need to find a replacement.

                                          When I got to the shop I started installing the CV axles. It took me a bit to figure out how to get them in with the trailing arms bolted down, but I got it.

                                          IMAG1157zps6ff13d98.jpg

                                          You can see that the diff cover is missing. I was sick of how nasty it looked and I didn't want to take the time to polish it.

                                          IMAG1154zps349b8896.jpg

                                          Trololololo

                                          Sorry Brian, I had to=P

                                          IMAG1158zps18a40f25.jpg

                                          It is the same color as the trailing arms and subframe main support. I also pressed in the diff mount while the cover was off.

                                          IMAG1159zpsf01a0384.jpg

                                          Then I reinstalled it on the diff. (two pictures that are at almost the same angle)

                                          IMG20130522162535zps8f7e2b0e.jpg
                                          IMAG1160zpsf5f80c2f.jpg

                                          Then I figured I might aswell finish it off with two of the final pieces.

                                          IMAG1161zps0ca0a146.jpg

                                          I need to loctite all of the bolts and torque everything down before it can go on. I am also adding a fresh coat of undercoat today after work.

                                          I brought the barrels home with me and decided to set them around my livingroom with the lips on top of them. Some crappy pictures to get the idea:

                                          Fronts (17x9.5 et14)
                                          IMG20130522190909zps572c3376.jpg

                                          Rears (17x10 et8)
                                          IMAG1164zps45b5054a.jpg

                                          That is all for now=)

                                          museum sig 2earl.jpg

                                          1 Reply Last reply
                                          0

                                          Hello! It looks like you're interested in this conversation, but you don't have an account yet.

                                          Getting fed up of having to scroll through the same posts each visit? When you register for an account, you'll always come back to exactly where you were before, and choose to be notified of new replies (either via email, or push notification). You'll also be able to save bookmarks and upvote posts to show your appreciation to other community members.

                                          With your input, this post could be even better 💗

                                          Register Login
                                          Reply
                                          • Reply as topic
                                          Log in to reply
                                          • Oldest to Newest
                                          • Newest to Oldest
                                          • Most Votes


                                          • Login

                                          • Don't have an account? Register

                                          • Login or register to search.
                                          Powered by NodeBB Contributors
                                          • First post
                                            Last post
                                          0
                                          • Categories
                                          • Recent
                                          • Tags
                                          • Popular
                                          • Users
                                          • Groups