Skip to content
  • Categories
  • Recent
  • Tags
  • Popular
  • Users
  • Groups
Skins
  • Light
  • Brite
  • Cerulean
  • Cosmo
  • Flatly
  • Journal
  • Litera
  • Lumen
  • Lux
  • Materia
  • Minty
  • Morph
  • Pulse
  • Sandstone
  • Simplex
  • Sketchy
  • Spacelab
  • United
  • Yeti
  • Zephyr
  • Dark
  • Cyborg
  • Darkly
  • Quartz
  • Slate
  • Solar
  • Superhero
  • Vapor

  • Default (No Skin)
  • No Skin
Collapse
WIBIMMERS logo

WIBIMMERS

  1. Home
  2. General Discussion
  3. Members BMWs
  4. My name is Earl, and I have a Stainless Steel bolt fetish =)

My name is Earl, and I have a Stainless Steel bolt fetish =)

Scheduled Pinned Locked Moved Members BMWs
1.8k Posts 58 Posters 0 Views 1 Watching
  • Oldest to Newest
  • Newest to Oldest
  • Most Votes
Reply
  • Reply as topic
Log in to reply
This topic has been deleted. Only users with topic management privileges can see it.
  • EarlE
    EarlE
    Earl
    wrote on last edited by
    #1458

    Sam seems to tell me that it is a bowling alley carpet or bus seats...

    museum sig 2earl.jpg

    1 Reply Last reply
    0
    • patsbimmer1P
      patsbimmer1P
      patsbimmer1
      wrote on last edited by
      #1459

      I think it looks like my childhood

      gamtrdtitle-main.gif

      2011 e90 M3 - DCT, Borla exhaust, BMW Performance Black Grille, ECS Painted Corners, Ziza Angel Eyes

      07 335i Stella - sport package, BMS DCI, zhp knob, TMS cf parking brake lever, VRSF downpipes, MHD tune, H&R race springs, other stuff *SOLD*

      97 328i Lola - sport package, m50 intake manifold, m50 manifold.com install kit, custom CAI, K&N filter, Borla exhaust, FK silverline coilovers, 25.5mm front sway bar, Powerflex front sway bushings, Turner Radiator, fan delete *sold*
      95 325is *sold*
      93 nissan 240sx KA-T *sold*

      BMWCCA #473306

      Instagram @patsbimmer1

      AKA- HALLWAY PAT

      "burnouts bring babes and babes dont have time for bushings" - Kaiser Rolls

      1 Reply Last reply
      0
      • DrLeadFootD
        DrLeadFootD
        DrLeadFoot
        wrote on last edited by
        #1460

        166488907099500be3187b.jpg

        Just whack it!

        15924991875a64c599885m.jpg

             @DrLeadFoot

        1 Reply Last reply
        0
        • EarlE
          EarlE
          Earl
          wrote on last edited by
          #1461

          That's as deep as mine goes but it isn't tight. It is really close to being interference fit but I can still pull it out with my finger=/

          museum sig 2earl.jpg

          1 Reply Last reply
          0
          • DrLeadFootD
            DrLeadFootD
            DrLeadFoot
            wrote on last edited by
            #1462

            How much did you freeze that thing?!? 

            Did they make different sizes? 

            I've read of people being able to lightly pull out pilot bearings on the removal side of the coin.  Maybe it's okay?

            I have a lot of questions.

            15924991875a64c599885m.jpg

                 @DrLeadFoot

            1 Reply Last reply
            0
            • EarlE
              EarlE
              Earl
              wrote on last edited by
              #1463

              I actually let it warm up and it turns out I didn't have it froze long enough to shrink it. It is just undersized to begin with. The old bearing was 1.260 and the new one is 1.2595. That .0005 is why it won't fit snug. I found a few threads with people getting undersized bearings so I just need to get a different one.

              museum sig 2earl.jpg

              1 Reply Last reply
              1
              • EarlE
                EarlE
                Earl
                wrote on last edited by
                #1464

                Finally an update worth sharing.

                Two weekends ago I pulled the motor from the stand and set it up on the floor to do the rear main seal and mate the trans. 

                Started by doing the rear main seal

                CAM01533zpsvben9joz.jpg

                CAM01534zpsg2tywmhg.jpg

                CAM01553zpslp8hcikv.jpg

                I then went to install the pilot bearing but had an issue. I had not thought to check if the  pilot bearing was different for a g250 and g260. Obviously it was. I then went through two different non-OEM pilot bearings and they were undersized and would not interference fit into the bore of the crank. I was trying to get the trans on quick so I didn't want to wait for an OEM one to arrive at the dealer. I ended up taking that route and the bearing fit perfect. I'm not sure what it is but aftermarket pilot bearings are not as thick as OEM and they are undersized, making them useless haha 

                Here is the original one vs the g260 one and one of the undersized ones

                CAM01554zpshk94jacl.jpg

                While I was was waiting for the OEM pilot bearing to show up, I tried to install the flywheel. I ran into another issue here. Some how I ended up with dual mass flywheel bolts instead of the shorter m20 flywheel bolts. I should have noticed this before installing them but hindsight is 20-20. 

                CAM01556zpskhwt85oa.jpg

                I ordered the correct bolts and picked them up, as well as my OEM pilot bearing. I then was able to get things to go smoothly for once=) 

                CAM01559zpsah71ak9g.jpg

                CAM01560zps08d5dusc.jpg

                CAM01561zpsequvh24g.jpg

                museum sig 2earl.jpg

                1 Reply Last reply
                0
                • EarlE
                  EarlE
                  Earl
                  wrote on last edited by
                  #1465

                  I then wiped down the friction surface of the flywheel (don't mind the two stains, happened when the flywheel was cleaned after being resurfaced) and installed the clutch

                  CAM01563zpsktvdnbqk.jpg

                  Put the clutch fork and throwout bearing in the trans

                  CAM01565zpsakvzas4t.jpg

                  Laid out the new hardware

                  CAM01566zpsj5cmgmvr.jpg

                  Then slide the trans on and bolted it down without any hiccups

                  CAM01567zps2zu7q4t2.jpg

                  CAM01568zpszvdq7juw.jpg

                  CAM01569zpsmykv7gf0.jpg

                  Trying to plan out what to do next. I want to get my battery cable routed to the hatch and my pressure gauge lines ran so that I can throw the carpet back in the car. I also want to get all of the brakelines routed in the bay before the motor goes back in. I would also be doing the rest of the brake lines at this time.

                  museum sig 2earl.jpg

                  1 Reply Last reply
                  2
                  • T
                    T
                    tsweers89
                    wrote on last edited by
                    #1466

                    Wait wait wait. All this work and your still using the m42?? But why?....

                    1 Reply Last reply
                    1
                    • EarlE
                      EarlE
                      Earl
                      wrote on last edited by
                      #1467

                      I just don't mind the little guy=) I really like the fuel economy and I think if I put a bigger motor in, I would be more likely to drive the car hard and potentially ruin something

                      museum sig 2earl.jpg

                      1 Reply Last reply
                      0
                      • R
                        R
                        REKIII
                        wrote on last edited by
                        #1468

                        Looking good!  However, now whenever I see your car, I will only be able to see the stained flywheel.   :lol:

                        1 Reply Last reply
                        1
                        • EarlE
                          EarlE
                          Earl
                          wrote on last edited by
                          #1469

                          Darn=/

                          museum sig 2earl.jpg

                          1 Reply Last reply
                          0
                          • Bassboy3313B
                            Bassboy3313B
                            Bassboy3313
                            wrote on last edited by
                            #1470

                            Looking great Earl!

                            CHECK OUT >>> RAGE DRIFT DESIGNS <<< FOR DECALS AND MORE!

                            1 Reply Last reply
                            0
                            • zojaveZ
                              zojaveZ
                              zojave
                              wrote on last edited by
                              #1471

                              :D

                              1 Reply Last reply
                              0
                              • EarlE
                                EarlE
                                Earl
                                wrote on last edited by
                                #1472

                                I have been holding off on updating this so that I would have a good update but things are going slower than molasses haha

                                Let's start where I left off. The motor and trans got mated and I started figuring out what I need to do before it goes back in. 

                                First I changed the rear carrier bushing for the shifter.

                                CAM01578zps578jtvuf.jpg

                                CAM01579zpsiuueahlh.jpg

                                After that I ordered up an 11/16" Volkswagen Rabbit master cylinder for my booster delete. I need to fit it and start doing the brake lines for the front of the car. I also just ordered all OEM rear hard lines so that I can finish that up. 

                                Speaking of the rear end

                                CAM01585zpsnhbjjgsi.jpg

                                I hated how one of the bushings wasn't seated right and I wanted to redo some of the paint. I also need to refresh the seals on the diff (sold the medium case 2.93) and install a stud kit from Thayer Motorsports. That will make swapping in a medium case much easier down the line. 

                                Here are some of the goodies that have arrived

                                CAM01584zpsjshfvdjc.jpg

                                I split the trailing arms from the subframe and removed the poly bushings but it got too dark to take pictures. I will be cleaning up the arms again, repainting them, and then installing the new bushings. I also stupidly drilled a hole in one of the bushing mounts last time to allow air to come out since one of the bushings did not want to install properly. I will be welding that up as well. 

                                I ordered a set of LED license plate lights and installed them too. I got a set off of ebay because every brand that I could find is still made in Taiwan (even the more costly options). I tested them with a power supply to check the light output and they are a very nice bright white without being blue at all. 

                                The only other news that I can think of is that I went to install my Motorsport handles but ran into an issue. It seems they have a different lock style than my handles, making  the cylinder swap not a plug and play affair. 

                                CAM01582zpswxdqca8g.jpg

                                I could swap the wafers from my lock cylinder into the ones for the motorsport handles, but the face plates of those cylinders are all dented up. I have the handles sold and was going to pick up another set but I think I am going to keep it simple and run plain handles.

                                I should be working on the car tonight and am hoping to get a bit of work done on the trailing arms.

                                museum sig 2earl.jpg

                                1 Reply Last reply
                                1
                                • ClassEC
                                  ClassEC
                                  ClassE
                                  wrote on last edited by
                                  #1473

                                  I can't wait to see this at Scooters...

                                  1 Reply Last reply
                                  1
                                  • EarlE
                                    EarlE
                                    Earl
                                    wrote on last edited by
                                    #1474

                                    Welded up the hole I idiotically drilled in the one mount

                                    CAM01592zps9xuexx0d.jpg

                                    CAM01593zpsuparafjz.jpg

                                    I then wire wheeled all of the paint on the arms that wasn't fairing well and threw a coat of primer on. Somehow my full can of primer ran out of aerosol after finishing one arm so I had to use a different can I had on the other. 

                                    CAM01594zpsfqfrzkov.jpg

                                    I will be picking up more primer today and then hopefully getting the paint on them.

                                    museum sig 2earl.jpg

                                    1 Reply Last reply
                                    0
                                    • EarlE
                                      EarlE
                                      Earl
                                      wrote on last edited by
                                      #1475

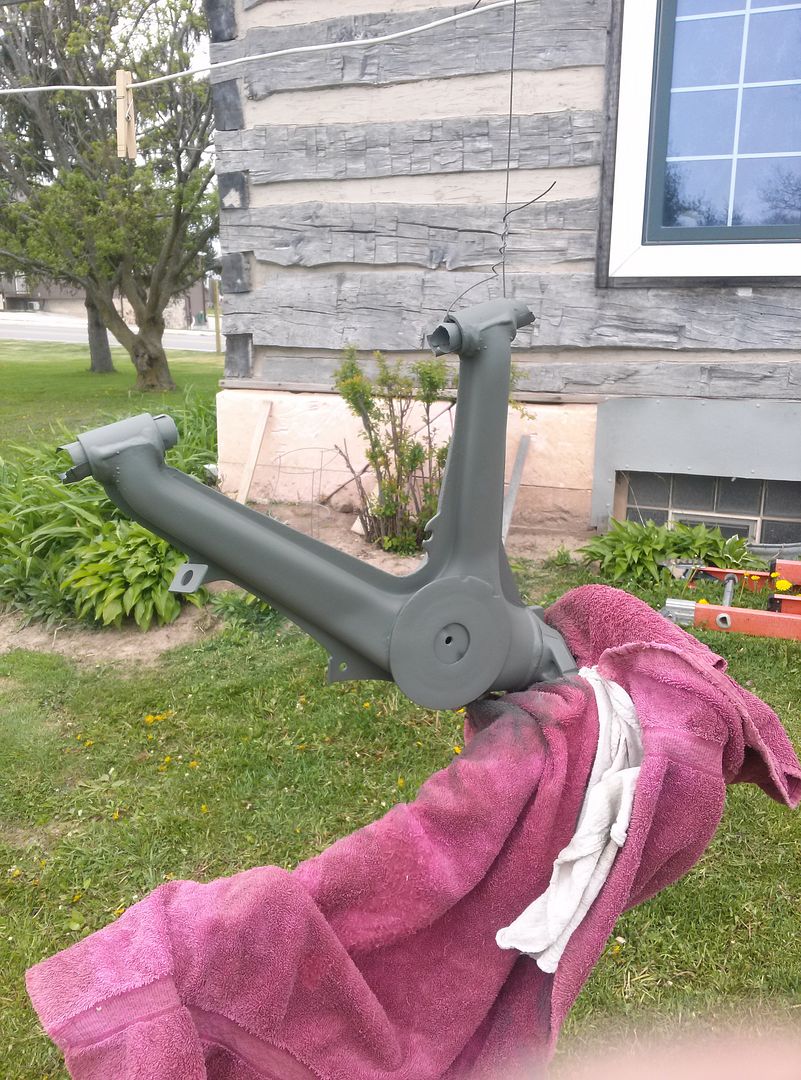
                                      I was going to finish painting the arms the other day but ran out of paint and the paint I was using is now discontinued. I did spray them with self etching primer though to cover any spots I missed with the first coat of primer. 
                                      CAM01595zpsohbb397j.jpg

                                      Now I just need to get a nice day to prep and paint them, as well as the subframe. 

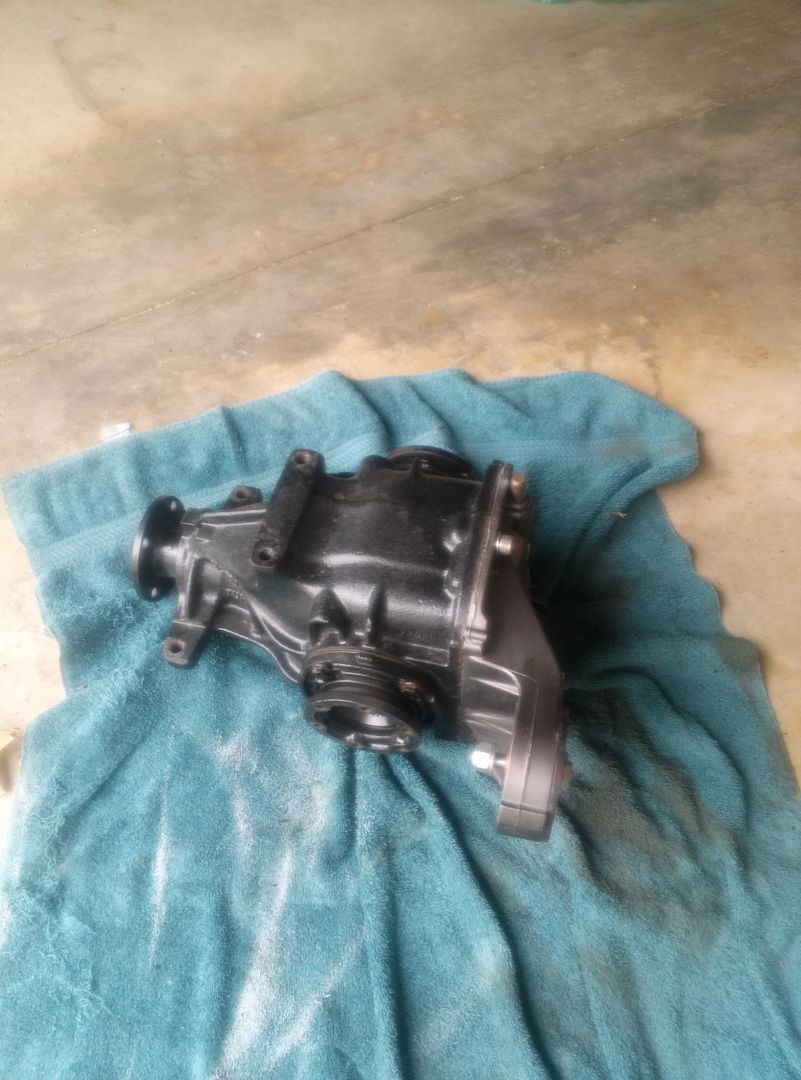
                                      Yesterday I tackled the output shaft detent rings and seals on my diff. I will be redoing the paint on it as well as replacing the bolts for the sides and the dust caps on the flanges, don't worry=) 

                                      CAM01606zps0h1sozvj.jpg

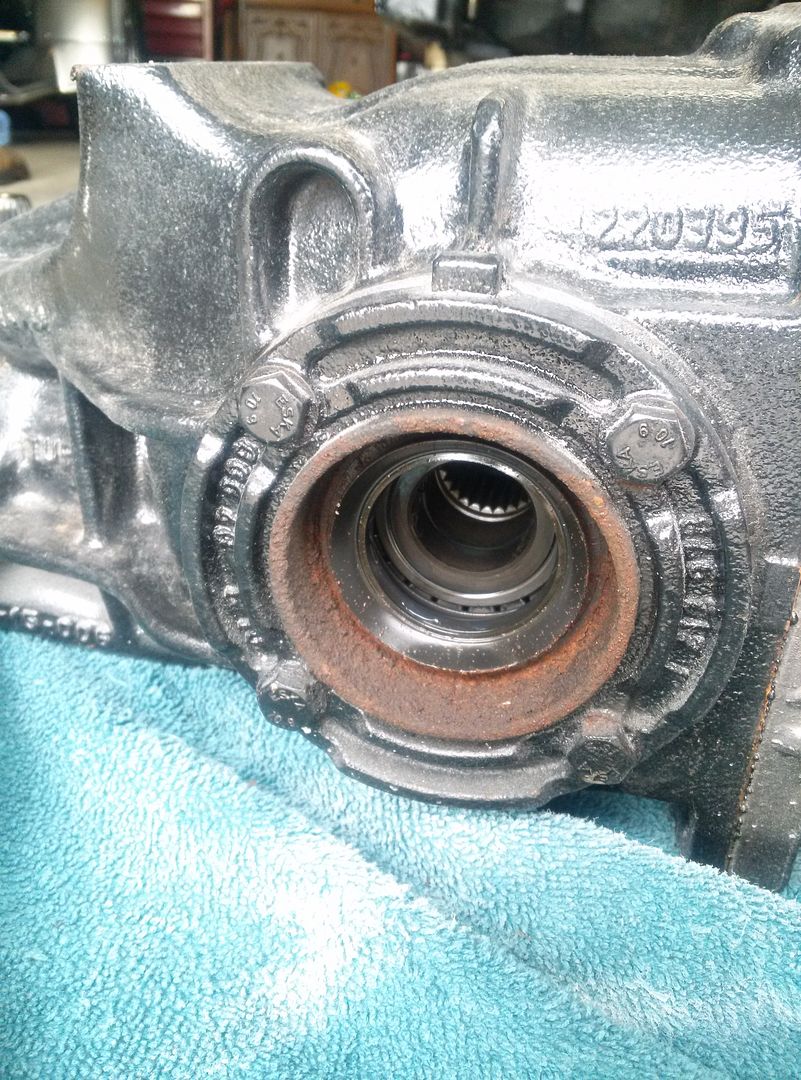
                                      Popped the flanges out to see what I was working with.

                                      CAM01607zpsprdos30w.jpg

                                      CAM01608zpsxfjefpue.jpg

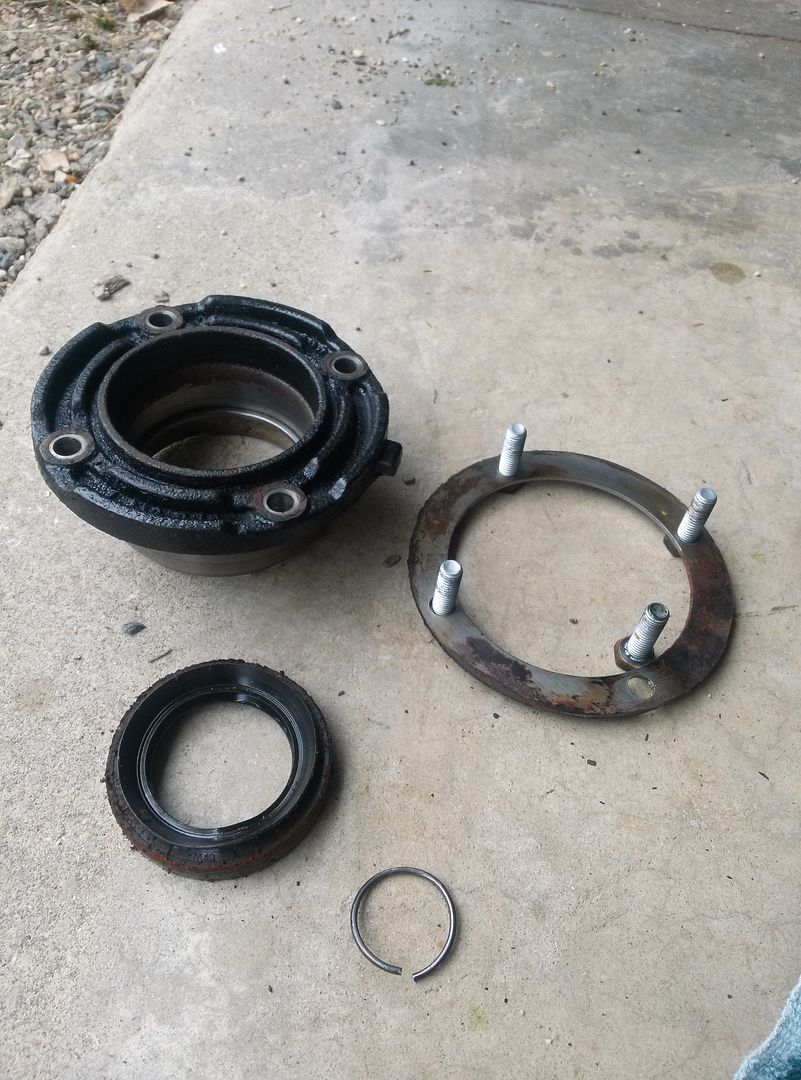
                                      Next I pulled the sides and popped out the old seals and detent rings

                                      CAM01609zpsn89vlg14.jpg

                                      CAM01610zpsnjsnbvot.jpg

                                      Then in went the new seals

                                      CAM01611zpshgyhbojr.jpg

                                      I popped the output flanges back in for now to keep any debris out of the diff. I will be coating it in KBS rustseal and just need to pick up that up as well as new hardware for the sides
                                      CAM01613zpsarjgoos8.jpg

                                      museum sig 2earl.jpg

                                      1 Reply Last reply
                                      2
                                      • EarlE
                                        EarlE
                                        Earl
                                        wrote on last edited by
                                        #1476

                                        Last week I realized that the color I used for the subframe, trailing arms, and diff cover was discontinued. The subframe needed repainting too so I clean it up again and reprimed it. 

                                        CAM01693zpstwrmrogy.jpg

                                        I also started KBS coating my diff. 

                                        I started with the Aqua Kleen. It needs to be kept wet for a half hour to clean the surface.
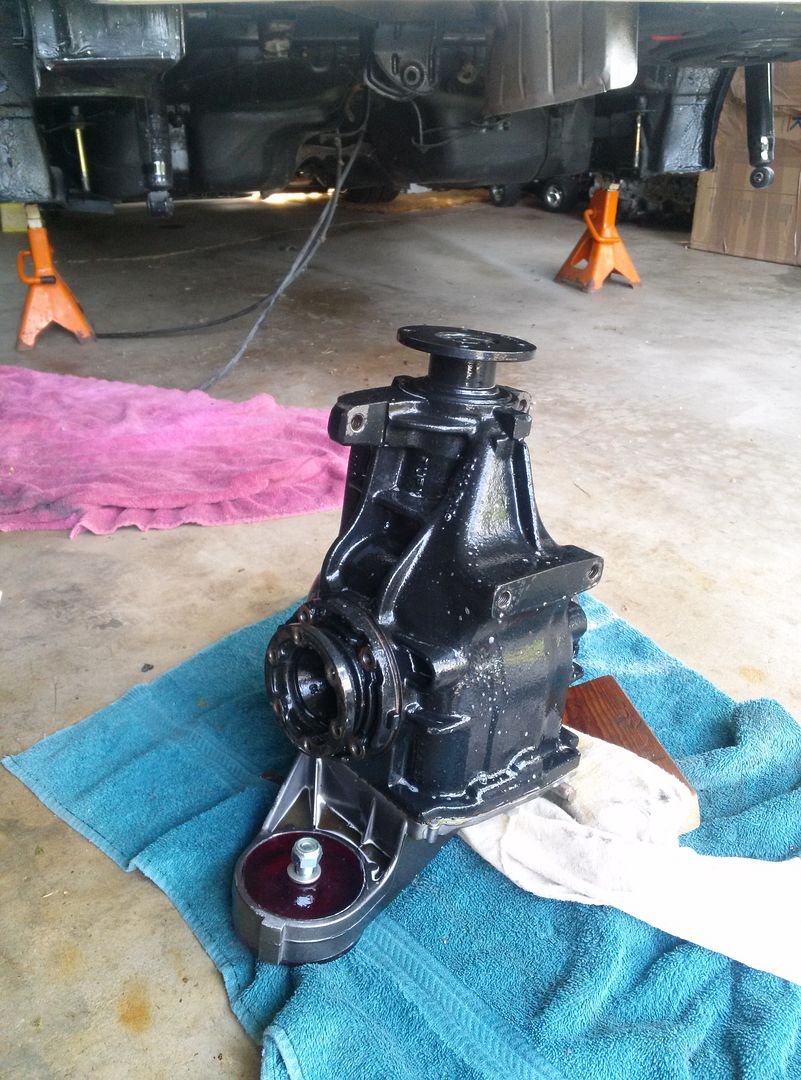
                                        CAM01691zpsgbwbiniq.jpg

                                        After that I used the Rust Blast to convert any rust and to put a thin zinc phosphate coating on the part to help the rust seal stick. I didn't really get a good picture of the diff after the rust seal but here is one with the diff disassembled and ready to coat. 
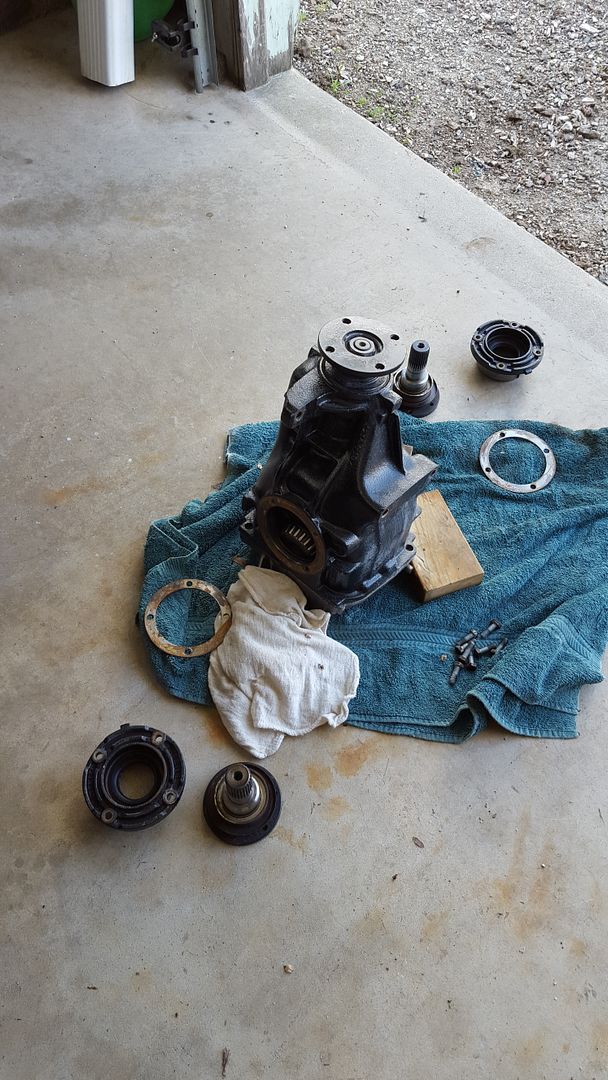
                                        20150602150706zps6mrpvy4a.jpg

                                        Coating the diff was as simple as lightly brushing on the rust seal. It self levels and covers really well. 
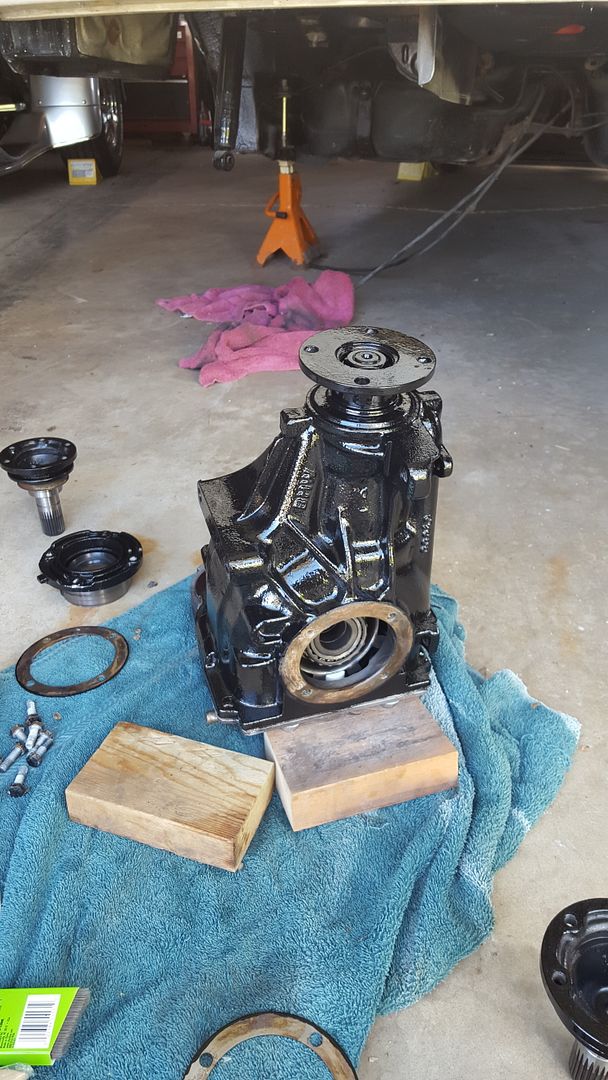
                                        20150602160022zpsfvmaimed.jpg

                                        I didn't coat the inside of the diff flange that you see since it didn't make much sense to me and is already painted in there.

                                        20150602160025zpsnpil8nx6.jpg

                                        I'll be reassembling the diff today (sans hardware) and painting the subframe. I also need to clean up and finish priming the trailing arms.

                                        museum sig 2earl.jpg

                                        1 Reply Last reply
                                        0
                                        • KaiserRollsK
                                          KaiserRollsK
                                          KaiserRolls
                                          wrote on last edited by
                                          #1477

                                          Dude.

                                          1 Reply Last reply
                                          0

                                          Hello! It looks like you're interested in this conversation, but you don't have an account yet.

                                          Getting fed up of having to scroll through the same posts each visit? When you register for an account, you'll always come back to exactly where you were before, and choose to be notified of new replies (either via email, or push notification). You'll also be able to save bookmarks and upvote posts to show your appreciation to other community members.

                                          With your input, this post could be even better 💗

                                          Register Login
                                          Reply
                                          • Reply as topic
                                          Log in to reply
                                          • Oldest to Newest
                                          • Newest to Oldest
                                          • Most Votes


                                          • Login

                                          • Don't have an account? Register

                                          • Login or register to search.
                                          Powered by NodeBB Contributors
                                          • First post
                                            Last post
                                          0
                                          • Categories
                                          • Recent
                                          • Tags
                                          • Popular
                                          • Users
                                          • Groups